Table of Contents
Advertisement
Quick Links
Advertisement
Table of Contents

Related Manuals for Sony SWR10


Summary of Contents for Sony SWR10
- Page 1 User guide SmartBand SWR10...
-
Page 2: Table Of Contents
Contents Basics.....................3 Introduction..................3 Hardware overview................3 Charging your SmartBand..............3 Assembly................... 4 Turning your SmartBand on and off...........4 Setting up your SmartBand............6 Preparing to use your SmartBand............. 6 Reconnecting your SmartBand............7 Day mode and night mode..............7 Resetting your SmartBand..............8 Settings for your SmartBand............9 Using the SmartBand application............ -
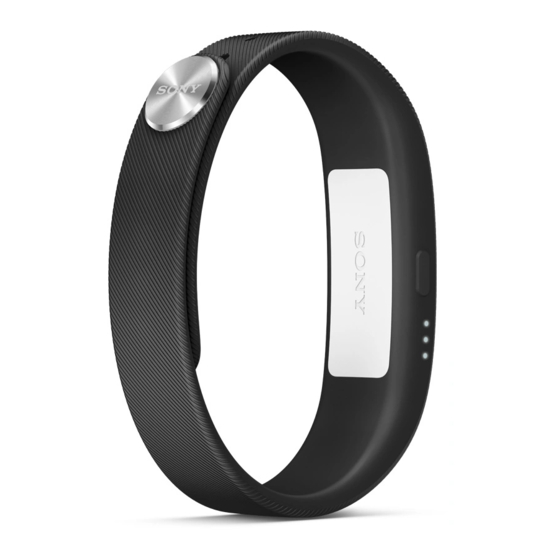
Page 3: Basics
NFC detection area Charging your SmartBand Before using your SmartBand for the first time, you need to charge it for approximately 30 minutes. Sony chargers are recommended. This is an Internet version of this publication. © Print only for private use. -
Page 4: Assembly
To charge your SmartBand Plug one end of the USB cable into the charger or into the USB port of a computer. Plug the other end of the cable into the Micro USB port of your SmartBand. Battery notification light status Notification light A flashes continuously The battery is charging and is not yet fully charged Notification light A is on... - Page 5 To turn off your SmartBand • Press and hold down the power key until all notification lights are on simultaneously and then turn off one by one. This is an Internet version of this publication. © Print only for private use.
-
Page 6: Setting Up Your Smartband
Google Play™ and connect to your Android™ device. The Smart Connect application is pre-installed on all Android™ devices from Sony Mobile at purchase. Make sure that you update it to the latest version. -
Page 7: Reconnecting Your Smartband
Start the Smart Connect application. Turn on your SmartBand. Android™ device: Turn on the Bluetooth® function, then scan for Bluetooth® devices and select SWR10 in the list of available devices. Follow the instructions to install the SmartBand application and the Lifelog application. -
Page 8: Resetting Your Smartband
Resetting your SmartBand Reset your SmartBand if it behaves unexpectedly or if you want to connect it to a new device. To reset your SmartBand Turn off your SmartBand. Press and hold down the power key until notification light A starts flashing. This is an Internet version of this publication. -
Page 9: Settings For Your Smartband
Settings for your SmartBand Using the SmartBand application You can view and change settings for your SmartBand from the SmartBand application, which can be accessed under Devices in the Smart Connect application. Turn the auto night mode function on or off. Set the time period during which auto night mode operates. -
Page 10: Notifications
To set a time interval for automatic night mode From the Home screen of your Android™ device, tap , then find and tap Smart Connect. Tap Devices > SmartBand > SmartBand. Tap Auto night mode. Adjust the settings for time interval, then tap Set. Tap Done. -
Page 11: Out-Of-Range Alert Notifications
For example, if you set a smart wake up alarm for 06:30 – 07:00 and your SmartBand is in night mode, it wakes you up sometime between 06:30 and 07:00 when you reach a state of light sleep. If you do not reach a state of light sleep during this period, the smart wake up alarm wakes you up at 07:00. -
Page 12: Controlling Applications From Your Smartband
To turn on the incoming call notification function From the Home screen of your Android™ device, tap , then find and tap Smart Connect. Tap Devices > SmartBand > SmartBand. Mark the Incoming call checkbox. To mute the ringtone for an incoming call •... -
Page 13: Logging Your Activities Using The Lifelog Application
Follow the instructions that appear on the screen and accept the terms and conditions. Create a new account or select to use an existing one. Sony PlayStation® Network accounts can also be used. Follow the instructions that appear on the screen to create a Lifelog account. - Page 14 View the time you have spent using communication applications from Google Play™ and some other applications such as the Phone and the Messaging applications from Sony View the number of steps you have taken and logged in the Lifelog application...
-
Page 15: Setting Goals
10 View your total time spent watching movies, TV shows and other video content using applications from Google Play™ and some other applications 11 View your total time spent browsing while using applications from Google Play™ and some other web browsers 12 View your total time spent reading books or comics using applications from Google Play™... - Page 16 To create a life bookmark using the Lifelog application In the Lifelog application, tap Follow the on-screen instructions. If necessary, add text notes, then tap OK. To create a life bookmark using your SmartBand Make sure that your SmartBand is turned on and in day mode. Press the power key twice to log the place and time.
-
Page 17: Important Information
Prior to use, please read the Important information leaflet separately provided. This User guide is published by Sony Mobile Communications AB or its local affiliated company, without any warranty. Improvements and changes to this User guide necessitated by typographical errors, inaccuracies of current information, or improvements to programs and/or equipment, may be made by Sony Mobile Communications AB at any time and without notice. -
Page 18: Declaration Of Conformity
(1) This device may not cause harmful interference, and (2) This device must accept any interference received, including interference that may cause undesired operation. Any change or modification not expressly approved by Sony may void the user's authority to operate the equipment.
Need help?
Do you have a question about the SWR10 and is the answer not in the manual?
Questions and answers