Table of Contents
Advertisement
Quick Links
Advertisement
Table of Contents

Related Manuals for Philips MCD288/05


Summary of Contents for Philips MCD288/05
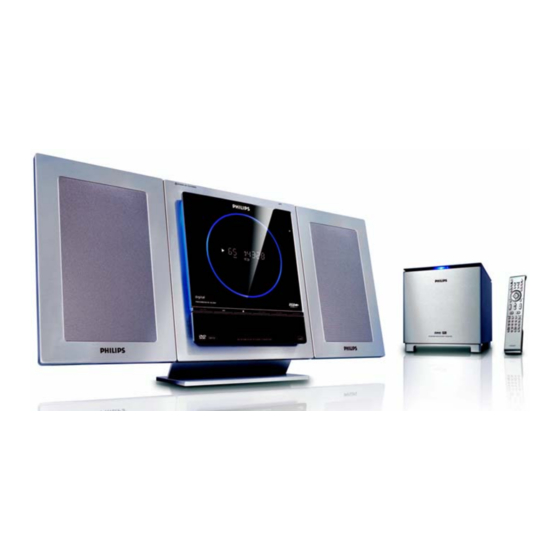
- Page 1 MCD288 DVD Micro Theatre...
- Page 2 Important notes for users in the U.K. Mains plug This apparatus is fitted with an approved 13 Amp plug. To change a fuse in this type of plug proceed as follows: Remove fuse cover and fuse. Fix new fuse which should be a BS1362 5 Amp, A.S.T.A.
- Page 4 ™ ∞ & ª ¡ £ º ⁄ • ≤ § ≥...
-
Page 5: English
Manufactured under license from Dolby Laboratories. "Dolby", "Pro Logic" and the double-D symbol are trademarks of Dolby Laboratories. English ------------------------------------------------ 6 This product incorporates copyright protection technology that is protected by method claims of certain U.S. patents and other intellectual property rights owned by Macrovision Corporation and other rights owners. - Page 6 Language Code Abkhazian 6566 Afar 6565 Afrikaans 6570 Amharic 6577 Arabic 6582 Armenian 7289 Assamese 6583 Avestan 6569 Aymara 6589 Azerhaijani 6590 Bahasa Melayu 7783 Bashkir 6665 Belarusian 6669 Bengali 6678 Bihari 6672 Bislama 6673 Bokmål, Norwegian 7866 Bosanski 6683 Brezhoneg 6682 Bulgarian...
-
Page 7: Table Of Contents
General Information Features ... 9 Discs for playback ... 9 Supplied accessories ... 10 Environmental information ... 10 Care and safety information ... 10 Installation Step 1: Connecting speakers ... 12 Step 2: FM antenna connection ... 12 Step 3: Connecting TV ... 13-15 Using AV OUT jack Using the video box Step 4: Placing the set and speakers ... - Page 8 Contents System Menu Options Basic operations ... 30 SYSTEM SETUP ... 30-32 TV SYSTEM SCREEN SAVER TV TYPE PASSWORD RATING DEFAULT DIVX(R) VOD registration code LANGUAGE SETUP ... 32 VIDEO SETUP ... 32-33 BRIGHTNESS CONTRAST SATURATION AUDIO SETUP ... 33 DIGITAL OUT DOWNMIX 3D PROCESSING...
-
Page 9: General Information
Features Your DVD Micro Theatre with 2.1 channel full digital amplifier creates the same dynamic sound qualities that you find in full-fledged cinemas and incorporates some of the best features in home theater technology. Other features include: Built-in Dolby Digital decoder, supporting Incredible Surround and DSC sound setting. -
Page 10: Supplied Accessories
General Information/Maintenance Supplied accessories – A/V cord (R/W/Y) – FM wire antenna – External video box – Power cord – 15-pin D-Sub cable – Stand – Remote Control and two AAA batteries – This instruction booklet and a quick start guide Environmental information Any unnecessary packaging has been omitted. -
Page 11: Installation
AC power cord Speaker (right) FM wire antenna IMPORTANT! – The type plate is located at the rear of the system. – The voltage selector located at the bottom of the subwoofer is preset at 220V-240V from the factory. For countries that operate at 110V-127V, please adjust to 110V-127V before you switch on the system. -
Page 12: Step 1: Connecting Speakers
Step 1: Connecting speakers Place the main set with the front side facing down on a flat and firm surface. Then remove the detachable cover on the back of the set to expose the terminals available for connection. Connect the two front speaker cables to the SPEAKER OUT terminals: right speaker to "R"... -
Page 13: Step 3: Connecting Tv
Step 3: Connecting TV IMPORTANT! – You only need to make one video connection from the following options, depending on the capabilities of your TV. – Connect the DVD system directly to the TV. Using AV OUT jack Connect the end of the supplied AV cord with only one connector to the AV OUT jack of the DVD system. - Page 14 Installation Using Component Video jacks (Y Pb Pr) IMPORTANT! – The progressive scan video quality is only possible when using Y Pb Pr, and a progressive scan TV is required. Use component video cables (red/blue/green - not supplied) to connect the COMPOENT VIDEO OUTPUT (Pr/Cr Pb/Cb Y) jacks to the corresponding Component video input jacks (or labeled as Y Pb/Cb Pr/Cr or YUV) on the TV.
-
Page 15: Step 4: Placing The Set And Speakers
(labeled as 75 ohm or RF In), you will need an RF modulator in order to view DVD playback on the TV. See your electronics retailer or contact Philips for details on RF modulator availability and operations. RF coaxial cable to TV... -
Page 16: Step 5: Connecting The Power Cord
Installation Step 5: Connecting the power cord After everything is connected properly, plug in the AC power cord to the power outlet. Never make or change any connection with the power switched on. Optional: Connecting additional equipment Listening to the playback of a non-USB device AUDIO OUT (for example) -
Page 17: Recording (Digital)
Recording (digital) ● Connect the COAXIAL (DIGITAL OUTPUT) jack on the video box to the DIGITAL IN jack on a digital recording device (such as DTS Digital Theatre compatible, with Dolby Digital decoder). Before starting operation, set the DIGITAL OUT according to the audio connection. -
Page 18: Controls
Controls Controls on the system STANDBY-ON y – switches the system on or to standby mode. iR sensor – infrared sensor for remote control. PROGRAM – DVD/VCD/CD/MP3-CD/USB: enters the program menu. – Picture CD: during playback, to select a slide show mode. - Page 19 9 OK – to exit or confirm the selection. í/ë – Disc: skips to the previous/next chapter/title/ track. – Tuner: selects a preset radio station. – In DISC/USB mode, to stop playback or clear a program. – In DISC/USB mode, to start or interrupt playback.
-
Page 20: Preparations
Preparations IMPORTANT! – Make sure to complete the preparation procedures before operating the system. Step 1: Inserting batteries into the Remote Control Open the battery compartment. Insert two AAA batteries following the indications (+/-) inside the compar tment. Close the cover. Using the Remote Control to operate the Player Aim the Remote Control... -
Page 21: Step 3: Setting Video Preference
Step 3: Setting video preference IMPORTANT! – Make sure you have completed all the necessary connections. (See "Connections-Connecting TV".) Turn on the TV set and set it to the correct Video-In channel. ➜ You may go to channel 1 on your TV set, then press the channel button repeatedly until you see the Video In channel. -
Page 22: Setting Up Progressive Scan Feature
Preparations Note: The format you select must be available on the disc. If it is not, the setting for TV Type will not affect the picture during playback. To exit the menu Press SYSTEM MENU again. Setting up Progressive Scan feature (for Progressive Scan TV only) The progressive scan display twice the number of frames per seconds than interlaced scanning... -
Page 23: Step 4: Setting Language Preference
Step 4: Setting language preference You can select your preferred language settings so that this DVD Micro System will automatically switch to the language for you whenever you load a disc. If the language selected is not available on the disc, the language set by default will be used instead. -
Page 24: Basic Functions
Basic Functions Switching the system on/off ● Press STANDBY -ONB (STANDBY B on the remote). ➜ “HELLO” is displayed briefly. The system will switch to the last selected source. ● Press TUNER, DISC, USB/CARD or AUX on the remote. ➜ The system will switch to the selected source. -
Page 25: Disc Operations
Video In channel. (See "Setting up the TV".) Press STANDBY-ON 2 (STANDBY 2 on the remote). ➜ You should see the blue Philips DVD background screen on the TV. Insert a disc into the slot loader. ➜ Make sure the label side is facing you. -
Page 26: Slow Motion
Disc Operations Zoom (DVD/VCD/JPEG) Zooming allows you to enlarge or reduce the video image during playback. Press ZOOM repeatedly to enlarge or reduce the playback video image. Press 2/3/5/4 to pan across the TV screen. Differnt play modes: SHUFFLE and REPEAT (DVD/VCD/CD/MP3/WMA) ●... -
Page 27: Forward/Reverse Searching
Forward/Reverse Searching (DVD/VCD/ Press TUNING 22/33 (2/3 on the remote) during playback to select the required speed: X2, X4, X8 or X20 (backward or forward). ➜ Sound will be muted. To return to normal speed, press PLAY/ PAUSE 2;. Time search & search by chapter/track number (DVD/VCD/CD/MP3/WMA) Press GOTO/STEREO until the time or chapter/track edit box appears. -
Page 28: Playing Mp3 Disc
Disc Operations Playing MP3/WMA/JPEG Disc IMPORTANT! – You have to turn on your TV and set to the correct Video In channel. (See "Setting up the TV".) Playing MP3/WMA disc General operation Load an MP3/WMA disc. ➜ A data disc menu appears on the TV screen and playback starts automatically from the first track. -
Page 29: Special Jpeg Features
Special JPEG features Zoom picture (JPEG) ● During playback, press ZOOM repeatedly to display the picture with different scales (2, 3, 4, 1/ 2, 1/3, 1/4 and OFF). ● Use 2/3/5/4 to view the zoomed picture. Slide show playback modes (JPEG) ●... -
Page 30: System Menu Options
System Menu Options Basic operations Press SYSTEM MENU to enter the Setup Menu. Press 2/3 to select a page to be set. Press 5/4 to highlight an option. Enter its submenu by pressing 3 or OK. Move the cursor by pressing 5/4 to highlight the selected item. -
Page 31: Rating
RATING Some DVDs may have a parental level assigned to the complete disc or to certain scenes on the disc. This feature lets you set a playback limitation level. The rating levels are from 1 to 8 and are country dependent. -
Page 32: Divx(R) Vod Registration Code
System Menu Options DIVX(R) VOD registration code Philips provides you the DivX Demand) registration code that allows you to rent and purchase videos using the DivX service. For more information, visit us at www.divx.com/ vod. In SYSTEM SETUP page, press 3 4 to highlight DIVX(R) VOD, then press 3 or OK to ener its submenu and press OK again to confirm. -
Page 33: Brightness
BRIGHTNESS Adjusts the brightness level. Range: 0-12. CONTRAST Adjusts the contrast level. Range: 0-12. Adjusts the hue level. Range: -6-+6. SATURATION Adjusts the saturation level. Range: 0-12. AUDIO SETUP The options included in AUDIO SETUP page are: "DIGITAL OUT", "DOWNMIX", "3D PROCESSING", "LPCM"... -
Page 34: Radio Reception
Radio Reception Tuning to radio stations Press SOURCE on the set repeatedly or TUNER on the remote to select FM tuner source. Press and hold TUNING 22/33 (2/3 on the remote) and release the button. ➜ The radio automatically tunes to a station with sufficient reception. -
Page 35: External Sources
Using a non-USB device Connect the system's AUX-IN jack to the AUDIO OUT jacks on another audio/visual device (such as a VCR, Laser Disc player or cassette desk) using a "single-to-double" cinch cable (with one end providing a 3.5" connector for connection to the AUX-IN jack while the other end providing two white/red connectors for connection to the other device's AUDIO... - Page 36 External Sources How to organize your MP3/WMA files on the USB mass storage device This Hi-Fi system will browse the MP3/WMA files in the folders/sub-folders/titles order. Example: Root Title 001 Title 002 Title 003 Album 01 Title 001 Title 002 Title 003 Album 02 Album 03...
-
Page 37: Clock/Timer
Clock setting See "Preparations-Step 2: Setting the clock". Timer setting ● The system can be used as an alarm clock, whereby the last selected source is switched on at a set time (one time operation). The clock time needs to be set first before the timer can be used. -
Page 38: Specifications
... 4 Hz - 22 kHz (48kHz) ... 4 Hz - 44 kHz (96kHz) Digital Output ..SPDIF (Sony Philips digital interface) Coaxial Number of programmable tracks ... 16 Signal-to-noise ratio ... Channel separation ... 40 dB (1 kHz) Total harmonic distortion ... -
Page 39: Troubleshooting
Do not open the system as there is a risk of electric shock. If a fault occurs, first check the points listed below before taking the system for repair. If you are unable to remedy a problem by following these hints, consult your dealer or Philips for help. Problem No power. - Page 40 Troubleshooting Problem The DVD player does not start playback. The DVD player does not respond when buttons are pressed. The language for the sound or subtitle cannot be changed when playing a DVD. No image is output when a function is selected.
- Page 41 Problem Recording or playback cannot be made Left and right sound outputs are reversed. The remote control does not function. The timer is not working The Clock/Timer setting is erased Some files on the USB device are not displayed. Troubleshooting Solution ✔...
-
Page 42: Glossary
Glossary Analog: Sound that has not been turned into numbers. Analog sound varies, while digital sound has specific numerical values. These jacks send audio through two channels, the left and right. Aspect ratio: The ratio of vertical and horizontal sizes of a displayed image. The horizontal vs. - Page 43 Meet Philips at the Internet http://www.philips.com MCD288 CLASS 1 LASER PRODUCT Printed in China PDCC-JS-JW-0614...
Need help?
Do you have a question about the MCD288/05 and is the answer not in the manual?
Questions and answers