ABB SM1000 User Manual
Videographic recorder
Hide thumbs
Also See for SM1000:
- User manual (110 pages) ,
- Replacing instructions (8 pages) ,
- Installation instructions manual (8 pages)
Table of Contents
Advertisement
Quick Links
Advertisement
Table of Contents

Related Manuals for ABB SM1000


Summary of Contents for ABB SM1000
- Page 1 Videographic Recorder User Guide IM/SM1000 Issue 11 SM1000...
- Page 2 Cert. No. Q 05907 As a part of ABB, a world leader in process automation technology, we offer customers application expertise, service and support worldwide. EN 29001 (ISO 9001) We are committed to teamwork, high quality manufacturing, advanced technology and unrivalled service and support.
-
Page 3: Table Of Contents
4.8.6 Comms Digital Input ........93 3.7.5 Binary Format Data Verification 4.8.7 Hybrid Modules .......... 94 and Integrity ..........41 Modbus TCP ............95 Archiving Online/Offline .......... 44 Backing-up Archived Data ........44 3.10 Archive Wrap ............44 IM/SM1000 Issue 11... - Page 4 Appendix F – Error & Diagnostics Information ....126 B.5 Operating Mode Modbus Coils ......106 B.6 Operating Mode Modbus Registers ......112 Appendix G – Symbols and Icons ........127 B.7 Comms. Analog and Digital Inputs ......114 Index ................. 128 IM/SM1000 Issue 11...
-
Page 5: Introduction
It is not necessary for archiving to be 'online'. Compact Flash Card Shunt Resistors Keys (If fitted with a compact flash drive) (1 per analog input) Mounting Clamps Standard Accessories Note. For optional accessories, refer to Appendix E on page 124. IM/SM1000 Issue 11... - Page 6 (Process Group 1) Files stored in Recording Channels 2.1 to 2.6 (Process Group 2) instrument's on-board Data saved to archive storage media Instrument Logs flash memory. Newest data overwrites oldest. Configuration Data Archive Media Fig. 1.1 Functional Overview IM/SM1000 Issue 11...
-
Page 7: Operation
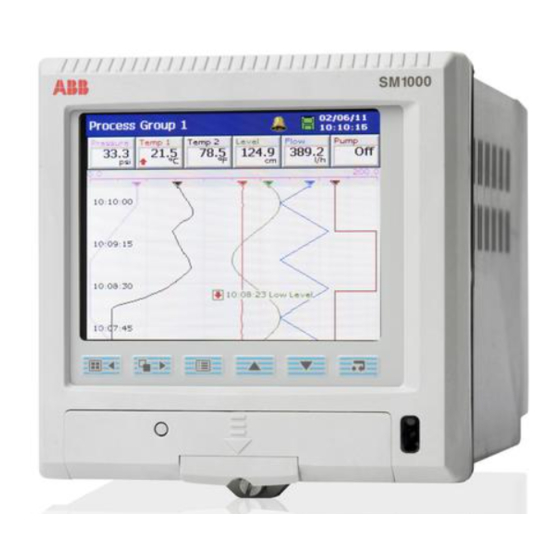
Section 4.4.1, page 52) and external archive media is inserted in the instrument, the operator can save a snapshot of any operator view to the external media, if pressed when the menu is not open. Fig. 2.1 Displays and Controls IM/SM1000 Issue 11... - Page 8 Vertical Bargraph Horizontal Bargraph Horizontal Bargraph Digital Indicator Digital Indicator Process View Process View Fig. 2.2 Overview of Operator Displays Note. Only process groups and views that have been enabled are displayed – see Section 4.5, page 61. IM/SM1000 Issue 11...
-
Page 9: Chart Views
(displayed in the Bargraph, Digital Indicators, Process and Chart Views), see Appendix G, page 127. Fig. 2.3 Horizontal and Vertical Chart Views Note. Do not remove media while either of the media update in progress status icons ( ) are displayed. IM/SM1000 Issue 11... - Page 10 Chart, Bargraph, Digital Indicator, Process, Instrument Status, Audit Log, Alarm Log or Totalizer Log view can be saved to the external media by pressing the key whenever the Operator Menu is not open. IM/SM1000 Issue 11...
- Page 11 Note. Use the keys to move backwards and forwards through the recorded data. Historical Review Active Invalid data – e.g. recording disabled Digital Values displayed Indicators indicate the process status at the cursor position Cursor IM/SM1000 Issue 11...
- Page 12 The instrument exits Historical Review mode automatically after 15 minutes if no key is pressed. Select Exit to return to the real-time recording display. Note. Pressing the key also exits Historical Review mode and displays the next enabled view. IM/SM1000 Issue 11...
-
Page 13: Im/Sm1000 Issue
If more than 15 icons are present on the screen, chart annotation is disabled automatically. When chart annotation is disabled, new operator messages and alarms are still added to the Alarm Event log – see Section 2.7, page 23. IM/SM1000 Issue 11... - Page 14 Up to 3 days/screen More than 60 seconds, less than 140 seconds Up to 3 days/screen Up to 4.5 days/screen More than 140 seconds Up to 7 days/screen Up to 10 days/screen Table 2.1 Sample Rates and Screen Intervals IM/SM1000 Issue 11...
- Page 15 Select 'AutoView Scroll' to display the chart for each configured process group in turn for 40 seconds. The AutoView Scroll status icon ( ) is displayed in the status bar when AutoView Scroll is active. Press any key to cancel AutoView Scroll. IM/SM1000 Issue 11...
-
Page 16: Electronic Signatures
Fig. 2.4 Entering an Electronic Signature Note. Up to 7 electronic signatures can be stored in the instrument’s memory. If 7 signatures exist and a new one is created, the oldest is overwritten. IM/SM1000 Issue 11... -
Page 17: Bargraph Views
B – Horizontal Bargraph View For a description of the Status Icons (displayed in the Status Bar) and Alarm Event Icons (displayed in the Bargraph, Digital Indicators, Process and Chart Views), see Appendix G, page 127. Fig. 2.5 Bargraph Views IM/SM1000 Issue 11... - Page 18 Select 'AutoView Scroll' to display the bargraph for each configured process group in turn for 40 seconds. The AutoView Scroll status icon ( ) is displayed in the status bar when AutoView Scroll is active. Press any key to cancel AutoView Scroll. IM/SM1000 Issue 11...
-
Page 19: Digital Indicator View
The totalizer option must be enabled and totalizers configured and enabled in the Configuration level before they are displayed – see Section 4.6.5, page 84. When a totalizer is not running (i.e. 'Stop' is selected), the corresponding totalizer value is shown in red. IM/SM1000 Issue 11... - Page 20 The digital indicators displayed are sized equally depending on the number of channels selected. This has no effect on the recording of the channel. Channels that have not been configured are greyed-out in the menu. Three or Four Two Channels Selected One Channel Selected Channels Selected IM/SM1000 Issue 11...
- Page 21 Select 'AutoView Scroll' to display the digital indicator for each configured process group in turn for 40 seconds. The AutoView Scroll status icon ( ) is displayed in the status bar when AutoView Scroll is active. Press any key to cancel AutoView Scroll. IM/SM1000 Issue 11...
-
Page 22: Process View
Fig. 2.7 Process View Note. Only totalizers that have been configured and enabled in the Configuration level are displayed. When a totalizer is not running (i.e. 'Stop' is selected), the corresponding totalizer value is shown in red. IM/SM1000 Issue 11... - Page 23 Stop and start individual totalizers. Channel totalizers that have not been enabled in the Configuration level are greyed-out. Note. When a totalizer is not running (i.e. 'Stop' is selected), the corresponding totalizer value is shown in red. IM/SM1000 Issue 11...
- Page 24 Select 'AutoView Scroll' to display the process view for each configured process group in turn for 40 seconds. The AutoView Scroll status icon ( ) is displayed in the status bar when AutoView Scroll is active. Press any key to cancel AutoView Scroll. IM/SM1000 Issue 11...
-
Page 25: Alarm Event Log
Note. When the number of entries in the Alarm Event log has reached that defined in 'Alarm log size' (see Section 4.4.6, page 60), the oldest data is overwritten by the newest. Entries are renumbered so that the number of the oldest entry is always 00. IM/SM1000 Issue 11... - Page 26 If an active alarm in process group the other is unacknowledged, the icon is surrounded by a red flashing border ( If neither alarm on a particular channel is configured, the short channel tag is shown greyed-out in the menu. IM/SM1000 Issue 11...
-
Page 27: Totalizer Log
For a description of the Totalizer Icons (displayed in the Totalizer Log and the Process View), see Appendix G, page 127. Fig. 2.9 Totalizer Log Note. Maximum, Minimum and Average statistics are not shown unless enabled in the 'Filter' menu – see overleaf. IM/SM1000 Issue 11... - Page 28 'Statistics' displays the maximum, minimum and average values of the analog value being totalized, together with the dates and times at which all maximum and minimum values occurred. These values are reset when the totalizer is reset and are updated only when the totalizer is running. IM/SM1000 Issue 11...
-
Page 29: Audit Log
For a description of the Audit Log Icons (displayed in the Audit Log) see Appendix G, page 127. Fig. 2.10 Audit Log Select the Configuration Level – see Section 4, page 45. Select the Setup Level – see Section 3, page 29. IM/SM1000 Issue 11... -
Page 30: Status View
Selects the Alarm Event Log Opens the Operator Menu for the current view Fig. 2.11 Status View Select the Configuration Level – see Section 4, page 45. Select the Setup Level – see Section 3, page 29. IM/SM1000 Issue 11... -
Page 31: Setup
Refer to Fig. 3.3 to access the Setup Level. Note. The Setup level can be accessed from any operator screen. Invalid Setup Password Setup Security Enabled Setup Security Not Enabled Valid Setup Password Fig. 3.1 Accessing the Setup Level – Basic Security IM/SM1000 Issue 11... - Page 32 If this occurs, access privileges can be reinstated only by the system administrator (User 1). If the system administrator's access privileges have been removed, the security system must be disabled using the configuration security switch (Yellow switch) to gain access to the configuration – see Section 4.1.2, page 45. IM/SM1000 Issue 11...
-
Page 33: Password Entry
Password Expired Passwords can be configured to expire at pre-determined intervals. If a password is time expired, this screen is displayed automatically. Enter a new password as described above. IM/SM1000 Issue 11... -
Page 34: Setup Menu
3. Select 'Reset archiving' in the Setup Menu. 4. Select 'On-line' in the Setup Menu. 5. Select data to be archived if >1 hour (Text format) or >1 day (Binary format) of data in internal memory and press IM/SM1000 Issue 11... - Page 35 The Off-line function is disabled (greyed-out in the Setup Menu) when in Historical Review mode. Use the file viewer to view a list of the files stored in internal memory and on external archive media. Note. Files stored in internal memory cannot be deleted. IM/SM1000 Issue 11...
-
Page 36: Archiving
>=1 Hour, <1 Day: Hours, e.g. '10 hours' <1 Hour: Minutes, e.g. '25 minutes' Fig. 3.3 Media Status Icons Note. Do not remove media while either of the media update in progress status icons ( ) are displayed. IM/SM1000 Issue 11... -
Page 37: Inserting And Removing Media
Ensure the media is the correct type for the instrument. and press the release catch to open the door If SmartMedia option is fitted, ensure only 3.3V SmartMedia cards used. Do not use excessive force. Fig. 3.4 Inserting and Removing External Media IM/SM1000 Issue 11... -
Page 38: Archive File Types
Analog or digital recording channels in the Batch *.V** current process group when the batch data files function is active. Batch *.X** Historical record of the batches recorded. log files Table 3.1 Text Format File Types and Extensions IM/SM1000 Issue 11... -
Page 39: Text Format Archive Files
Example – if the original file had an extension of .D00, after one of the above events a new file will be created with the same filename but an extension of .D01. IM/SM1000 Issue 11... -
Page 40: Text Format Filename Examples
Note. Totalizer logs are created only if the totalizer option is month. enabled. New text format log data files are also created when the daylight saving period starts or ends. Files containing log data generated during the daylight saving period (summertime) have '~DS' appended to the filename. IM/SM1000 Issue 11... -
Page 41: Text Format Data File Examples
'fingerprint' of the contents of the data file that can be used to prove if the data has been tampered with or corrupted. Data validation can be carried out on a PC using the Company's DataManager software package. Fig. 3.5 Channel Data File Sample – Text Format IM/SM1000 Issue 11... - Page 42 Videographic Recorder SM1000 3 Setup Fig. 3.6 Alarm Event Log Sample – Text Format Fig. 3.7 Totalizer Log Sample – Text Format Fig. 3.8 Audit Log Sample – Text Format IM/SM1000 Issue 11...
-
Page 43: Binary Format Archive Files
01:45:00 01:59:59 (before The log files also contain built-in integrity checks enabling the summertime starts). integrity of the data to be verified by the DataManager software. file '03000030Mar03Ch1_1AnlgSM2000~DS.B00' contains data generated from 03:00:00 (after summertime starts). IM/SM1000 Issue 11... - Page 44 Videographic Recorder SM1000 3 Setup Fig. 3.9 Channel Data File Sample – Binary Format Fig. 3.10 Alarm Event Log Sample – Binary Format IM/SM1000 Issue 11...
- Page 45 Videographic Recorder SM1000 3 Setup Fig. 3.11 Totalizer Log Sample – Binary Format Fig. 3.12 Audit Log Sample – Binary Format IM/SM1000 Issue 11...
-
Page 46: Archiving Online/Offline
During this time file automatically from the external media when the media operator views cannot be accessed, but new data approaches its maximum capacity – see 'Wrap' on page 71. continues to be recorded to the internal buffer memory. IM/SM1000 Issue 11... -
Page 47: Configuration
Set the internal security switch to the 'Configuration Level Not Protected' position – see Fig. 4.2, page 47. Access the Configuration Level – see Fig. 4.1, page 46. Make changes to parameters as detailed in Figs. 4.1 and 4.3. IM/SM1000 Issue 11... - Page 48 2. The option to load or retain the security configuration applies only to Advanced Security mode and is available only to the System Administrator (User 1). If a new or existing configuration file is opened by a user other than the System Administrator, the instrument's existing security settings are retained. IM/SM1000 Issue 11...
- Page 49 Access the Configuration level as shown in Fig. 4.1 Fig. 4.2 Setting the Security Switch Note. The red switch is for factory use only. Ensure it remains in the position closest to the rear of the instrument. IM/SM1000 Issue 11...
-
Page 50: Overview Of Configuration
Adjust the contrast to the required level using the keys (0 = darkest and 100 = lightest). Press the key to save selected contrast level Press the key to cancel the selection. Fig. 4.4 Adjusting Screen Contrast IM/SM1000 Issue 11... -
Page 51: Making Changes To Parameters
Fig. 4.5 Locating Parameter Settings Note. The appropriate data entry box is displayed automatically – see Fig. 4.6 Use the key to open the Configuration menu in order to select a different channel – see Fig. 4.11, page 72. IM/SM1000 Issue 11... - Page 52 Fig. 4.6 Data Entry Dialog Boxes Note. Tags with a high percentage of capital letters and wide characters such as 'W' or 'M' may appear truncated in some Operator Views. In such cases, use lower case letters or fewer characters. IM/SM1000 Issue 11...
- Page 53 Selecting 'Save as Current Configuration' suspends recording for a short time while the new configuration is implemented. When saving the current configuration to internal storage, the file is saved automatically with the 'SM1000.cfg' filename, and with a '<time><date><instrument tag>.cfg' filename.
-
Page 54: Common Configuration
•1 If this parameter is changed, internally recorded data files are recreated and unarchived data is lost. IM/SM1000 Issue 11... -
Page 55: Screen
The images are saved even if archiving is set to 'Offline'. If external archive media is not inserted, or is full, the screen capture facility is disabled automatically. Adjust screen contrast – refer to Section 4.2.1, page 48. IM/SM1000 Issue 11... -
Page 56: Time
Archive files created during the daylight saving period (see Section 4.5.6, page 70) are compatible with the database feature of Version 5.8 (or later) only of the Company's DataManager data analysis software package. IM/SM1000 Issue 11... - Page 57 Note. Displayed only if 'Daylight Saving - Enable' is set to 'Auto - Europe'. Note. Displayed only if 'Daylight Saving - Enable' is set to 'Auto - Custom'. Set the start and end of the daylight saving period. IM/SM1000 Issue 11...
-
Page 58: Security
Setup level is protected by each user's unique password. Note. Displayed only if 'Security system' is set to 'Basic' and 'Setup level security' is set to 'On' – see above. Enter the password to be used by all users to access the Setup level. IM/SM1000 Issue 11... - Page 59 If the number of incorrect entries exceeds this limit, the user's access privileges are de-activated and can be reinstated only by the System Administrator (User 1). Passwords have a maximum length of 20 characters. Enter the minimum length required for all new passwords. IM/SM1000 Issue 11...
-
Page 60: Users
Note. When the method of access to the Configuration level is set to 'Password protected' (see Section 4.4.4, page 56) and a user with Configuration level access privileges changes the instrument's configuration, the 'Name' of the user is included in the audit log entry. IM/SM1000 Issue 11... - Page 61 Security Settings. Note. The System Administrator (User 1) only is able to change the Audit Log size and the Security Settings. Enter an initial password for the selected user. Note. The user may subsequently change this password. IM/SM1000 Issue 11...
-
Page 62: Logs
(active to inactive) triggers the addition of the Operator Message to the Alarm Event log. Assign to group 1/Assign to group 2 Select the group(s) to which the message is to apply. IM/SM1000 Issue 11... -
Page 63: Process Group Configuration
Process Group. Refer to Appendix A, page 104 for a description of the available sources. Note. This signal is edge-triggered. A rising edge (inactive to active) enables recording. A falling edge (active to inactive) disables recording. Enabled Disabled IM/SM1000 Issue 11... - Page 64 A falling edge (active to inactive) switches to the primary sampling rate. Secondary Primary •1 If this parameter is changed, internally recorded data files are recreated and unarchived data is lost. IM/SM1000 Issue 11...
-
Page 65: Configuring The Chart View
4.5.2 Configuring the Chart View Major Chart Divisions Minor Chart Divisions Scale Bar Chart Trace Time Stamp Screen Interval Operator Message Annotation Alarm Event Annotation Chart Divisions Vertical Chart Screen Interval Horizontal --> Chart Horizontal <-- Chart IM/SM1000 Issue 11... - Page 66 Select the number of major and minor chart divisions to be displayed on the chart and its scale bar. Select the number of major vertical divisions to be displayed. Select the number of minor vertical divisions to appear between the major chart divisions. IM/SM1000 Issue 11...
- Page 67 Chart annotation select enable Enables the display of Alarm events and Operator messages on the chart to be enabled or disabled by the operator. Note. Menu items that are not enabled are greyed-out in the relevant Chart View menu. IM/SM1000 Issue 11...
-
Page 68: Configuring The Bargraph View
Max/min reset enable Enables the operator to reset the maximum and minimum values of one or more channels to the current value. Note. Menu items that are not enabled are greyed-out in the Bargraph menu. IM/SM1000 Issue 11... -
Page 69: Configuring The Process View
Enables the Operator to stop and start totalizers on any or all channels. View select enable Enables the Operator to select the Alarms and Statistics views. Note. Menu items that are not enabled are greyed-out in the Process view menu. IM/SM1000 Issue 11... -
Page 70: Configuring The Digital Indicator View
Alarm Status Units Channel Units Totalizer Units See Note below Totalizer Value Note. Displayed only if the Totalizer option is enabled and is enabled for that channel (see Section 4.6.5, page 84) and for display (see next page). IM/SM1000 Issue 11... - Page 71 Enables the Operator to display or hide individual channels. Note. Menu items that are not enabled are greyed-out in the Digital Indicator View menu. Totalizer menu items can be enabled only if the Totalizer option is enabled. IM/SM1000 Issue 11...
-
Page 72: Archiving
The historical record of all totalizer and *.T00 (Text) Totalizer associated statistical values relating to the log files group's recording channels. *.TE0 (Binary) *.A00 (Text) Audit log The historical entries in the audit log. files *.AE0 (Binary) IM/SM1000 Issue 11... - Page 73 Automatic update Any un-archived data is saved to removable Not Applicable archive media at regular intervals (approximately every 30 seconds). Table 4.1 Archive Triggers IM/SM1000 Issue 11...
-
Page 74: Channel Configuration
All historical data stored internally for this channel is lost. If this parameter is changed from a previous setting of 'None' new internal data files for all enabled recording channels are created. Any unarchived data is lost. IM/SM1000 Issue 11... - Page 75 •1 If this parameter is changed, internally recorded data files are recreated and unarchived data is lost. IM/SM1000 Issue 11...
-
Page 76: Analog Input Configuration
An external 10Ω shunt resistor is required for current ranges – see Section 5.4.1, page 100. •1 If this parameter is changed to or from 'Volt free digital input', internally recorded data files are recreated and unarchived data is lost. IM/SM1000 Issue 11... - Page 77 – see Table 4.2: Input Standard Inputs High Specification Inputs Ω Ω Type Min. –1000 –50 –100 Max. 2000 5000 1000 2000 Table 4.2 Limits of Electrical Ranges IM/SM1000 Issue 11...
- Page 78 Enter the tag name to be displayed in the Process view and •1 used in the archive files (20 characters max.). •1 If this parameter is changed, internally recorded data files are recreated and unarchived data is lost. IM/SM1000 Issue 11...
-
Page 79: Digital Input Configuration
Enter the tag name to be displayed in the Process view and used in the archive files (20 characters max.). •1 If this parameter is changed, internally recorded data files are recreated and unarchived data is lost. IM/SM1000 Issue 11... -
Page 80: Alarm Configuration
Alarm On Alarm Latched Alarm Off Alarm acknowledged by operator High Latch Alarm Action Process Variable Hysteresis Trip Point Alarm On Alarm Latched Alarm Off Alarm acknowledged by operator Low Latch Alarm Action Fig. 4.13 High/Low Latch Alarms IM/SM1000 Issue 11... - Page 81 Deviation exceeded – becomes inactive. fast rate alarm becomes Deviation active, slow rate alarm becomes inactive, new period starts. Fast Rate Alarm Period Alarm On Alarm Off Slow Rate Alarm Alarm On Alarm Off Fig. 4.15 Fast-/Slow-Rate Alarms IM/SM1000 Issue 11...
- Page 82 Alarm Enable signal is switched On. Alarm delay alarm is now enabled. switched Off. Alarm is timer is started. Alarm is activated disabled immediately. because process variable Alarm de-activates. is above trip point. Fig. 4.16 Delayed High/Low Process Alarms IM/SM1000 Issue 11...
- Page 83 Note. Annunciate alarms only – see Fig. 4.14. Set the value, in engineering units, at which the alarm is to activate. Set the time hysteresis in seconds. IM/SM1000 Issue 11...
- Page 84 Set the filter time to be used to reduce the number of spurious alarm trips. The source signal is averaged over the filter period prior to the rate alarm being determined. IM/SM1000 Issue 11...
- Page 85 Assign the alarm to one or more of 12 groups. The alarm states assigned to each group are 'ORed' together to create an internal digital signal that may be assigned to relays, digital outputs or internal digital controls. IM/SM1000 Issue 11...
-
Page 86: Totalizer Configuration
Select a signal source to stop and start the totalizer. Refer to Appendix A, page 104 for a description of the available sources. Note. This signal is edge-triggered. A rising edge (inactive to active) starts the totalizer. A falling edge (active to inactive) stops the totalizer. Start Stop IM/SM1000 Issue 11... - Page 87 30 minutes 0, 30 minutes past the hour 60 minutes On the hour 2 hours Midnight, 2am, 4am, etc. 3 hours Midnight, 3am, 6am, etc. 4 hours Midnight, 4am, 8am, etc. 8 hours Midnight, 8am, 4pm, etc. 12 hours Midnight, 12am 24 hours Midnight IM/SM1000 Issue 11...
- Page 88 Units Input Signal Example – a count of 5 digital pulses with 'Count rate' set to 100 increments the totalizer from 0 to 500 in 100 unit steps. 1minute 1minute Totalizer Value IM/SM1000 Issue 11...
-
Page 89: Functions
– see Section 4.6.2, page 74. Note. X is input to the linearizer expressed as a percentage of the electrical range. Y is output expressed as a percentage of the engineering range. IM/SM1000 Issue 11... -
Page 90: Real-Time Alarms
(determined by the 'Minutes' setting) or on the hour (if 'Minutes' is set to 'Off'). Set the duration for the alarm to remain active. Set to 'On' to add an entry to the Alarm event log each time the real-time alarm becomes active. IM/SM1000 Issue 11... -
Page 91: I/O Module Configuration
3. Repeat steps 1 and 2 for a value above 50% of the engineering range. 4. Repeat steps 1 to 3 for each input. Reset adjustment Select to reset 'Offset adjust' and 'Span adjust' (see next page) to zero and to 1 respectively. IM/SM1000 Issue 11... -
Page 92: Relay Modules
4.8.3 Ethernet Modules Refer to the Ethernet Communications Option User Guide Supplement (IM/SMENET) for information on how to install, configure and use the instrument on an Ethernet network and for information on configuring and using the e-mail facility. IM/SM1000 Issue 11... -
Page 93: Rs485 (Modbus™) Communications
Note. If any RTU devices are polled, set a response time that is long enough to allow for the normal turn around time from these devices. The configuration allows for only one setting for all devices connected to the network. IM/SM1000 Issue 11... -
Page 94: Comms Analog Input
Sint16 X 10 – signed, 16 bit integer, multiplied by a factor of Sint16 X 100 – signed, 16 bit integer, multiplied by a factor of Sint16 X 1000– signed, 16 bit integer, multiplied by a factor of 1000 IM/SM1000 Issue 11... -
Page 95: Comms Digital Input
'None'. is not Enter the register number to be read or written to in the slave device. Note. Displayed only if 'RTU Address' set to 'None'. is not Select the register type, 'Input Status' or 'Coil Status'. IM/SM1000 Issue 11... -
Page 96: Hybrid Modules
H0 to H10 and BCD digital inputs H12 to H31 are deactivated. If digital inputs H1 to H5 are all inactive when digital input H6 (update trigger) is activated then BCD digital input H0 is activated. BCD digital inputs H1 to H31 are deactivated. IM/SM1000 Issue 11... -
Page 97: Modbus Tcp
Refer to the Ethernet Communications Option User Guide Supplement (IM/SMENET) for information on how to install, configure and use the instrument on an Ethernet network and for information on configuring and using the Modbus TCP facility. Refer to Appendix B, page 106 for further information on using the Modbus link. IM/SM1000 Issue 11... -
Page 98: Installation
B – At Eye-level Location D – Use Screened Cable Fig. 5.2 Environmental Limits C – Avoid Vibration Fig. 5.1 General Requirements IM/SM1000 Issue 11... -
Page 99: Mounting
Note. This is critical in order to ensure proper compression of the panel seal and achieve the NEMA 4X hosedown rating. AC Power Supply Earth (Ground) Stud Insert the instrument Fig. 5.4 Fitting the Instrument into the Panel IM/SM1000 Issue 11... -
Page 100: Electrical Connections
It is strongly recommended that screened cable is used for signal inputs and relay connections. Connect the screen to the earth (ground stud) – see Fig. 5.5, page 99. Replacement of the internal battery (types Duracell DL2450 or Renata CR2450N 3V lithium cell) must be carried out by an approved technician only. IM/SM1000 Issue 11... - Page 101 V*, mV – THC mA V*, mV – – THC mA – Tx/Rx V*, mV – – – RJ45 Connector Fig. 5.5 Electrical Connections Note. Terminal screws must be tightened to a torque of 2.5 lbf.in (0.28 Nm). IM/SM1000 Issue 11...
-
Page 102: Analog Inputs
Note. Refer also to Fig. 5.5 for terminal numbers. transmitter power supply module boards, each of which is capable of driving two 2-wire transmitters. 2-wire Transmitter Power Supply (24V DC, 45mA max.) Analog Input – – – 10W Shunt Fig. 5.7 Transmitter Power Supply IM/SM1000 Issue 11... -
Page 103: Rs422/485 Serial Communications
Connections on links with multiple slaves must be B – 4-wire Connection made in parallel. When connecting cable screens, ensure that no 'ground loops' are introduced. See Warnings on Page 98 Fig. 5.8 RS422/485 Serial Communications IM/SM1000 Issue 11... -
Page 104: Mains Power Connections
Warning. Use fuse rating – 315mA (max.) type T. Note. Relay contacts are fitted with arc suppression components as standard. Fuse, 3A, Type T 24V DC – Terminal Block E Fig. 5.10 DC Power Supply Warning. Use fuse rating – 3A (max.) type T. IM/SM1000 Issue 11... -
Page 105: Hybrid I/O Module Connections
Note. Voltage level: 5V. Load: 450Ω min. 15kΩ max. Dxx inactive Fig. 5.13 Digital Input Connections 5.8.3 Analog Output Connections – Fig. 5.14 Two analog outputs are provided on the Hybrid option board. – – Fig. 5.14 Analog Output Connections IM/SM1000 Issue 11... -
Page 106: Appendix A - Signal Sources
BCD (Binary Coded Decimal) Digital Input States. Digital states derived from digital inputs D1 to D6. Available only if optional hybrid I/O board is fitted in module position D. BCD digital I/P D31 Table A.1 Signal Sources IM/SM1000 Issue 11... - Page 107 Totalizer Count Pulse. Active for 100ms each time the totalizer updates by one whole count, e.g. if two decimal places are set, a pulse is generated when the totalizer value increments from 0.99 to 1.00 or 1.99 to 2.00. Count pulse 2.6 Table A.1 Signal Sources (Continued) IM/SM1000 Issue 11...
-
Page 108: Appendix B - Modbus Guide
0008 updates that are valid and generates an exception response if any of the registers are not currently writable. 0003 0009 0004 0010 0005 0011 0006 0012 Reserved 0013 to 0050 Table B.2 Analog Input Fail States IM/SM1000 Issue 11... - Page 109 0070 0120 Reserved 0175 to 0180 Alarm 2.5A 0071 0121 Table B.4 Operator Messages Alarm 2.5B 0072 0122 Alarm 2.6A 0073 0123 Alarm 2.6B 0074 0124 Reserved 0075 to 0100 0125 to 0150 Table B.3 Alarm States IM/SM1000 Issue 11...
- Page 110 0218 0268 0318 0219 0269 0319 0220 0270 0320 0221 0271 0321 0222 0272 0322 0223 0273 0323 0224 0274 0324 Not Used 0225 to 0250 0275 to 0300 0325 to 0350 Table B.6 Digital I/O States IM/SM1000 Issue 11...
- Page 111 0460 0510 0560 Totalizer 2.5 0361 0411 0461 0511 0561 Totalizer 2.6 0362 0412 0462 0512 0562 Reserved 0363 to 0400 0413 to 0450 0463 to 0500 * Time since last reset Table B.7 Totalizer Digital Signals IM/SM1000 Issue 11...
- Page 112 0754 Alarm Group 5 0755 Alarm Group 6 0756 Alarm Group 7 0757 Alarm Group 8 0758 Alarm Group 9 0759 Alarm Group 10 0760 Alarm Group 11 0761 Alarm Group 12 0762 Table B.9 Alarm Groups IM/SM1000 Issue 11...
- Page 113 1110 1130 1150 1170 1190 1210 1230 1011 1031 1051 1071 1091 1111 1131 1151 1171 1191 1211 1231 Reserved 1020 1040 1060 1080 1100 1120 1140 1160 1180 1200 1220 1240 Table B.12 Channel Digital Signals IM/SM1000 Issue 11...
-
Page 114: Operating Mode Modbus Registers
0017 and 0018 Alarm 2.6A 0145 and 0146 0019 and 0020 Alarm 2.6B 0147 and 0148 0021 and 0022 Reserved 0149 to 0250 0023 and 0024 Table B.14 Alarm Trip Levels Reserved 0025 to 0100 Table B.13 Analog Inputs IM/SM1000 Issue 11... - Page 115 0745 to 0748 0274 0324 0374 0575 0624 0674 0275 to 0325 to 0375 to 0576 to 0625 to 0675 to Reserved 0449 to 0550 0749 to 0850 0300 0350 0400 0600 0650 0700 Table B.15 Totalizer Totals IM/SM1000 Issue 11...
-
Page 116: Comms. Analog And Digital Inputs
Character 15 0965 Character 6 0956 Character 16 0966 Character 7 0957 Character 17 0967 Character 8 0958 Character 18 0968 Character 9 0959 Character 19 0969 Character 10 0960 Character 20 0970 Table B.17 Remote Operator Messages IM/SM1000 Issue 11... - Page 117 Space “ & < > Char £ ° ² ³ µ Ω Note. Character codes 2C, 60 and 7F Hex (44, 96 and 127 Dec) are not supported Table B.18 ASCII Character Set for Remote Operator Messages IM/SM1000 Issue 11...
-
Page 118: Appendix C - Storage Capacity
28.4 days 10.0 minutes 37.4 months 18.7 months 12.5 months 9.3 months 1.0 hour 18.7 years 9.3 years 6.2 years 4.7 years 12.0 hours 224.4 years 112.2 years 74.7 years 56.0 years Table C.1 Internal Storage Capacity IM/SM1000 Issue 11... -
Page 119: Archive Storage Capacity
18.0 months 3.0 years 5.7 years 1.0 minute 4.0 years 8.0 years 17.0 years 34.0 years 10.0 minutes 44.0 years 88.0 years 176.0 years 344.0 years Table C.2 External (Archive) Storage Capacity – Text Formatted Archive Files IM/SM1000 Issue 11... - Page 120 6.7 years 13.3 years 26.0 years 1.0 minute 20.0 years 39.0 years 79.8 years 155.9 years 10.0 minutes 199.0 years 399.0 years 798.0 years 1558.6 years Table C.3 External (Archive) Storage Capacity – Binary Formatted Archive Files IM/SM1000 Issue 11...
-
Page 121: Appendix D - Default Settings
Channel data file False Alarm event log file False Totalizer log file False •1 Audit log file False Filename tag Process Group 1 New file interval Daily Wrap •1 Applicable only if the Totalizer option is enabled IM/SM1000 Issue 11... -
Page 122: Recording Channels
Analog output source None Alarm B tag x.xB Trip 0.0 % Hysteresis Hysteresis 0.0 % Time hysteresis 0 Secs Enable source None Log enable Alarm group All None •1 Applicable only if the Totalizer option is enabled IM/SM1000 Issue 11... -
Page 123: Functions
Archive file enables Channel data file True D.2.6 QSRTD_F New file interval Hourly As D.2.5 QSRTD_C except: Analog Inputs (A1 to A6 and B1 to B6) Engineering range Units °F •1 Applicable only if the Totalizer option is enabled IM/SM1000 Issue 11... -
Page 124: Qsdemo
Simulated sine wave Engineering range units Ch1.1 °C Ch1.2 Ch1.3 Gal/h Ch1.4 Litres Ch1.5 °F Short tags Ch1.1 Temp 1 Ch1.2 Pressure Ch1.3 In Flow Ch1.4 Volume Ch1.5 Temp 2 •1 Applicable only if the Totalizer option is enabled IM/SM1000 Issue 11... -
Page 125: Qsdairy
Long tag Tank Temperature Broken sensor direction Upscale Analog Input A2 Engineering range –10.0 High 90.0 Units °C Short tag Return Long tag Return Temperature Broken sensor direction Upscale •1 Applicable only if the Totalizer option is enabled IM/SM1000 Issue 11... -
Page 126: Appendix E - Spare Parts And Accessories
Voltage Divider Board GR2000/0375 (inc. 250Ω shunt GR2000/0377) Compact Flash Card 512Mb B12156 B12567 B12568 USB Universal Card Reader B12028 Documentation Pack User Guide (this manual) IM/SM1000 Quick reference guide IM/SM1000–Q End User Licence Agreement IM/SM2000–L Data Sheet SS/SM1000 IM/SM1000 Issue 11... - Page 127 Hybrid I/O board upgrade pack GR2000/0705 Transmitter PSU board GR2000/0706 upgrade pack 6-Channel standard analog I/P GR2000/0708 board upgrade pack 6-Channel high specification GR2000/0714 analog I/P board upgrade pack RS485 serial communications GR2000/1722 board upgrade pack Ethernet board upgrade pack GR2000/0722 IM/SM1000 Issue 11...
-
Page 128: Appendix F - Error & Diagnostics Information
If the error persists, try another card. The unit runs slowly and the red archive arrow is on continually, even If a very large number of files (>500) exist in the SM1000 directory on when there is apparently no unarchived data to catch-up the removable media card, some delay may be experienced during archiving. -
Page 129: Appendix G - Symbols And Icons
Real Time Alarm Maximum Value Archive Media Full Daylight Saving Start/End Changed Minimum Value System Error/Reset Archiving Alarm Acknowledged Average Value Date/Time or Daylight Saving Start/End Changed Operator Message Daylight Saving Start/End Changed FTP Logon Electronic Signature Security Change IM/SM1000 Issue 11... -
Page 130: Index
Basic Security – See Security System: Basic Passwords ............57 BCD (Binary Encoded) Digital Inputs .......94, 104 Type ............. 45, 56 Binary Format Archive Files ........41 to 43 View/Edit Other Users ........58, 59 Totalizers ............84 to 86 Type ................52 IM/SM1000 Issue 11... - Page 131 Fitting the Instrument ..........97 Totalizer Reset ............22 Mounting Dimensions ..........97 Totalizer Stop/Go ............21 Instrument Status ............28 Instrument Tag ..............52 Language ................ 52 Linearizer Type ..............75 Linearizer Units ..............75 Log Sizes ................ 60 IM/SM1000 Issue 11...
- Page 132 Menu .................32 Recording Control ............32 Signal Sources ..............104 Simulated Inputs ..............74 Siting ................96 Span Adjust ..............90 Spare Parts and Accessories .........124 Storage Capacity External Media ............117 Internal Memory ............116 System Administrator ......30, 46, 56, 57, 60 IM/SM1000 Issue 11...
- Page 133 Service Organization. Contact one of the following offices for – Chemical & Pharmaceutical details on your nearest Service and Repair Centre. – Food & Beverage – Manufacturing ABB Limited – Metals and Minerals Tel: +44 (0)1480 475321 – Oil, Gas & Petrochemical Fax: +44 (0)1480 217948 –...
- Page 134 Modbus is a registered trademark of the Modbus-IDA organization Microsoft is a registered trademark of Microsoft Corporation in the United States and/or other countries ABB has Sales & Customer Support expertise The Company's policy is one of continuous product in over 100 countries worldwide improvement and the right is reserved to modify the information contained herein without notice.
Need help?
Do you have a question about the SM1000 and is the answer not in the manual?
Questions and answers