
Related Manuals for Philips DCM230/55


Summary of Contents for Philips DCM230/55
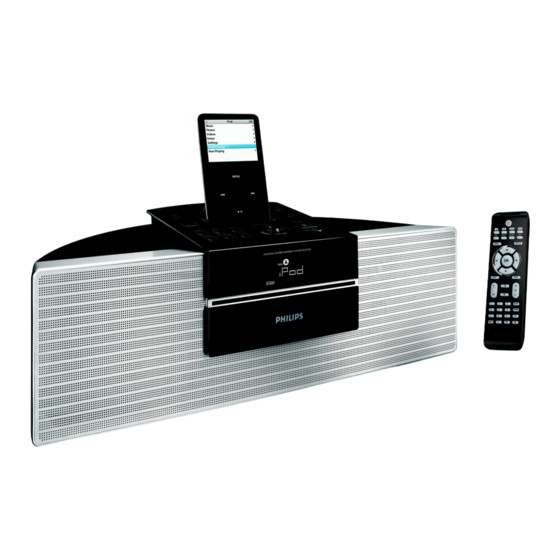
- Page 1 DCM230 Docking Entertainment System Cadastre seu produto e obtenha suporte em Registre su producto y obtenga asistencia en www.philips.com/welcome User manual...
- Page 2 Philips Electronics HK, Ltd. ______________________________ ANTES DE USAR SU APARATO. Philips Mexicana, S.A. de C.V. no se hace – Maltrato, descuido o mal uso, presencia de insectos o roedores (cucarachas, ratones etc.). – Cuando el aparato no haya sido operarado...
- Page 3 ª º ⁄ & iPod § ¤ ∞ TIMER ≥ • 8£ £ & ¡ ™ ≤...
- Page 4 CAUTION Use of controls or adjustments or performance of procedures other than herein may result in hazardous radiation exposure or other unsafe operation.
- Page 5 Index English ------------------------------------------------ 6...
-
Page 6: Table Of Contents
Contents General Information Environmental Information ... 7 Supplied accessories ... 7 Safety Information ... 7 Hearing Safety ... 8 Preparations Rear connections ... 9 Connecting a USB device or memory ... 10 card ... 10 Connecting other equipment to your ... 10 system ... -
Page 7: General Information
Congratulations on your purchase and welcome to Philips! To fully benefit from the support that Philips offers, register your product at www.philips.com/welcome. Environmental Information All unnecessary packaging has been omitted. We have tried to make the packaging easy to separate into three materials: cardboard (box), polystyrene foam (buffer) and polyethylene (bags, protective foam sheet). -
Page 8: Hearing Safety
General Information Hearing Safety Listen at a moderate volume. ● Using headphones at a high volume can impair your hearing. This product can produce sounds in decibel ranges that may cause hearing loss for a normal person, even for exposure less than a minute. -
Page 9: Preparations
FM wire antenna Rear connections The type plate is located at the rear of the system. For users in the U.K.: please follow the instructions on page 2. Power ● Before connecting the AC power adaptor to the wall outlet, ensure that all other connections have been made. -
Page 10: Connecting A Usb Device Or Memory
Preparations FM Antenna ● For better FM stereo reception, connect an outdoor FM antenna to the FM AERIAL (FM ANTENNA) terminal. Optional connection The optional equipment and connecting cords are not supplied. Refer to the operating instructions of the connected equipment for details. Connecting a USB device or memory card By connecting a USB mass storage device... -
Page 11: Before Using The Remote Control
Before using the remote control Pull out the plastic protective sheet. Select the source you wish to control by pressing one of the source select keys on the remote control (for example DISC, FM). Then select the desired function (for example ÉÅ... -
Page 12: Controls On The System And Remote Control
Controls (illustrations on page 3) Controls on the system and remote control STANDBY-ON/ECO POWERB – switches the system on or to Eco Power standby/normal standby with clock display. Display screen – shows the status of the system. EJECT 0 – ejects a disc from the disc loader. - Page 13 § MENU – equivalent to the MENU button on your iPod player. ≥ Numerical Keypad (0~9) – (for CD/MP3/USB) selects a track directly. • BAND – For tuner (TUNER): press to switch between MW and FM. ª iPod dock – is used to dock your iPod player for playback or recharging through this system.
-
Page 14: Basic Functions
Basic Functions Important! Before you operate the system, complete the preparation procedures. Switching the system on ● Press STANDBY-ON/ECO POWER B (or B on the remote). ➜ The system will switch to the last selected source. ● Press SOURCE on the top of the system or CD, USB, iPod, TUNER or AUX on the remote control. -
Page 15: Cd/Mp3-Cd Operation
Important! The lens of the CD player should never be touched. Loading a disc This CD player plays Audio Discs including CD Recordables, CD-Rewritables and MP3 CD. ● CD-ROM, CD-I, CDV, VCD, DVD or computer CDs, however, are not possible. Press SOURCE on the top of the system to select CD or press CD on the remote. -
Page 16: Playing An Mp3 Disc
CD/MP3-CD Operation To find a passage within a track Press and hold remote control). When you recognize the passage you want, 5 /6 release control). ➜ Normal playback continues. To stop playback ● Press 9. To interrupt playback ● Press ÉÅ during playback. ➜... -
Page 17: Different Play Modes: Shuffle And Repeat17
Different play modes: SHUFFLE and REPEAT You can select and change the various play modes before or during playback. The REPEAT modes can also be combined with PROGRAM. To select your play mode, press PLAY•MODE (SHUFFLE or REPEAT on the remote control) before or during playback until the display shows the desired function. -
Page 18: Radio Reception
Radio Reception Tuning to radio stations Press SOURCE repeatedly (or TUNER on the remote control) to select the tuner source. Press BAND on the remote control to select the desired waveband : FM or MW. 5 /6 Hold on the remote control) and then release the button. -
Page 19: Tuning To Preset Radio Stations
Tuning to preset radio stations ● Press ALBUM/PRESET +/- (or 3 / 4 on the remote control) until the desired preset station is displayed. Radio Data System is a service that allows FM stations to show additional information. If you are receiving a RDS station, station name are displayed. -
Page 20: External Sources
External Sources Using a non-USB device Connect the audio out terminals of the external equipment (TV, VCR, Laser Disc player, DVD player or CD Recorder) to the AUX terminals of your system. Press SOURCE repeatedly (or AUX on the remote control) to select external equipment. Note: –... - Page 21 How to transfer music files from PC to a USB mass storage device By dragging and dropping music files, you can easily transfer your favorite music from PC to a USB mass storage device. For the flash player, you can also use its music management software for the music transfer.
-
Page 22: Clock/Timer
Clock/Timer Clock setting The clock can be set in either 12-hour or 24-hour mode (12HR or 24HR for example). In standby mode, press PROG. ➜ SET CLOCK is displayed briefly. Then, 12HR or 24HR is displayed. Press ALBUM/PRESET +/- (or ¡ / ™ on the remote control) to select clock mode. -
Page 23: Sleep Timer Setting
Sleep timer setting The sleep timer enables the system to switch off by itself after a set period of time. Press SLEEP on the remote control repeatedly to select a preset time. ➜ The selections are as follows (time in minutes): OFF ™... -
Page 24: Ipod Dock
iPod Dock Compatible iPod players ● Most Apple iPod models with 30-pin dock connectors as follows: Nano 1st /2nd/3rd generation, iPod 5th generation (video), iPod touch and iPod classic. Selecting the correct dock adaptor ● 4 iPod dock adaptors of different type, as indicated at the back of the adaptor, are included to fit the following iPod: Nano 1st /2nd/3rd generation, iPod 5th... -
Page 25: Specifications
Cleaning the disc lens ● After prolonged use, dirt or dust may accumulate at the disc lens. To ensure good playback quality, clean the disc lens with Philips CD Lens Cleaner or any commercially available cleaner. Follow the instructions supplied with cleaner. -
Page 26: Troubleshooting
Do not open the system as there is a risk of electric shock. If a fault occurs, first check the points listed below before taking the system for repair. If you are unable to remedy a problem by following these hints, consult your dealer or Philips for help. - Page 27 Problem Some files on the USB device are not displayed. “DEVICE NOT SUPPORTED” scrolls on the display. Troubleshooting Solution ✔ Check if the number of folders exceeds 99 or the number of titles exceeds 400. ✔ Remove the USB mass storage device or select another source.
- Page 28 Meet Philips at the Internet http://www.philips.com DCM230 CLASS 1 LASER PRODUCT Printed in China PDCC-JH/ZYL-0832...
Need help?
Do you have a question about the DCM230/55 and is the answer not in the manual?
Questions and answers