
Related Manuals for Philips SBCRU930/00


Summary of Contents for Philips SBCRU930/00
-
Page 1: Table Of Contents
Taking a First Look The Batteries The Appliance The Touch Screen Using ProntoNEO Activating the ProntoNEO Operating Devices Working with Modes Adjusting the Settings Defining the Brands of Your Devices Learning Commands Recording Macros NEOedit Maintaining ProntoNEO Important Notices Cleaning ProntoNEO Troubleshooting General Problems Programming Problems... -
Page 2: Taking A First Look
In the memory of ProntoNEO, IR codes are stored to activate different brands for all kinds of video and audio devices. ProntoNEO is set up by default to operate with Philips and compatible devices. When you have other brands, you simply define the brands of your devices when you use ProntoNEO for the first time. -
Page 3: The Batteries
The Batteries When you use ProntoNEO for the first time, you have to install the batteries. The ProntoNEO requires 3 AA-batteries (3 x 1,5 V) to function. You can use either primary or rechargeable batteries. 1 Remove the battery cover by pressing and sliding. 2 Place the batteries in the battery compartment. -
Page 4: The Appliance
Taking a First Look The Appliance On the ProntoNEO you can perform numerous actions by means of soft and hard buttons. • Soft buttons are the buttons you can tap on the LCD touch screen. • Hard buttons are the buttons located below and on the left side of the LCD touch screen. -
Page 5: The Touch Screen
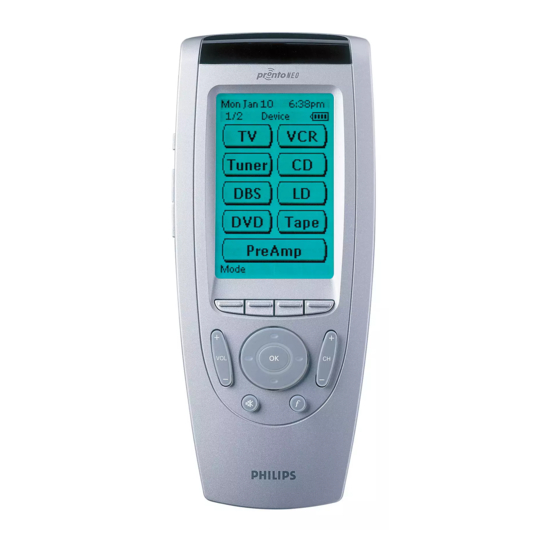
The Touch Screen The LCD touch screen is divided into different sections: User Manual Taking a First Look Here the date and time are displayed when you are operating your devices. In this area you can see: · the page number; ·... -
Page 6: Using Prontoneo
Using ProntoNEO Activating the ProntoNEO When the ProntoNEO is switched on for the first time or when it is reset, the Introduction screen appears for a few seconds. The ProntoNEO then automatically switches to the Device Overview that displays all available devices on your ProntoNEO. -
Page 7: Changing The Lcd Contrast
Changing the LCD Contrast To adjust the LCD contrast on the touch screen: 1 Press and hold the Backlight button. The screen lights up. 2 While still holding the Backlight button, press the Page Up button once to increase the LCD contrast one level. The LCD contrast is adjusted one level up. -
Page 8: Operating Devices
Using ProntoNEO The Battery Status The battery icon When the battery status is low, the Low Battery icon the touch screen. You can still operate your devices, but you cannot adjust the settings, define brands, learn commands or record macros anymore. When you try to perform these actions, a message screen appears. -
Page 9: Using The Soft Buttons
Selecting a Device on the Device Overview Tap the soft button of the device you want to operate. The first page of the selected device appears. See ‘Using the Page Up and Page Down Buttons’ on p. 10 to go to another page of the device. You operate devices using the buttons on your ProntoNEO: •... -
Page 10: Working With Modes
Using ProntoNEO Using the Page Up and Page Down Buttons The controls to operate your devices are mostly located on different pages. You can scroll through these pages using the Page Up and Page Down buttons on the left side of the touch screen. The page number on the left of the touch screen indicates the active page number and the total number of screens, for example 1/6. -
Page 11: Adjusting The Settings
Note You have to press and hold the Mode button for 3 seconds to prevent accidental changes. 3 Select the desired mode from the Mode screen. Note When you switch to another mode from the Device Overview, you cannot choose the Brand mode, Learn mode and Macro mode. - Page 12 Using ProntoNEO Adjust the LCD Timeout The LCD timeout indicates how long the LCD touch screen stays active before it turns off. The LCD will only time out when you don’t touch any buttons. You can set the timeout between 1 second and 120 seconds. Press ‘+’...
- Page 13 Change the Beep volume The beep volume setting adjusts or turns off the volume of all button and system beeps on the ProntoNEO. The beep volume levels are mute, soft, medium and loud. Press ‘+’ to increase or ‘-’ to decrease the beep volume. Second Setup Page On the second setup page you can adjust: •...
-
Page 14: To Exit Setup Mode
Using ProntoNEO Third Setup Page ProntoNEO Information This page contains information that may be important to the dealer in case of a defect. The following information is displayed on this screen: • Free memory (in percentage), which gives you an indication on how much memory is left to (further) customize the ProntoNEO;... -
Page 15: Defining The Brands Of Your Devices
Philips (or compatible with), you do not have to define the brands of your devices. Note Not every Philips device (TV, VCR, CD, …) uses the same IR codes. If you notice that some devices or commands are not functioning properly, change the code set as described in this chapter. - Page 16 Using ProntoNEO 5 Tap Next to define the code set of your device. The code set screen appears. When the brand is already defined like in the default configuration, the code set is displayed. –or– Press Cancel to exit Brand mode. 6 Enter the code set from the ‘Table of Brands’...
- Page 17 If you entered an incorrect code set, you hear an error beep. A message screen appears. 1 Press OK. ProntoNEO returns to the code set screen where the incorrect code set is displayed. 2 Look up the correct code set and repeat instructions 6 and 7. User Manual Using ProntoNEO...
-
Page 18: Learning Commands
Using ProntoNEO Learning Commands If an IR code or a brand is not in the database, you can program ProntoNEO commands by transmitting IR signals from your existing remote controls to ProntoNEO’s learning eye. To do this, place ProntoNEO and the device’s remote control on a flat surface, 1 to 4 inches (2 to 10 cm) apart. - Page 19 4 Tap Learn on the Mode screen. ProntoNEO is now in Learn Mode. ‘Learn’ and the label of the selected device appear at the top of the touch screen. 5 Use, if necessary, the Page Up or Page Down button to go to the next button you want to learn.
- Page 20 Using ProntoNEO When the ProntoNEO does not receive an IR code in 5 seconds: • You will hear an error beep; • The label changes from Learning to Failed. The Learn sequence has failed. • ProntoNEO will return to Learn mode. Return to step 5 of the Learn sequence to relearn the button.
-
Page 21: Recording Macros
Recording Macros A macro allows you to send a sequence of commands using one single button. You can for instance, switch on your TV, turn to a movie channel and prepare your VCR for recording by rewinding the videotape. All this can be done be pressing a single button on your ProntoNEO. - Page 22 Using ProntoNEO 6 Tap the soft or hard button you want to select as a macro. A message screen appears. 7 Tap Start. The Device Overview appears with the ‘Recording’ label at the top of the screen. The buttons you tap on this screen will not be recorded. From the Device Overview you can go to the different devices or you can press the Extra hard button to go to the Extra screen with delays and beeps.
- Page 23 9 Tap the soft or hard buttons with the commands you want to record. 10 Press the Page Up and Page Down buttons to go to different screens of the same device. –or– Press the Device button to go to the Device Overview again. 11 To add delays and beeps to the macro, press the Extra hard button on the Device Overview.
- Page 24 Using ProntoNEO 13 Press OK to save the macro and return to the Mode screen. The existing command of the selected button is replaced by the macro. –or– Press Cancel to return to the Mode screen without saving the macro. The button retains its previous command.
-
Page 25: Neoedit
ProntoNEO’s companion software that you find on the included CD-ROM. You can find more information and updates of the software on http://www.pronto.philips.com. NEOedit is the visual editor for creating and configuring ProntoNEO Configuration Files (NCF) on your computer. An NCF is a file that is used to define the ProntoNEO behaviour and look for the LCD touch screen. -
Page 26: Minimum System Requirements
NEOedit Minimum System Requirements • PC with a Pentium 166 MHz or higher • Windows 95/98/ME/XP or NT 4.0/2000 • 32 MB of RAM • 16 MB of free hard disk space • Free serial port • CD-ROM player Installing NEOedit from the CD-ROM 1 Place the NEOedit CD-ROM in your computer. -
Page 27: Maintaining Prontoneo
Maintaining ProntoNEO Important Notices Take care not to scratch the touch screen Use your finger to tap the LCD touch screen or use plastic-tipped pens intended for use with touch screens. Never use an actual pen, pencil or other sharp object on the LCD touch screen. Protect ProntoNEO from extreme temperatures Keep ProntoNEO away from heaters and other heat sources. -
Page 28: Faq
How do I reset the ProntoNEO? Under normal circumstances, you will never have to reset the ProntoNEO. However, on rare occasions, if the ProntoNEO’s touch screen freezes or if you notice unusual behavior, you need to perform a reset to get the ProntoNEO running again. -
Page 29: Troubleshooting
General Problems The display stays blank or becomes black • Make sure the batteries are properly installed. See “The Batteries” on page 3. • Press the Backlight button to make sure ProntoNEO and the backlight are turned on. See ‘Turning on the Display and the Backlight’ on p. 6. •... -
Page 30: Programming Problems
See ‘How do I reset the ProntoNEO?’ on p. 28. • Try to recover the ProntoNEO Configuration File (NCF) by downloading a backup copy or the default file from NEOedit. See ‘NEOedit’ on p. 25. • Go to the Philips website http://www.pronto.philips.be for more information. User Manual... -
Page 31: Specifications
Blue EL backlighting for LCD and hard buttons 3-wire (RS232) serial port connector Database with IR codes to operate different brands Built-in Philips RC codes Total number of devices limited only by memory Infrared sending LED and learning eye Operating distance of 33 feet (10 meters) -
Page 32: Table Of Brands
Table of Brands PreAmp Carver Curtis Mathes Linn Magnavox Marantz Optimus Philips Pioneer Polk Audio Realistic Sony Soundesign Victor Wards Yamaha Cable Allegro Americast Archer Bell South Century Citizen Comtronics Contec Emerson Everquest Focus Garrard Gemini General Instrument GoldStar Goodmind... - Page 33 Linn Magnavox Marantz Mission Nikko Onkyo Optimus 0059, 0495, 0447, 0206, 0464, 0332, 1090, 0027, 0064, 0172 Panasonic Parasound Philips Pioneer Polk Audio Proton Quasar 0080, 0059, 0495, 0332, 1089, Realistic Rotel Sansui Sanyo Scott Sears Sharp Sherwood Sonic Frontiers...
- Page 34 Table of Brands Panasonic Penney Philips Pioneer Proscan Quasar Realistic Sansui Sharp Sherwood Sony Sunfire Teac Technics Thorens Victor Yamaha Yorx DBS (Sattelite) AlphaStar Echostar Expressvu General Instrument Hitachi Hughes Network Systems Jerrold Magnavox Memorex Next Level Panasonic Philips Primestar...
- Page 35 Multitech Nikko Onwa Optimus Optonica Orion Panasonic Penney 0074, 1374, 0087, 0057, 0048, 0205, 0078, 0046, 0083, 0183, 0774 Philco 0172, 0046, 0057, 0081, 0490 Philips Pilot Pioneer Portland Princeton User Manual Table of Brands 0205 Prism 0206 Proscan 0081...
- Page 36 Noblex 0027 Olympus 0064 Optimus 0064 0059 Orion Panasonic 0506, 0027, 0064, 0070 Penney 0074, 0131 Pentax 0062 Philco 0027 Philips Pilot 0027 Pioneer 0459, 0553 Polk Audio 0064, 0065 Profitronic 0027 Proscan 0074 Protec 0027 Pulsar 0065, 0108 Quasar...
- Page 37 Marantz 0068, 0506, 0027, 0094, Mitsubishi 0236, 0298 Onkyo 0074, 0131, 0267 Optimus 0211, 0148, 0070, 0072 Oritron 0064, 0069, 0027, 0062, Panasonic 0074, 0131 Philips 0072 Pioneer 0075 Proscan 0099 0267 Samsung 0099 Sharp 0059, 0027, 0062, 0663 Sony...
-
Page 38: Index
Index activating a device, 8 Device Overview, 8 ProntoNEO, 6 adjusting backlight timeout, 12 beep volume, 13 date, 13 LCD contrast, 7 LCD timeout, 12 settings, 11 time, 13 backlight switching off, 6 timeout, 12 turning on, 6 Backlight button, 4, 6, 10 batteries, 3 installing, 3 status, 8... - Page 39 NCF. See ProntoNEO Configuration File NEOedit, 25 NEOemulator, 25 overview of devices, 6, 8 page number, 10 Page Up/Page Down buttons, 4, 10 Philips website, 2 powering battery status, 8 installing the batteries, 3 programming. See customizing ProntoNEO cleaning, 27...
- Page 40 © Royal Philips Electronics NV All rights are reserved. Reproduction in whole or in part is prohibited without the prior written consent of the copyright owner.
Need help?
Do you have a question about the SBCRU930/00 and is the answer not in the manual?
Questions and answers