Acer Veriton 1000 User Manual
Veriton series
Hide thumbs
Also See for Veriton 1000:
- Manuel d'utilisation (141 pages) ,
- Guía del usuario (131 pages) ,
- Manual do utilizador (130 pages)
Table of Contents
Advertisement
Quick Links
Advertisement
Table of Contents

Related Manuals for Acer Veriton 1000


Summary of Contents for Acer Veriton 1000
- Page 1 Veriton Series User Guide...
- Page 2 Serial number: ___________________________________ Purchase date: ___________________________________ Place of purchase: ________________________________ Acer and the Acer logo are registered trademarks of Acer Incorporated. Other companies' product names or trademarks are used herein for identification purposes only and belong to their respective companies.
-
Page 3: Safety Instructions
Information for your safety and comfort Safety instructions Read these instructions carefully. Keep this document for future reference. Follow all warnings and instructions marked on the product. Turning the product off before cleaning Unplug this product from the wall outlet before cleaning. Do not use liquid cleaners or aerosol cleaners. - Page 4 circuit rating. If power strips are used, the load should not exceed 80% of the power strip's input rating. • This product's AC adapter is equipped with a three-wire grounded plug. The plug only fits in a grounded power outlet. Make sure the power outlet is properly grounded before inserting the AC adapter plug.
-
Page 5: Disposal Instructions
To minimize pollution and ensure utmost protection of the global environment, please recycle. For more information on the Waste from Electrical and Electronics Equipment (WEEE) regulations, visit http://global.acer.com/about/sustainability.htm. Mercury advisory For projectors or electronic products containing an LCD/CRT monitor or display: Lamp(s) inside this product contain mercury and must be recycled or disposed of according to local, state or federal laws. -
Page 6: Tips And Information For Comfortable Use
Note: The statement above is applicable only to Acer system with an ENERGY STAR sticker. As an ENERGY STAR partner, Acer Inc. has determined that this product meets the ENERGY STAR guidelines for energy efficiency. This product has been shipped enabled for power management: •... -
Page 7: Finding Your Comfort Zone
• coldness or weakness If you have these symptoms, or any other recurring or persistent discomfort and/or pain related to computer use, consult a physician immediately and inform your company's health and safety department. The following section provides tips for more comfortable computer use. Finding your comfort zone Find your comfort zone by adjusting the viewing angle of the monitor, using a footrest, or raising your sitting height to achieve maximum comfort. - Page 8 viii Eyes • Rest your eyes frequently. • Give your eyes regular breaks by looking away from the monitor and focusing on a distant point. • Blink frequently to keep your eyes from drying out. Display • Keep your display clean. •...
-
Page 9: Table Of Contents
Information for your safety and comfort Safety instructions Disposal instructions Tips and information for comfortable use 1 System tour Front panel Rear panel Optical drive Taking care of your CDs and DVDs 2 Setting up your computer Arranging a comfortable work area Positioning your monitor Positioning your keyboard Positioning your mouse... - Page 10 Installing an expansion card 4 Frequently asked questions Frequently asked questions 5 Regulations and safety notices FCC notice Modem notices Laser compliance statement LCD pixel statement Macrovision copyright protection notice Radio device regulatory notice General European Union (EU) The FCC RF safety requirement Canada —...
-
Page 11: System Tour
1 System tour... -
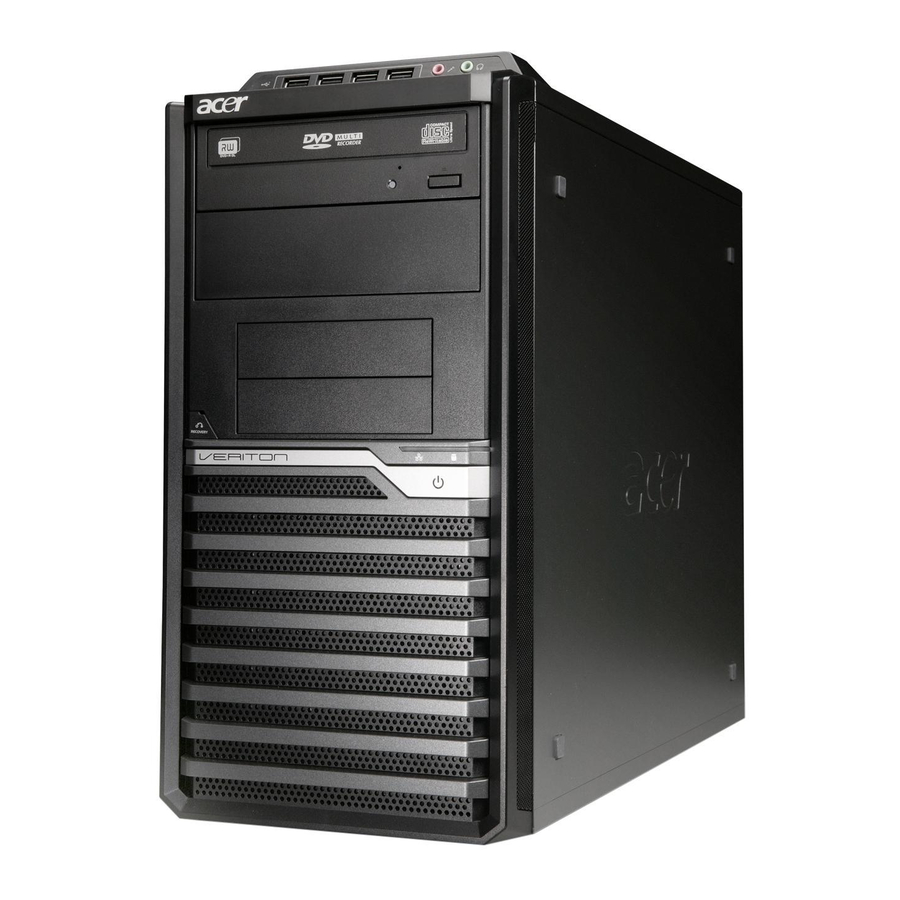
Page 12: Front Panel
Front panel Your computer's front panel consists of the following: Icon Component 5.25" drive bay(s) 3.5" floppy drive Microphone-in jack (front) Speaker-out/line-out port USB ports OBR (One Button Recovery) button (for selected models) Indicators Power button Rear panel Your computer's rear panel consists of the following: Icon Component Power supply... -
Page 13: Optical Drive
Audio jacks function table Headphone Color/Use Line-in Blue Headphone Green Pink Orange Black Gray Note: See "Connecting peripherals" on page 7 Optical drive Your computer may come with a CD-ROM, DVD-ROM, DVD/CD-RW combo, DVD-Dual or DVD-Super multi drive. This drive is located on the front panel of your computer. - Page 14 the disk lens reader on the CD or DVD drive, or stop the computer from successfully reading the disk. • When handling disks, always hold them by the edges to avoid smudges or fingerprints. • When cleaning disks, use a clean, dust-free cloth and wipe in a straight line from the center to the edge.
-
Page 15: Setting Up Your Computer
2 Setting up your computer... -
Page 16: Arranging A Comfortable Work Area
Arranging a comfortable work area Take note of the following when selecting a location for your computer: • Do not put your computer near any equipment that might cause electromagnetic or radio frequency interference, such as radio transmitters, televisions, copy machines or heating and air-conditioning equipment. -
Page 17: Connecting Peripherals
moving the mouse. Connecting peripherals Setting up your computer is easy. For the most part, you only have four things to connect: the mouse, the keyboard, the monitor, and the power cable. Note: The peripherals shown in the connections below are for your reference only. -
Page 18: Connecting The Power Cable
Connecting the power cable Caution: Before you proceed, check the voltage range in your area. Make sure that it matches your computer's voltage setting. If they don't match, change your computer's voltage setting according to your area's voltage range. Set the voltage selector switch to the voltage range applicable to your area (a). Plug the power cable into the power cable socket located on the rear panel of your computer (b). -
Page 19: Upgrading Your Computer
3 Upgrading your computer... -
Page 20: Installation Precautions
Installation precautions Before you install any computer component, we recommend that you read the following sections. These sections contain important ESD precautions along with preinstallation and post-installation instructions. ESD precautions Electrostatic discharge (ESD) can damage your processor, disk drives, expansion boards, and other components. Always observe the following precautions before you install a computer component: Do not remove a component from its protective packaging until you are ready to install it. -
Page 21: Post-Installation Instructions
Post-installation instructions Observe the following after installing a computer component: See to it that the components are installed according to the step- by-step instructions in their respective sections. Replace any expansion boards or peripherals that you removed earlier. Replace the side panels. Connect the necessary cables and turn on your computer. -
Page 22: To Remove A Memory Dimm
Certain components of your computer are upgradeable, such as the memory, the hard disk, the CPU and the expansion cards. You need to observe the "Installation precautions" on page 10 when installing or removing a computer component. However, for safety purposes, we do not recommend that you perform these upgrades yourself. -
Page 23: To Reconfigure Your Computer
Align the memory DIMM with the socket (a). Press the memory DIMM into the socket until the clips lock onto the memory DIMM (b). Note: The memory DIMM sockets are slotted to ensure proper installation. If you insert a memory DIMM but it does not fit easily into the socket, turn the memory DIMM around and try to insert it again. -
Page 24: Installing An Expansion Card
Note: Make sure that the other ends of the disk cables are securely connected to their corresponding connectors on the mainboard. Reinstall the metal bracket frame to the housing. Replace the computer cover. Installing an expansion card To install an expansion card: Remove the computer cover. -
Page 25: Frequently Asked Questions
4 Frequently asked questions... -
Page 26: Frequently Asked Questions
Frequently asked questions The following questions indicate possible situations that may arise during the use of your computer and each is followed by easy answers and solutions. I pressed the power switch but the system did not boot up. Check the LED located above the power switch. If the LED is not lit, no power is being applied to the system. -
Page 27: The Printer Does Not Work
The printer does not work. Do the following: • Make sure the printer is connected to a power outlet and that it is turned on. • Make sure the printer cable is connected securely to the system's parallel or USB port and the corresponding port on the printer. •... - Page 28 4 Frequently asked questions...
-
Page 29: Regulations And Safety Notices
5 Regulations and safety notices... -
Page 30: Fcc Notice
FCC notice This device has been tested and found to comply with the limits for a Class B digital device pursuant to Part 15 of the FCC rules. These limits are designed to provide reasonable protection against harmful interference in a residential installation. -
Page 31: Modem Notices
Cet appareil numérique de la classe B est conforme a la norme NMB-003 du Canada. Declaration of Conformity for EU countries Hereby, Acer, declares that this PC series is in compliance with the essential requirements and other relevant provisions of Directive 1999/5/EC. (Please visit http://global.acer.com/support/certificate.htm for complete documents.) -
Page 32: Notice For Australia
Caution: To reduce the risk of fire, use only No. 26 AWG or larger UL Listed or CSA Certified Telecommunication Line Cord. TBR 21 This equipment has been approved [Council Decision 98/482/EC - "TBR 21"] for single terminal connection to the Public Switched Telephone Network (PSTN). However, due to differences between the individual PSTNs provided in different countries, the approval does not, of itself, give an unconditional assurance of successful operation on every PSTN termination point. -
Page 33: Laser Compliance Statement
device. The associated equipment shall be set to operate within the following limits for compliance with Telecom's Specifications: There shall be no more than 10 call attempts to the same number within any 30 minute period for any single manual call initiation, and The equipment shall go on-hook for a period of not less than 30 seconds between the end of one attempt and the beginning of the next call attempt. -
Page 34: Lcd Pixel Statement
PRODUCTO LÁSER DE LA CLASE I ADVERTENCIA: RADIACIÓN LÁSER INVISIBLE AL SER ABIERTO. EVITE EXPONERSE A LOS RAYOS. ADVARSEL: LASERSTRÅLING VEDÅBNING SE IKKE IND I STRÅLEN. VARO! LAVATTAESSA OLET ALTTINA LASERSÅTEILYLLE. VARNING: LASERSTRÅLNING NÅR DENNA DEL ÅR ÖPPNAD ÅLÅ TUIJOTA SÅTEESEENSTIRRA EJ IN I STRÅLEN VARNING: LASERSTRÅLNING NAR DENNA DEL ÅR ÖPPNADSTIRRA EJ IN I STRÅLEN... -
Page 35: European Union (Eu)
European Union (EU) R&TTE Directive 1999/5/EC as attested by conformity with the following harmonized standard: • Article 3.1(a) Health and Safety EN60950-1:2001 + A11:2004 • EN50371:2002 • Article 3.1(b) EMC • EN301 489-1 V1.6.1 • EN301 489-3 V1.4.1 (Applicable to non-bluetooth wireless •... -
Page 36: Canada - Low-Power License-Exempt Radio Communication Devices (Rss-210)
This device is restricted to indoor use due to its operation in the 5.15 to 5.25 GHz frequency range. FCC requires this product to be used indoors for the frequency range 5.15 to 5.25 GHz to reduce the potential for harmful interference to co-channel Mobile Satellite systems. -
Page 37: Federal Communications Comission Declaration Of Conformity
The following local Manufacturer /Importer is responsible for this declaration: Product: Model number: Name of responsible party: Address of responsible party: Contact person: Tel: Fax: Personal Computer Veriton Series Acer America Corporation 333 West San Carlos St. San Jose, CA 95110 U. S. A. Acer Representative 254-298-4000 254-298-4147... - Page 38 Tel: 886-2-8691-3089 Fax: 886-2-8691-3120 E-mail: easy_lai@acer.com.tw Hereby declare that: Product: Desktop Computer Trade Name: Acer Model Number: Veriton Series Is compliant with the essential requirements and other relevant provisions of the following EC directives, and that all the necessary steps have been taken and are in force to assure that production units of the same product will continue comply with the requirements.
- Page 39 Year to begin affixing CE marking 2008. Easy Lai, Manager Regulation Center,Acer Inc. Remark: All images are for reference purposes only. Actual configuration may vary. V09A1 Aug.13, 2008 Date...
Need help?
Do you have a question about the Veriton 1000 and is the answer not in the manual?
Questions and answers