
Related Manuals for Philips VTR8110


Summary of Contents for Philips VTR8110
- Page 1 Register your product and get support at www.philips.com/welcome VTR8110 VTR8110 使用手册 / User Manual English 中文...
-
Page 3: Table Of Contents
目录 6 拍照 1 欢迎 7 录音 1.1 产品特点 8 一键回放模式 2 重要须知 2.1 安全 9 视频模式 2.2 听力保护 9.1 视频播放 2.3 录音的法律限制 3 您的数码音视频记录仪 10 照片模式 3.1 供货范围 3.2 主机概览 11 语音模式 3.3 遥控器(选配件)概览 11.1 语音播放 4 开始使用 12 遥控器 (选配件) 4.1 开... - Page 4 19 胸针的装取 14 拓展功能 14.1 GPS(选配件) 19.1 佩戴胸针 14.2 对讲机送话器(选配件) 19.2 取下胸针 14.3 多功能底座 20 常见问题 15 设置模式 15.1 录音设置 15.2 录像设置 21 技术参数 15.3 拍照设置 15.4 系统设置 16 电池的装取 16.1 装入电池 16.2 取出电池 17 背夹的装取 17.1 安装背夹 17.2 取下背夹 18 背夹佩戴方式...
-
Page 5: 产品特点
1 欢迎 • 字符叠加功能,所有视频和照片都附加时间、产品编号、使 用者编号等信息,无法剪辑,更具法定证据效力。 • 超长文件名,所有录像文件的文件名都包含产品编号、时间、 欢迎来到飞利浦世界!您能选择和购买飞利浦的产品,我们非 使用者编号等信息,方便数据存档、检索。 常高兴。您可在我们的官方网站上获得飞利浦公司的全方位技 • 录像资料自动分割保存,防止误操作造成资料丢失。 术支持,如:使用手册、软件下载、保修信息等。 • VTR8110 为外置存储卡,最大支持 128G。 www.philips.com • 高清扬声器:采用高品质振动喇叭 , 无论播放录音文件或录 像文件,都给人身临其境的享受。 • 以常见的 WAV 格式录音。 1.1 产品特点 • 使用高速 USB 2.0 快速存取录音文件和数据。 • 一键录音:仅仅按下录音键即可实现录音,再按一下录音键 • 可作为大容量的 USB 存储设备,确保最大的兼容性。... -
Page 6: 重要须知
2 重要须知 2.3 录音的法律限制 2.1 安全 ·本设备录音功能的使用可能受限于所在国家法律的限制。录 制他人谈话或者课程时应尊重他人隐私及第三方人权。 注意 ·请注意,在部分国家,当录制用户与他人通话时,用户应根 据法律要求通知对方,否则该录音行为将被视为不合法。请 • 此符号标志指明处理或操作设备时必须遵守的各种注意事项。 在电话录音前确认使用人所在国家该录音数据使用的合法性。 小心 所用符号标志 • 使用本产品前请仔细阅读本说明书,如因人为操作或不可抗力 因素而导致数据丢失,本公司一概不予负责。特别提醒用户 提示 小心操作,注意将资料另外备份。 • 此符号标志指明帮助您更加高效简便使用设备的信息。 2.2 听力保护 注意 使用耳机时请遵守下列原则: • 此符号标志指明处理或操作设备时必须遵守的各种注意事项。 ·调整至合适的音量,切勿长时间使用耳机。 ·特别需要注意,切勿将音量调至耳朵所能承受的范围之外。 小心 ·切勿将音量调至盖过周边环境的声音。 • 此符号标志警告可能发生的设备损坏和数据丢失。操作不当, ·在危险情况下请小心或暂停使用耳机。 可能导致损坏。 ·在驾驶汽车、骑自行车、玩滑板时,切勿使用耳机。否则会 导致交通意外,且违反相关法律法规。... - Page 7 警告 • 此符号标志警告人身伤害危险。操作不当,可能导致人身伤害 或设备损坏。...
-
Page 8: 您的数码音视频记录仪
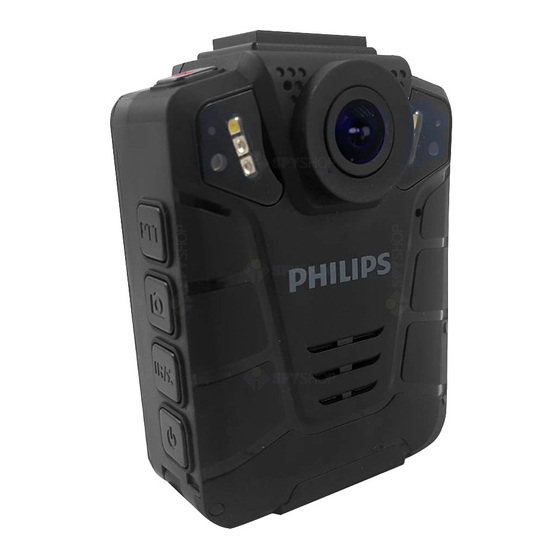
3 您的音视频记录仪 3.2 主机概览 3.1 VTR8110 供货范围:... - Page 9 录音键 麦克风 送话键 镜头 照明灯 拍照键 红外灯 / 星标键 状态指示灯 电源 / 关屏键 光敏电阻 多功能接口定位孔 红外灯 遥控指示灯 多功能接口 电池盖 激光灯 铭牌 对讲咪头 喇叭 显示屏 菜单选项选择 / 文件选择 / 音量加键 停止 / 返回 / 照明灯键 菜单 / 菜单选项选择键 菜单选项选择 / 文件选择 / 音量减键 播放...
-
Page 10: 遥控器(选配件)概览
3.3 遥控器概览 ( 选配 ): 开 / 关机键 遥控器指示灯 录音键 拍照键 录像键... -
Page 11: 开始使用
4.1 开 / 关机 注意 • 第一次使用机器时,请对该机器在关机状态下充电 4 小时以 提示 确保机器有电工作! • 本机使用可拆卸锂电池供电,如果长时间不使用音视频记录 仪,请长按开关机键 3s 关掉机器。 关机状态下,长按开机键 3s,本机立即自动开机,然后显示飞 利浦图标,如下图所示: 如果音视频记录仪无法正常工作,请确认机器是否已没电。 • VTR8110 机器工作过程中,请勿直接把外置卡拔出,否则会损 • 坏文件或导致机器导常。 当电量指示标志为“ ”时,请及时充电。或者更换电池, • 如果更换电池,请于 3 分钟内更换完成。 4.2 充电方法 然后机器进入预览界面,如下图所示,预览状态下,工作状态 (1) 本产品配有可置换电池,可将电池取出用出厂配的座充和充 指示灯亮绿灯,在此界面短按“ ”键,机器回到设置界面。 电盒进行充电。 长按“... -
Page 12: 连接电脑
请将机器开机后再使用 USB 数据线将音视频记录仪与电脑相 连或者使用 USB 数据线将音视频记录仪与电脑相连后长按电 提示 源键 3s。 • 本机充电可以使用关机充电和开机充电的方式,一般情况下, 如需要格式化 TF 卡,如果卡容量是 16GB-64GB,文件系统 • 关机充满电需要 3.5 小时左右, 开机充满电需要 6 小时左右 (建 选项须选择 FAT32 进行格式化。如果卡容量是 128GB,则文 议关机充电)。 件系统选项必须选择 exFAT 进行格式化。不能使用 NTFS 格 式,否则机器将无法摄录。 4.3 连接电脑 音视频记录仪可作为大容量的 USB 存储设备,并可方便地与电 脑相连,VTR8110 无须安装软件,音视频记录仪会自动显示为可 移动设备。... - Page 13 5 录像 录像参考界面如下如所示: 当您初次使用音视频记录仪录像时, 请注意本节中的内容说明! (1) 在摄像预览状态按下“录像”键开始录像,机器短振两下, 状态指示灯将红灯闪烁。 (2) 长按“ ”或“ ”放大与缩小预览界面,实现数码变 焦功能。 (3) 在黑夜或者光线暗的环境下录像时,如果红外切换为手动 录像界面说明 : 切换, 长按 “IR/ ” 键, 此时红外灯开启进入到夜视摄录模式, 画面颜色为黑白模式。 (4) 长按“回放”键,激光灯会开启,可以实现激光定位,确 定录像区域。 (5) 在黑夜或者光线暗的环境下录像时,长按“停止”键,照 明灯将打开,补充光源。 (6) 按“拍照”键可以抓拍当前摄录画面。 (7) 按下“IR/ ”键,文件将会标记为重要文件,循环录像 打开时,此文件不会被删除。 (8) 长按“录音”键,音频记录仪将转到录音模式进行录音。 (9) 再次短按 “录像” 键结束录像, 机器短振两下, 红色指示灯灭, 并回到摄像预览状态界面,状态指示灯亮绿色。...
- Page 14 录像分辨率 提示 系统当前日期 时间水印 • 录像前,请先设置所需的录像参数。 ID 号水印 • 请先删除一些不必要的文件再录。 ID 号 • 本机有感光元件,如果红外切换设置为自动切换,当环境光 录像状态 线暗到一定值时,红外灯自动打开。 当前录像时间 电量指示 系统当前时间 卡剩余容量 卡标志 注意 • 电池标记符显示空格时, 表明低电。 低电时系统会自动关机。 如果正在录像或者录音, 系统自动保存录音文件后再关机。 电量不足时, 请及时充电。 低电关机时机器会有震动提示, 显示屏也会有相应的提示,显示屏的提示图标如下所示:...
- Page 15 6 拍照 当您初次使用音视频记录仪拍照时, 请注意本节中的内容说明! 在摄像预览状态下,直接按拍照按键进行拍照,拍照时红色指 示灯亮,并发出“咔嚓”一声,在黑夜或者光线暗的环境下拍 摄需要开启机器红外灯或补光灯进行拍摄。在录像状态下,按 下拍照按键可以抓拍当时摄录照片。...
- Page 16 7 录音 录音界面说明 当您初次使用音视频记录仪录音时, 请注意本节中的内容说明! 在摄像预览状态按下“录音键”开始录音;工作状态指示灯 将亮黄灯; 请将内置麦克风对准音源。 00:00:01 按下“IR/ ”键,文件将会标记为重要文件,循环录像打 开时,此文件不会被删除。 3 长按“录像”键,音视频记录仪将转到录像模式进行录像。 录音状态 4 按下“录音”键结束录音,并回到预览界面。 当前录音时间 电量指示 录音参考界面如下如所示: 提示 • 录音前,请先设置所需的录音类型。 • 请先删除一些不必要的文件再录。 • 请先测试录音,以确保音视频记录仪设置是否正确。 • VTR8110 在录音或者录像过程中禁止直接将卡拔出,否则可 00:00:01 能导致文件损坏。 • 录音或者录像时请勿断电, 否则这会导致音视频记录仪故障, 文件丢失或文件损坏等问题。 • 如果需要长时间使用,请在录音前充电。...
-
Page 17: 一键回放模式
8 一键回放模式 在摄像预览状态下,录像保存后,短按停止键,音视频记录仪 将直接播放你刚刚摄录的录像文件。录音保存后短按停止键, 音视频记录仪将直接播放你刚刚录的录音文件。机器刚刚开机 启动,一键回放功能默认为播放最近摄录的录像文件。... -
Page 18: 视频模式
9 视频模式 录像文件播放界面说明: 在摄像预览状态界面中,我们可以使用播放键进入查阅回放界 面,按“ ”或“ ”键,选择视频回放选项,然后短按播放 键确认进入视频文件列表界面,视频文件列表参考界面如下图 所示: 播放状态 当前时间 录制时间 ID 号水印 进度条 文件总时间 在按“ ”或“ ”键选择需要播放的视频文件,短按播放键 ID 号 进入视频播放停止界面,视频播放停止参考界面如下图所示:... -
Page 19: 视频播放
9.1 视频播放 (1) 按“ ”或“ ”键,选择要播放的文件。 (2) 按“播放”键开始播放,工作状态指示灯将亮绿灯。 (3) 按菜单键,显示屏上将会出现音量图标和音量值,使用“ ” 或 “ ” 键调节音量, 如果 8s 钟无调节音量操作或者按 “停 止键”则退出音量调节。 (4) 按“停止”键结束播放,并返回视频文件列表界面。 (5) 播放过程中,按播放键暂停播放,再次按下播放键,将继 续先前位置的播放。 (6) 播放时短按 “ ” 或 “ ” 键, 可选择 2 倍, 4 倍, 8 倍, 16 倍, 32 倍,64 倍快退或快进当前正在播放的文件。... -
Page 20: 照片模式
10 照片模式 在摄像预览状态界面中,我们可以使用播放键进入查阅回放界 面,按“ ”或“ ”键,选择拍照回放选项,然后短按播放 键确认进入。然后,短按播放键进入拍照文件列表界面,拍照 文件列表参考界面如下图所示: 按“ ”或“ ”键选择需要播放的照片文件,短按播放键进 入照片浏览状态,按“ ”或“ ”键选择要查看的照片。 照片回放界面下,按“IR/ ”键即可将当前选中文件标记为 重要文件,循环录像打开时,此文件不会被覆盖。只有通过连 接电脑才可以删除该文件。... -
Page 21: 语音模式
11 语音模式 语音文件播放界面说明: 在摄像预览状态下,你可以使用播放键进入查阅回放界面,按 “ ”或“ ”键,选择录音回放选项,然后短按播放键确认 进入语音文件列表界面,语音文件列表参考界面如下图所示: 播放状态 当前时间 时间文件名 播放进度条 按“ ”或“ ”键选择需要播放的音频文件,短按播放键进 总时间 入语音播放停止界面,语音播放停止参考界面如下图所示: 11.1 语音播放 (1) 按“ ”或“ ”键,选择要播放的文件。 (2) 按“播放”键开始播放,工作状态指示灯将亮绿灯 (3) 按菜单键,显示屏上将会出现音量图标和音量值,使用“ ” 或 “ ” 键调节音量, 如果 8s 钟无调节音量操作或者按 “停止键” 则退出音量调节。 (4) 按“停止”键结束播放。并返回语音文件列表界面。... - Page 22 (5) 播放过程中,按播放键暂停播放,再次按下播放键,将继 续先前位置的播放。 (6) 按“IR/ ”键即可将当前选中文件标记为重要文件,循 环录像打开时,此文件不会被覆盖。只有通过连接电脑才可以 删除该文件。 提示 • 当耳机插入插孔内,录音笔扬声器被关闭。...
-
Page 23: 遥控器(选配件
12 遥控器(选配件) 行,只有机器上的白色遥控指示灯慢闪时,遥控功能才处 于开启状态。 对码成功且遥控功能打开下,按下遥控器上的按键后,如 • 遥控器可以方便远距离操控机器,本机配备的遥控器有遥控开 果遥控器上的红色指示灯亮起,说明遥控操作起作用。拍 关机,录音,录像,拍照等功能。 照时遥控器上的红色指示灯闪烁一次;录音和录像启动时, 遥控器上的红色指示灯闪烁两次;录音和录像保存时,遥 控器上的红色指示灯闪烁三次。 12.1 遥控功能开关 • 遥控距离要求:在 10 米内无阻碍水平任意角度均能遥控。 (1) 机器关机状态下,如果白色遥控指示灯熄灭,此时机器不 能使用遥控功能,此状态下按菜单键 3 秒,白色遥控器指示灯 亮起,随后进入慢闪状态 , 便打开遥控功能。 12.2 遥控器对码匹配 (2) 机器关机状态下,如果白色遥控指示灯常亮慢闪 , 此时遥控 功能为开启状态, 可以按遥控器上的开机键实现远程遥控开机。 在机器关机并且遥控功能关闭状态下,长按菜单键 8 秒使主机 此状态下按菜单键 3 秒,白色遥控指示灯熄灭,关闭遥控功能。 白色遥控指示灯进入快闪状态,在... -
Page 24: 连接 Hdmi 高清输出
13 连接 HDMI 高清输出 在预览状态下,使用 Micro HDMI 转 HDMI 线,将本机连接到高 清显示设备上,在连接显示设备后,本机的所有操作功能仍然 可以操作。 提示 • 在连接 HDMI 时,显示设备的画面会与显示屏的画面有一些 不一致的现象。... -
Page 25: 拓展功能
14 拓展功能 14.2 对讲机送话器(选配件) 集成送话器功能,通过专用连接线与对讲机连接,作为“肩咪” 音视频记录仪底部有触点式接口,可以外接 GPS 模块以及外接 使用,带来清晰响亮的语音质量,确保用户在嘈杂的环境中保 对讲机,移出模块时要旋出接口两边的定位螺丝。拓展多功能 持畅通的对讲。与成像系统并行独立工作,互不影响。即使音 底座可以同时为主机及备用电池充电,也可连接到电脑进行数 视频记录仪电量耗尽,也不影响送话器工作。 据传输,解决备用电池充电问题。这三个都是选配件。 提示 14.1 GPS(选配件) • 连接数字对讲机时需先连接音视频记录仪,再连接数字对 可以扩展全球定位 GPS, 北斗芯片模块,将经纬度显示在显示屏 讲机。 不同的对讲机请选用正确的对讲机连接线。 上,通过地图回放音视频记录仪的轨迹。使用时需先在菜单中 • 将 GPS 功能打开。 14.3 多功能底座(选配件) 提示 使用 USB 线将多功能底座和出厂配备的充电器连接,将机器或 • 为保证设备的兼容性,请使用专用的 GPS 模块设备。 者标配电池按照正确的顺序插入,即可对机器或者电池进行充 •... -
Page 26: 设置模式
15 设置模式 立体声:WAV 格式,高音质,比特率为 1536kbps。 长时间:WAV 格式,一般音质,比特率为 385kbps。 录音设置菜单栏包括:录音类型,麦克灵敏度和自动降噪。选 15.1.2 麦克灵敏度 择录像设置菜单,按“ ”或“ ”键选择所需设置的选项,然 在麦克灵敏度菜单中有三种增益可供选择:“高 , 中,低”。 后按“回放”键确认进入。 选择不同的麦克灵敏度可以达到不同的录音效果。 15.1 录音设置 录音设置菜单栏包括:录音类型,麦克灵敏度和自动降噪。选 择录像设置菜单,按“ ”或“ ”键选择所需设置的选项,然 后按“回放”键确认进入。 15.1.1 录音类型 在录音类型菜单中有两种录音类型可供选择:“立体声、长时 15.1.3 自动降噪 间” 。 如果选择的是立体声录音类型, 则在录音达到一个小时后, 音视频记录仪携带智能编码解码器,双咪头自动降噪,可以在 机器自动保存录音文件,然后进行下一个录音。参考界面如下 自动降噪菜单中对其进行打开或关闭。 图所示: 打开自动降噪后,录音或者录像过程中,如果没有按下“IR/ ”键,保存后的音视频文件的文件名中将包含“RNC”字母,标... -
Page 27: 录像设置
15.2.2 视频质量 15.2 录像设置 在视频质量菜单中有三种画质可供选择:“超精细 , 良好,正 录像设置菜单栏包括:分辨率, 视频质量, 视频预录, 视频延录。 常”。根据不同的需求选择不同的画质效果,画质越好,相同 选择录像设置菜单图标,按“ ”或“ ”键选择所需设置 录像时间所占的内存越大。 的选项,然后按“回放”键进入。 15.2.3 视频预录 15.2.1 分辨率 使用视频预录功能,你可以提前录制事件触发前十几秒到几十 录 像 分 辨 率 有 1920×1080 30P、1280×720 60P、1280×720 秒的画面,视频预录有关闭和打开两种选择,按“ ”或“ ” 30P、848×480 60P、848×480 30P 五个级别,多种录像分辨 键进行选择,选择完成后按“回放”键确定,按返回键可返回 率选择,可满足大部分应用场合,按“ ”或“ ”选择按键选 上一级菜单。... -
Page 28: 拍照设置
图片大小 15.3 拍照设置 拍照设置菜单栏包括:照片大小,照片质量,连拍,自动拍照。 选择拍照设置菜单图标,按“ ”或“ ”键选择所需设置的选 项,然后按回放键进入。 15.3.1 照片大小 拍照照片的大小有 34M、23M、20M、18M、16M、14M、12M、8M、 15.3.2 照片质量 5M、3M 这个 10 个级别,按“ ”或“ ”选择按键选择合 在拍照设置菜单中,选择“照片质量”菜单,再按“回放”键 适的分辨率,选择完成后按回放键确定,按返回键可返回上一 进入照片质量菜单。 在视频质量菜单中有三种画质可供选择 : “超 级菜单。参考界面如下图所示: 精细 , 良好,正常”。根据不同的需求选择不同的画质效果, 画质越好,相同录像时间所占的内存越大。 图片大小 图片大小 15.3.3 连拍 连拍是指在取景预览模式下或在录像过程中,按一次拍照键机 器能够连续拍摄照片。 在拍照设置菜单中,选择“连拍”菜单,再回放单键进入连拍 菜单。连拍设置可以设置关闭、3 张、5 张、10 张、20 张五个 选择,... -
Page 29: 系统设置
15.3.4 自拍 自动拍照是指在取景预览模式下或在录像过程中,按一次拍照 键机器每隔一定的时间拍摄一张照片,直到按下拍照键取消或 者卡满和没电为止。 自动拍照可以设置关闭、 3 秒、 5 秒、 10 秒、 30 秒、 60 秒六个选择, 按 “ ” 或 “ ” 键选择合适的秒数, 选择完成后按回放键确定, 按返回键可返回上一级菜单。 15.4.2 系统制式 系统制式也称电视广播制式,有 NTSC 和 PAL 两大制式,机器做 15.4 系统设置 为电视输出时要根据电视机的制式选择正确的选项。 系统设置菜单栏包括:语言,系统制式,默认设置,屏亮度, 15.4.3 默认设置 系统时间,自动关机,自动关屏,音量,车载模式,循环录像, 车载录音,分段录像,按键音,指示灯,红外切换,移动侦测, 使用此功能,你可以重置机器的设置选项。... - Page 30 15.4.5 VTR8110 系统时间 系统时间设置界面,参考图片如下: 15.4.7 自动关屏 自动关屏时间有五种时长可供选择:关闭、1 分钟、2 分钟、3 在此界面下, 按 “ ” 或 “ ” 与 “ ” 可以设置实时时间。 按 “ 分钟和 5 分钟。如果在设定的时间内没对机器做任何操作,显 ”选择年﹑月﹑日;按“ ”或“ ”改变相应位置数值。 示屏将会自动灭。如果选择“关闭”,显示屏将会常亮。 15.4.6 自动关机 15.4.8 音量 如果在设定的时间内没对机器做任何操作, 系统将会自动关机。 使用此功能,你可以设置机器的输出音量。 自动关机设置参考界面如下: 音量设置可以从 0~16 之间 17 个数值选择,按“...
- Page 31 15.4.9 车载模式 15.4.11 车载录音 本机可以当行车记录仪使用,车载模式默认为“关闭”,“循 使用此功能,你可以选择是否需要录下车内的声音。 环录像”和“车载录音”这两个选项为灰色,不能选择。车载 模式选择“打开”后,“循环录像”和“车载录音”这两个菜 15.4.12 分段录像 单选项变成可选,并且“自动关屏”默认为关。 视频分段有 5 分钟、 10 分钟、 15 分钟、 20 分钟、 30 分钟五个级别, 在录像过程中,视频分段在每所设定的时间自动将视频文件分 15.4.10 循环录像 段保存并自动进入下一个文件录像,并且是无缝切换。视频分 在录像设置菜单中,选择“循环录像”菜单,再按回放键进入 段功能参考界面如下图所示: 循环录像菜单。有关闭和打开两种选择,按“ ”或“ ”键进 行选择,选择完成后按回放键确定,按返回键返回上一级菜单。 在录像设置菜单中,选择“循环录像”菜单,再按回放键进入 循环录像菜单。有关闭和打开两种选择,按“ ”或“ ”键进 行选择,选择完成后按回放键确定,按返回键返回上一级菜单。 15.4.13 按键音 使用此功能,你可以根据需要打开或者关闭按键操作提示音。...
- Page 32 曝光补偿设置可以从 -2.0~+2.0 之间 13 个数值选择,按“ ” 在系统设置菜单中,按 或 键选择“红外”菜单,再按回 或“ ”键选择合适的曝光值,选择完成后按“回放”键确定。 放键进入红外切换菜单。 红外切换可以设置手动、 自动两种选择, 选择完成后按回放键确定,按返回键可返回上一级菜单。 15.4.18 GPS 音视频记录仪有内置 GPS,接收卫星信号提供全球定位信息, 15.4.16 移动侦测 需要把 GPS 功能打开才能使用。如果您已不需要使用 GPS,请 音视频记录仪在侦测状态下,有物体进入音视频记录仪拍摄范 在菜单中将 GPS 功能关闭。 围内后自动开启录像功能,物体离开音视频记录仪拍摄范围后 结束录像功能并保存录像文件。自移动侦测功能有四种设置可 供选择:关闭、低、中和高。你可以根据需要将移动侦测功能 15.4.19 VTR8110 ID 号 关闭或者选择一个合适的灵敏度。打开移动侦测功能后,按一 ID 号设置界面,参考图片如下: 下“录像”键即可启动侦测。...
- Page 33 在此界面下,按“ ”或“ ”与“ ”可以设置机器的设备 编号和用户编号。按“ ”和“ ”选择相应的数字位置;按“ ”改变相应位置数值。 15.4.20 系统信息 系统信息菜单中包括:总存储容量,可用空间,可用录像时间, 可用录音时间,电池电量和版本号。 总存储容量:使用此功能,你可以查看本机内存大小信息。 可用空间:使用此功能,你可以查看剩余空间信息。 可用录像时间:使用此功能,你可以查看当前录像分辨率可以 录像多久。 可用录音时间:使用此功能,你可以查看当前录音类型可以录 音多久。 电池电量:使用此功能,你可以查看当前电池电量信息。 版本号:使用此功能,你可以查看固件版本信息。...
-
Page 34: 电池的装取
16 电池的装取 17 背夹的装取 16.1 装入电池 17.1 安装背夹 (1) 用手按住电池门, 同时用手指抠开电池扣, 然后打开电池盖。 背夹与机器的滑槽①对应好,按②的方向装入背夹。 (2) 将电池按照正确的方向推进电池盒。如下图所示: 如下图所示: (3) 关上电池门,将电池门口按压归位。 16.2 取出电池 (1) 用手按住电池门, 同时用手指抠开电池扣, 然后打开电池盖。 17.2 取下背夹 (2) 翻出电池尾部的拉带,然后夹紧拉带往外拉。 (3) 关上电池门,将电池门口按压归位。 取出背夹时将扣位往上提,然后按相反的方向并加向上的力拉 出。 注意 • 如果电池更换不当会有爆炸危险 只能使用同样类型或等效类 型的电池来更换。... -
Page 35: 背夹佩戴方式
18 背夹的佩戴方式 (1) 压住手夹位使夹子口张开,然后朝着肩章夹入,使夹钩勾 住肩章纽扣的根部。 (2) 松开手夹位, 使夹子夹住肩章, 并将机器调整至合适的位置。... -
Page 36: 胸针的装取
19 胸针的佩戴方式 注意 • 佩戴胸针需要穿执法外套。 19.1 佩戴胸针 将胸针扣到合适的位置,此时机器的磁铁槽刚好对准胸针的铁 块。如下图所示: 19.2 取下胸针 将胸针的铁块剥离机器的磁铁凹槽,然后取下胸针。... -
Page 37: 常见问题
20 常见问题 音视频记录仪无法播放录音或者录像: 电池电量已耗尽,请充电。 此处列举了常见问题的解答,可帮助解决音视频记录仪出现的 简单问题。如果故障仍无法排除,请咨询经销商或访问我们的 音视频记录仪死机后如何处理: 官方网站 : 你有时在操作中会遇到开不了机,黑屏,操作不了等死机现像, www.philips.com/support 通常处理方法是,复位一下,复位键位置:打开电池仓,在触 点一侧等上部有一个小孔,用聂子或尖的东西点按一下小孔即 无法启动音视频记录仪: 可。 电池电量已耗尽请及时充电。 注:本操作不会造成文件数据丢失或者损坏。 显示时间 / 日期不正确: 音视频记录仪时间不准确,请在菜单上重新设置时间。 拍照 / 录像图像模糊,不清楚: 镜头不干净。请用干净的绒布清洁镜头。 音视频记录仪无法录音或者录像: 音视频记录仪存储空间已满并且未开启循环录像。请删除部分 文件或将其移至外部存储设备。... -
Page 38: 技术参数
21 技术参数 运行条件 温度:-30° –55° C 存储器 空气湿度:10% – 90%, 不凝结 外置存储空间 参考录音时间(32GB):立体声录音模式约 44 小时,长时间录 音模式约 160 小时。 内置存储器类型:C10 TF 卡 移动存储器 (PC):是 尺寸和重量 宽 × 高 × 深:59×28×79 (mm) 重量 (含电池): 170g 系统要求 操作系统:Windows 7/Vista/XP/2000, Mac OS X, Linux 接口:USB 接口... - Page 39 Table of Contents 8 One-touch Playback Mode 9 Video Mode 9.1 Video Playback 1 Welcome 1.1Product highlights 10 Camera Mode 2 Important 11 Voice Mode 2.1 Safety 11.1 Voice Playback 2.2 Hearing safety 12 Remote Control(Optional) 2.3 Legal restrictions on recording 12.1 Remote Control Enable/Disable 3 Your Video &...
- Page 40 16 Changing the battery 17 How to use the back clip of the device 17.1 Back clip installment 17.2 Back clip uninstallment 18 How to wear the back clip 19 How to use the brooch of the device 19.1 Brooch installment 19.2 Brooch uninstallment 20 FAQs 21 Technical Parameters...
-
Page 41: Welcome
Congratulations on your purchase and welcome to Philips! Character superimposing for improved legal evidence by • To fully benefit from the support that Philips offers, visit adding time, product number and user code to all videos our website for support information such as user manuals, and images, which cannot be edited. - Page 42 through satellite signals. Link to walkie-talkie to use as a shoulder microphone. • Multi-function base, charging more flexible and convenient. •...
-
Page 43: Important
2 Important Adjust to a desired volume; do not use headphones for a • long period of time. Please remember not to turn the volume up beyond your • tolerance. 2.1 Safety Do not turn up the volume so high that you can’t hear •... -
Page 44: Your Video & Audio Recorder
3 Your digital recorder 3.2 Overview: 3.1 VTR8110, What’s in the box? -
Page 45: Remote Control (Optional) Overview
Microphone Power/LCD off Camera Locating hole for Multifunctional interface Lamp Multifunctional interface Working status indicator Battery cover Light sensor Infrared lamp Remote control indicator 3.3 Remote control (Optional) overview: Laser light Microphone for walkie-tallkie function Speaker Display Menu option/file choosing/increasing volume Stop/Return/lighting Menu/ Menu option Menu option/file choosing/decreasing volume... -
Page 46: Get Started
“PHILIPS” logo. See the picture below: If the device doesn’t work normally, please make sure the • device is not out of power. VTR8110,When the device is working, do not unplug the • external card directly, or it may damage files or cause a malfunction. -
Page 47: Pc Connection
The Video Tracer or case recharger. can be linked to a computer with a USB cable. VTR8110, The device can be connected to a PC using the USB The Video Tracer can automatically be recognized as a mass cable. -
Page 48: Recording
5 Video Recording (9)Press the “Video Record” button again to end the recording. The device will vibrate twice briefly, the red lightgoes out, and the device returns to the preview interface. The state indicator turns green. Please note the instructions in this section when you make the first video recording with your Video Tracer! Recording Interface Reference: (1)On the Preview interface, press the “Video Record”... - Page 49 Resolution Current recording time Note Current system date Battery Time watermark Current system time Prior to video recording please set the desired recording • ID Number watermark Remain video parameters. ID Number TF card Please delete any unnecessary files before recording. •...
-
Page 50: Camera
6 Camera Please note the instructions in this section when you take the first photo with your Video Tracer! On the preview interface, press the Camera button to take a photo. While taking a photo, a red light appears with a “click” sound. -
Page 51: Voice Recording
7 Voice Recording Note Prior to recording, please preset the type of recording • you need. Please note the instructions in this section when you make Please delete any unnecessary files before recording. • the first voice recording with your Video Tracer! Make a test recording to make sure that the Video Tracer •... -
Page 52: One-Touch Playback Mode
8 One-touch Playback Mode On the Preview interface, press the Stop button quickly after the video recording file is saved, the Video Tracer will directly play the file. Press the Stop button quickly after the voice recording file is saved, the Video Tracer will directly play the file. -
Page 53: Video Mode
9 Video Mode Illustration of Video Playback Interface: On the preview interface, you can enter the playback review interface through the Play button; press the “ ” or “ ” button to select Video Playback, and then press the Play button quickly to enter the video file list interface. - Page 54 4 Press the “Stop” button to stop playing a video and return to the video file list interface. 5 When playing, press to pause, press again to continue playing. 6 When playing, press “ ” or “ ” to choose 2x, 4x, 8x, 16x, 32x, 64x to fast forward or backward.
-
Page 55: Camera Mode
10 Camera Mode On the preview interface, you can enter the playback review interface through the Play button; press the “ ” or “ ” button to select Photo Playback, and then press the Play button quickly to enter the photo file list interface. The photo file list interface is shown in the following figure: Press the “... -
Page 56: Voice Mode
11 Voice Mode Illustration of Voice Playback Interface: On the Preview interface, you can enter the playback review interface through the Play button; press the “ ” or “ ” button to select Voice Playback, and then press the Play button quickly to enter the voice file list interface. -
Page 57: Voice Playback
11.1 Voice Playback 1 Press the “ ” or “ ”button to select a file for play back. 2 Press the “Play” button to start playing, and the status indicator turns green. 3 Press the Menu button ,than the volume icon and the volume value will display on the lcd display, press the “... -
Page 58: Remote Control(Optional)
12 Remote Control(Optional) Note before using for the first time! If the red indicator is flickering all the time when the • Remote control allows the user to control the device remote control is working after the code is matched, remotely. -
Page 59: Hdmi
13 HDMI On the preview interface of recording, connect the device to a HD display devices with a Micro HDMI switch HDMI cable (cthis cable is available as an accesories), all the operations are still available. Note When connecting HDMI, there are some inconsistencies •... -
Page 60: Expanded Function
14 Expanded function Note To guarantee the compatibility of the device, please use • 14.1 GPS(Optional) dedicated GPS module. The device can be provided with GPS and a Beidou chip. 14.3 Multi-function foundation(Optional) The map playback body worn camera trace can display the latitude and longitude on the LCD. -
Page 61: Settings Mode
15 Settings Mode Record type On the preview interface, press the Menu button to enter the Settings interface. See the Settings interface reference. It is comprised of Voice Settings, Video Settings, Camera Settings and System Settings.Press the menu key to switch HQ: WAV format, high quality, bit rate 1536kbps. -
Page 62: Video Settings
Noise cut has two options: Off and On. Press the “ ” or “ ” button to select. After turning on automatic noise reduction, if you do not press the “IR/ ” key while recording or recording, the saved file name of the video and audio file will contain "RNC" letter, marking this file as noise reduction file. -
Page 63: Camera Settings
a set time after pressing the button to save the recorded Photo size Photo size video. Delay Record has six options: Off, 5 Sec, 10 Sec, 15 Sec, 30 Sec and 60 Sec. Press the “ ” or “ ” button to select. After selection, press the Play button to confirm, or press the Back button to return to the previous menu. -
Page 64: System Settings
15.4 System Settings 15.3.3 Photo Rate The System Settings menu comprises Language, TV Mode, Photo Rate means that the device can take photos Default Settings, LCD Brightness, System Time, Auto Off, continuously by pressing the Camera button once in the LCD Auto Off, Volume, In-car Model, Video Loop, In-car preview mode or in the course of video recording. - Page 65 Back button to return to the previous auto off setting interface reference below: menu. Auto off Auto off 15.4.5 VTR8110, System Time 5 Min The System Time interface is illustrated below: 1 Min 2 Min 3 Min...
- Page 66 15.4.7 LCD Auto Off 15.4.10 Video loop On the video recording setting menu, choose “Video loop” LCD Auto Off has 5 options: OFF, 1 Min, 2 Min, 3 Min and 5 and press Play button to confirm. Press “ ” or “ ” to choose Min.
- Page 67 15.4.15 Infrared Switch 15.4.12 Duration On the System Settings menu, press the button to Video recording has five time periods: 5 Min, 10 Min, 15 Min, select the “Infrared” menu, and then press the Play button to 20 Min and 30 Min. In the course of video recording, this enter the Infrared Switch menu.
- Page 68 Total Space: This allows the user to check the amount of memory space in the device. Available Space: This allows the user to check the remaining 15.4.19 VTR8110 ID Number space available. Remain Video: This allows the user to check how long the The PID setting interface is illustrated below: device can record for the current video resolution.
-
Page 69: Changing The Battery
16 Changing the battery 16.2 Battery unloading 1 Hold the battery door by hand, open the battery button 16.1 Battery loading with your finger, and then open the battery cover.2 Take out the battery. 3 Close the battery door, press the battery door home. 1 Hold the battery door by hand, open the battery button with your finger, and then open the battery cover. -
Page 70: How To Use The Back Clip Of The Device
17 How to use the back clip 18 How to wear the back clip 17.1 Back clip installment (1) Open the clip by pressing the finger position, then nip the epeulet and make the clip hook hookup the bottom of the Match the back clip with the slot 1 on the device, and install epaulet. -
Page 71: How To Use The Brooch Of The Device
19 How to use the brooch of the device 19.1 Brooch installment Buckle the brooch to the right position in loose coat, than match the iron on the brooch with the magnet slot of the audio and video recorder, as shown in below picture Note Police has to wear the Law enforcement coat when •... -
Page 72: Faqs
My Video Tracer does not play recordings: www.philips.com/support The battery is out of power, please recharge. My Video Tracer cannot power on: My Video Tracer crashes: The battery is out of power, please recharge promptly. -
Page 73: Technical Parameters
21 Technical Parameters Voice Record HQ REC: bit rate 1536kbps, WAV format Storage SLP REC: bit rate 385kbps, WAV format Internal Storage Estimated Recording Time (32GB): around 44 hours with HQ Operating Conditions recording mode, around 180 hours with SLP Recording mode Type of Internal Storage: C10 TF card Temperature: -30–55°C Humidity: 10–90%, no condensation... - Page 75 VTR8110...
- Page 76 Register your product and get support at © 2021 Speech Processing Solutions GmbH. www.philips.com/welcome 版权所有文档版本 1.2, 2021/01/29...
Need help?
Do you have a question about the VTR8110 and is the answer not in the manual?
Questions and answers