
Related Manuals for JVC KD-G115


Summary of Contents for JVC KD-G115
- Page 1 CD RECEIVER For canceling the display demonstration, see page 7. For installation and connections, refer to the separate manual. INSTRUCTIONS KD-G116/KD-G115 KD-G116/KD-G115 GET0252-001A [U/UH]...
-
Page 2: How To Reset Your Unit
• If a disc is loaded, it will eject. Be careful not to drop the disc. Thank you for purchasing a JVC product. If a disc cannot be recognized by the receiver or cannot be ejected, ejects the disc as follows. -
Page 3: Table Of Contents
How to forcibly eject a disc... How to read this manual... How to use the MODE button ... Control panel — ... 5 KD-G116/KD-G115 Parts identification... Getting started... 6 Basic operations ... Canceling the display demonstrations ... Setting the clock ... -
Page 4: How To Read This Manual
How to read this manual The following methods are used to made the explanations simple and easy-to-understand: • Some related tips and notes are explained in “More about this receiver” (see page 17). • Button operations are mainly explained with the illustrations as follows: Press briefly. -
Page 5: Control Panel
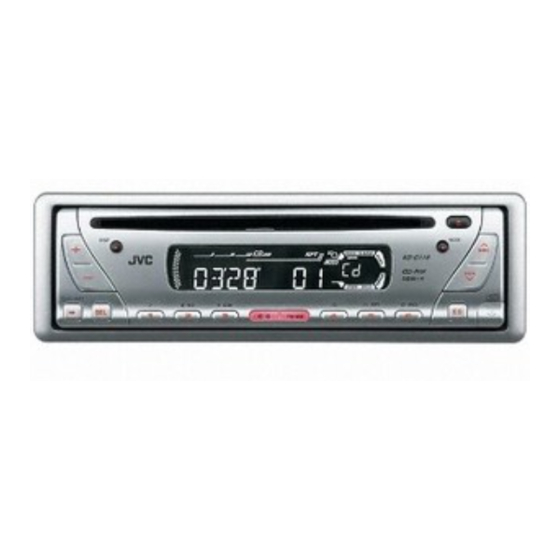
FM/AM button r RPT (repeat) button t RND (random) button y EQ (equalizer) button (control panel release) button i Number buttons KD-G116/KD-G115 Parts identification Display window o Tuner reception indicators MO (monaural), ST (stereo) ; CD indicator a RND... -
Page 6: Getting Started
Getting started Ÿ You cannot select “CD” as the playback source if there is no disc in the loading slot. Volume level appears. ⁄ Adjust the sound as you want. (See pages 12 and 13.) Basic operations To drop the volume in a moment (ATT) To turn off the power Discs produce very little noise compared with other sources. -
Page 7: Canceling The Display Demonstrations
Canceling the display demonstrations If no operations are done for about 20 seconds, display demonstration starts. [Initial: DEMO ON]—see page 14. Finish the procedure. To activate the display demonstration In step 3 above... Setting the clock Set the hour and minute. 1 Select “CLOCK H”... -
Page 8: Radio Operations
Radio operations Lights up when receiving an FM stereo broadcast with sufficient signal strength. Selected band appears. Ÿ Start searching for a station. When a station is received, searching stops. To stop searching, press the same button again. To tune in to a station manually In step Ÿ... -
Page 9: Storing Stations In Memory
Storing stations in memory You can preset six stations for each band. FM station automatic presetting — SSM (Strong-station Sequential Memory) Select the FM band (FM1 – FM3) you want to store into. “SSM” flashes, then disappears when automatic presetting is over. Local FM stations with the strongest signals are searched and stored automatically in the FM band. -
Page 10: Disc Operations
Disc operations All tracks will be played repeatedly until you stop playback. Total playing time of the inserted disc Elapsed playing Current track time number To stop play and eject the disc Playing a disc To fast-forward or reverse the track To go to the next or previous tracks Total track number of the inserted disc... -
Page 11: Selecting The Playback Modes
Prohibiting disc ejection You can lock a disc in the loading slot. To cancel the prohibition, repeat the same procedure. Selecting the playback modes You can use only one of the following playback modes at a time. Select your desired playback mode. Repeat play Ex.: When “TRK RPT”... -
Page 12: Sound Adjustments
Sound adjustments Selecting preset sound modes You can select a preset sound mode suitable to the music genre. Ex.: When “ROCK” is selected Indication pattern for each sound mode: (C-EQ: custom equalizer) Indication For: BAS * USER (Flat sound) ROCK Rock or disco music CLASSIC Classical... -
Page 13: Adjusting The Sound
Adjusting the sound You can adjust the sound characteristics to your preference. Ex.: When “TRE” is selected Indication pattern changes as you adjust the level. Indication To do: BAS* Adjust the bass. (bass) TRE* Adjust the treble. (treble) FAD* Adjust the front (fader) and rear speaker balance. -
Page 14: General Settings - Psm
General settings — PSM Basic procedure You can change PSM (Preferred Setting Mode) items listed in the table that follows. Select a PSM item. Ex.: When you select “AMP GAIN” Indications DEMO Display demonstration CLOCK H Hour adjustment CLOCK M Minute adjustment AMP GAIN Amplifier gain control... -
Page 15: Detaching The Control Panel
Detaching the control panel Attaching the control panel When detaching or attaching the control panel, be careful not to damage the connectors on the back of the control panel and on the panel holder. Detaching the control panel Before detaching the control panel, be sure to turn off the power. -
Page 16: Maintenance
• After starting the heater in the car. • If it becomes very humid inside the car. Should this occur, the CD player may malfunction. In this case, eject the disc and leave the receiver turned on for a few hours until the moisture evaporates. -
Page 17: More About This Receiver
More about this receiver Basic operations Turning off the power • If you turn off the power while listening to a disc, disc play will start from where playback has been stopped previously, next time you turn on the power. Tuner operations Storing stations in memory •... -
Page 18: Troubleshooting
The antenna is not connected firmly. Disc is inserted upside down. CD-R/CD-RW is not finalized. Disc is locked. The CD player may have functioned incorrectly. You are driving on rough roads. Disc is scratched. Connections are incorrect. No disc is in the loading slot. -
Page 19: Specifications
[AM Tuner] Sensitivity: 20 µV Selectivity: 35 dB Having TROUBLE with operation? Refer to page of How to reset your unit CD PLAYER SECTION Type: Compact disc player Signal Detection System: Non-contact optical pickup (semiconductor laser) Number of channels: Frequency Response: 5 Hz to 20 000 Hz... - Page 20 EN, TH © 2004 Victor Company of Japan, Limited 1004DTSMDTJEIN...
- Page 21 INSTALLATION (IN-DASH MOUNTING) The following illustration shows a typical installation. If you have any questions or require information regarding installation kits, consult your JVC car audio dealer or a company supplying kits. • If you are not sure how to install this receiver correctly, have it installed by a qualified technician.
-
Page 22: Electrical Connections
• Be sure to ground this receiver to the car’s chassis again after installation. Notes: • Replace the fuse with one of the specified rating. If the fuse blows frequently, consult your JVC car audio dealer. • It is recommended to connect to the speakers with maximum power of more than 50 W (both at the rear and at the front, with an impedance of 4 Ω... - Page 23 ALAT PENERIMA CD For canceling the display demonstration, see page 7. Untuk membatalkan tampilan demonstrasi, lihat halaman 7. For installation and connections, refer to the separate manual. Untuk instalasi dan penyambungan, lihat buku pedoman terpisah. INSTRUCTIONS BUKU PETUNJUK KD-G116/KD-G115 KD-G116/KD-G115 GET0252-003A [UN]...
- Page 24 • If a disc is loaded, it will eject. Be careful not to drop the disc. Thank you for purchasing a JVC product. If a disc cannot be recognized by the receiver or cannot be ejected, ejects the disc as follows.
- Page 25 How to forcibly eject a disc... How to read this manual... How to use the MODE button ... Control panel — ... 5 KD-G116/KD-G115 Parts identification... Getting started... 6 Basic operations ... Canceling the display demonstrations ... Setting the clock ...
- Page 26 How to read this manual The following methods are used to made the explanations simple and easy-to-understand: • Some related tips and notes are explained in “More about this receiver” (see page 17). • Button operations are mainly explained with the illustrations as follows: Press briefly.
-
Page 27: User (Flat Sound)
FM/AM button r RPT (repeat) button t RND (random) button y EQ (equalizer) button (control panel release) button i Number buttons KD-G116/KD-G115 Parts identification Display window o Tuner reception indicators MO (monaural), ST (stereo) ; CD indicator a RND... -
Page 28: Getting Started
Getting started Ÿ You cannot select “CD” as the playback source if there is no disc in the loading slot. Volume level appears. ⁄ Adjust the sound as you want. (See pages 12 and 13.) Basic operations To drop the volume in a moment (ATT) To turn off the power Discs produce very little noise compared with other sources. -
Page 29: Canceling The Display Demonstrations
Canceling the display demonstrations If no operations are done for about 20 seconds, display demonstration starts. [Initial: DEMO ON]—see page 14. Finish the procedure. To activate the display demonstration In step 3 above... Setting the clock Set the hour and minute. 1 Select “CLOCK H”... -
Page 30: Radio Operations
Radio operations Lights up when receiving an FM stereo broadcast with sufficient signal strength. Selected band appears. Ÿ Start searching for a station. When a station is received, searching stops. To stop searching, press the same button again. To tune in to a station manually In step Ÿ... -
Page 31: Storing Stations In Memory
Storing stations in memory You can preset six stations for each band. FM station automatic presetting — SSM (Strong-station Sequential Memory) Select the FM band (FM1 – FM3) you want to store into. “SSM” flashes, then disappears when automatic presetting is over. Local FM stations with the strongest signals are searched and stored automatically in the FM band. -
Page 32: Disc Operations
Disc operations All tracks will be played repeatedly until you stop playback. Total playing time of the inserted disc Elapsed playing Current track time number To stop play and eject the disc Playing a disc To fast-forward or reverse the track To go to the next or previous tracks Total track number of the inserted disc... -
Page 33: Selecting The Playback Modes
Prohibiting disc ejection You can lock a disc in the loading slot. To cancel the prohibition, repeat the same procedure. Selecting the playback modes You can use only one of the following playback modes at a time. Select your desired playback mode. Repeat play Ex.: When “TRK RPT”... -
Page 34: Sound Adjustments
Sound adjustments Selecting preset sound modes You can select a preset sound mode suitable to the music genre. Ex.: When “ROCK” is selected Indication pattern for each sound mode: (C-EQ: custom equalizer) Indication For: BAS * USER (Flat sound) ROCK Rock or disco music CLASSIC Classical... -
Page 35: Tre * 2 Loud
Adjusting the sound You can adjust the sound characteristics to your preference. Ex.: When “TRE” is selected Indication pattern changes as you adjust the level. Indication To do: BAS* Adjust the bass. (bass) TRE* Adjust the treble. (treble) FAD* Adjust the front (fader) and rear speaker balance. -
Page 36: General Settings - Psm
General settings — PSM Basic procedure You can change PSM (Preferred Setting Mode) items listed in the table that follows. Select a PSM item. Ex.: When you select “AMP GAIN” Indications DEMO Display demonstration CLOCK H Hour adjustment CLOCK M Minute adjustment AMP GAIN Amplifier gain control... -
Page 37: Detaching The Control Panel
Detaching the control panel Attaching the control panel When detaching or attaching the control panel, be careful not to damage the connectors on the back of the control panel and on the panel holder. Detaching the control panel Before detaching the control panel, be sure to turn off the power. -
Page 38: Maintenance
• After starting the heater in the car. • If it becomes very humid inside the car. Should this occur, the CD player may malfunction. In this case, eject the disc and leave the receiver turned on for a few hours until the moisture evaporates. -
Page 39: More About This Receiver
More about this receiver Basic operations Turning off the power • If you turn off the power while listening to a disc, disc play will start from where playback has been stopped previously, next time you turn on the power. Tuner operations Storing stations in memory •... -
Page 40: Troubleshooting
The antenna is not connected firmly. Disc is inserted upside down. CD-R/CD-RW is not finalized. Disc is locked. The CD player may have functioned incorrectly. You are driving on rough roads. Disc is scratched. Connections are incorrect. No disc is in the loading slot. -
Page 41: Specifications
[AM Tuner] Sensitivity: 20 µV Selectivity: 35 dB Having TROUBLE with operation? Refer to page of How to reset your unit CD PLAYER SECTION Type: Compact disc player Signal Detection System: Non-contact optical pickup (semiconductor laser) Number of channels: Frequency Response: 5 Hz to 20 000 Hz... - Page 42 EN, IN © 2004 Victor Company of Japan, Limited 1004DTSMDTJEIN...
- Page 43 ENGLISH This receiver is designed to operate on 12 V DC, NEGATIVE ground electrical systems. If your vehicle does not have this system, a voltage inverter is required, which can be purchased at JVC car audio dealers. Parts list for installation and connection The following parts are provided for this receiver.
-
Page 44: Electrical Connections
• Be sure to ground this receiver to the car’s chassis again after installation. Notes: • Replace the fuse with one of the specifi ed rating. If the fuse blows frequently, consult your JVC car audio dealer. • It is recommended to connect to the speakers with maximum power of more than 50 W (both at the rear and at the front, with an impedance of 4 Ω... - Page 45 CD RECEIVER For canceling the display demonstration, see page 7. For installation and connections, refer to the separate manual. INSTRUCTIONS KD-G116/KD-G115 KD-G116/KD-G115 GET0252-007A [UT]...
- Page 46 • If a disc is loaded, it will eject. Be careful not to drop the disc. Thank you for purchasing a JVC product. If a disc cannot be recognized by the receiver or cannot be ejected, ejects the disc as follows.
- Page 47 How to forcibly eject a disc... How to read this manual... How to use the MODE button ... Control panel — ... 5 KD-G116/KD-G115 Parts identification... Getting started... 6 Basic operations ... Canceling the display demonstrations ... Setting the clock ...
-
Page 48: How To Read This Manual
How to read this manual The following methods are used to made the explanations simple and easy-to-understand: • Some related tips and notes are explained in “More about this receiver” (see page 17). • Button operations are mainly explained with the illustrations as follows: Press briefly. -
Page 49: Control Panel
FM/AM button r RPT (repeat) button t RND (random) button y EQ (equalizer) button (control panel release) button i Number buttons KD-G116/KD-G115 Parts identification Display window o Tuner reception indicators MO (monaural), ST (stereo) ; CD indicator a RND... -
Page 50: Getting Started
Getting started Ÿ You cannot select “CD” as the playback source if there is no disc in the loading slot. Volume level appears. ⁄ Adjust the sound as you want. (See pages 12 and 13.) Basic operations To drop the volume in a moment (ATT) To turn off the power Discs produce very little noise compared with other sources. -
Page 51: Canceling The Display Demonstrations
Canceling the display demonstrations If no operations are done for about 20 seconds, display demonstration starts. [Initial: DEMO ON]—see page 14. Finish the procedure. To activate the display demonstration In step 3 above... Setting the clock Set the hour and minute. 1 Select “CLOCK H”... -
Page 52: Radio Operations
Radio operations Lights up when receiving an FM stereo broadcast with sufficient signal strength. Selected band appears. Ÿ Start searching for a station. When a station is received, searching stops. To stop searching, press the same button again. To tune in to a station manually In step Ÿ... -
Page 53: Storing Stations In Memory
Storing stations in memory You can preset six stations for each band. FM station automatic presetting — SSM (Strong-station Sequential Memory) Select the FM band (FM1 – FM3) you want to store into. “SSM” flashes, then disappears when automatic presetting is over. Local FM stations with the strongest signals are searched and stored automatically in the FM band. -
Page 54: Disc Operations
Disc operations All tracks will be played repeatedly until you stop playback. Total playing time of the inserted disc Elapsed playing Current track time number To stop play and eject the disc Playing a disc To fast-forward or reverse the track To go to the next or previous tracks Total track number of the inserted disc... -
Page 55: Selecting The Playback Modes
Prohibiting disc ejection You can lock a disc in the loading slot. To cancel the prohibition, repeat the same procedure. Selecting the playback modes You can use only one of the following playback modes at a time. Select your desired playback mode. Repeat play Ex.: When “TRK RPT”... -
Page 56: Off On
Sound adjustments Selecting preset sound modes You can select a preset sound mode suitable to the music genre. Ex.: When “ROCK” is selected Indication pattern for each sound mode: (C-EQ: custom equalizer) Indication For: BAS * USER (Flat sound) ROCK Rock or disco music CLASSIC Classical... -
Page 57: Adjusting The Sound
Adjusting the sound You can adjust the sound characteristics to your preference. Ex.: When “TRE” is selected Indication pattern changes as you adjust the level. Indication To do: BAS* Adjust the bass. (bass) TRE* Adjust the treble. (treble) FAD* Adjust the front (fader) and rear speaker balance. -
Page 58: General Settings - Psm
General settings — PSM Basic procedure You can change PSM (Preferred Setting Mode) items listed in the table that follows. Select a PSM item. Ex.: When you select “AMP GAIN” Indications DEMO Display demonstration CLOCK H Hour adjustment CLOCK M Minute adjustment AMP GAIN Amplifier gain control... -
Page 59: Detaching The Control Panel
Detaching the control panel Attaching the control panel When detaching or attaching the control panel, be careful not to damage the connectors on the back of the control panel and on the panel holder. Detaching the control panel Before detaching the control panel, be sure to turn off the power. -
Page 60: Maintenance
• After starting the heater in the car. • If it becomes very humid inside the car. Should this occur, the CD player may malfunction. In this case, eject the disc and leave the receiver turned on for a few hours until the moisture evaporates. -
Page 61: More About This Receiver
More about this receiver Basic operations Turning off the power • If you turn off the power while listening to a disc, disc play will start from where playback has been stopped previously, next time you turn on the power. Tuner operations Storing stations in memory •... -
Page 62: Troubleshooting
The antenna is not connected firmly. Disc is inserted upside down. CD-R/CD-RW is not finalized. Disc is locked. The CD player may have functioned incorrectly. You are driving on rough roads. Disc is scratched. Connections are incorrect. No disc is in the loading slot. -
Page 63: Specifications
[AM Tuner] Sensitivity: 20 µV Selectivity: 35 dB Having TROUBLE with operation? Refer to page of How to reset your unit CD PLAYER SECTION Type: Compact disc player Signal Detection System: Non-contact optical pickup (semiconductor laser) Number of channels: Frequency Response: 5 Hz to 20 000 Hz... - Page 64 EN, CT © 2004 Victor Company of Japan, Limited 1004DTSMDTJEIN...
- Page 65 INSTALLATION (IN-DASH MOUNTING) The following illustration shows a typical installation. If you have any questions or require information regarding installation kits, consult your JVC car audio dealer or a company supplying kits. • If you are not sure how to install this receiver correctly, have it installed by a qualified technician.
- Page 66 • Be sure to ground this receiver to the car’s chassis again after installation. Notes: • Replace the fuse with one of the specified rating. If the fuse blows frequently, consult your JVC car audio dealer. • It is recommended to connect to the speakers with maximum power of more than 50 W (both at the rear and at the front, with an impedance of 4 Ω...
Need help?
Do you have a question about the KD-G115 and is the answer not in the manual?
Questions and answers