Table of Contents
Advertisement
Available languages
Available languages
Quick Links
Air-Conditioners
Indoor unit
Кондиционеры
ВНУТРЕННИЙ БЛОК
SLZ-KF25, KF35, KF50, KF60VA2
OPERATION MANUAL
For safe and correct use, please read this operation manual thoroughly before operating the air-conditioner unit.
BEDIENUNGSHANDBUCH
Zum sicheren und einwandfreien Gebrauch der Klimaanlage dieses Bedienungshandbuch vor Inbetriebnahme
gründlich durchlesen.
MANUEL D'UTILISATION
Pour une utilisation correcte sans risques, veuillez lire le manuel d'utilisation en entier avant de vous servir du
climatiseur.
BEDIENINGSHANDLEIDING
Voor een veilig en juist gebruik moet u deze bedieningshandleiding grondig doorlezen voordat u de
airconditioner gebruikt.
MANUAL DE INSTRUCCIONES
Lea este manual de instrucciones hasta el final antes de poner en marcha la unidad de aire acondicionado para
garantizar un uso seguro y correcto.
ISTRUZIONI DI FUNZIONAMENTO
Leggere attentamente questi istruzioni di funzionamento prima di avviare l'unità, per un uso corretto e sicuro della
stessa.
ΕΓΧΕΙΡΙΔΙΟ ΟΔΗΓΙΩΝ ΧΡΗΣΕΩΣ
Για ασφάλεια και σωστή χρήση, παρακαλείστε διαβάσετε προσεχτικά αυτό το εγχειρίδιο χρήσεως πριν θέσετε σε
λειτουργία τη μονάδα κλιματισμού.
MANUAL DE OPERAÇÃO
Para segurança e utilização correctas, leia atentamente o manual de operação antes de pôr a funcionar a
unidade de ar condicionado.
DRIFTSMANUAL
Læs venligst denne driftsmanual grundigt før airconditionanlægget betjenes af hensyn til sikker og korrekt brug.
DRIFTSMANUAL
Läs denna driftsmanual noga för säkert och korrekt bruk innan luftkonditioneringen används.
IŞLETME ELKITABI
Emniyetli ve doğru biçimde nasıl kullanılacağını öğrenmek için lütfen klima cihazını işletmeden önce bu
elkitabını dikkatle okuyunuz.
РУКОВОДСТВО ПО ЭКСПЛУАТАЦИИ
Для обеспечения правильного и безопасного использования следует ознакомиться с инструкциями,
указанными в данном руководстве по эксплуатации, тщательным образом до того, как приступать к ис-
пользованию кондиционера.
BRUKSANVISNING
Vennligst les nøye gjennom denne bruksanvisningen, for sikkert og riktig bruk av klimaanlegget.
INSTRUKCJA OBSŁUGI
Aby zapewnić bezpieczne i prawidłowe korzystanie z urządzenia, należy wcześniej uważnie przeczytać niniejszą
instrukcję obsługi.
FOR USER
FÜR BENUTZER
POUR L'UTILISATEUR
VOOR DE GEBRUIKER
PARA EL USUARIO
PER L'UTENTE
ΓΙΑ ΤΟΝ ΧΡΗΣΤΗ
PARA O UTILIZADOR
TIL BRUGER
FÖR ANVÄNDAREN
KULLANICI İÇİN
ДЛЯ ПОЛЬЗОВАТЕЛЯ
FOR BRUKER
INFORMACJA DLA UŻYTKOWNIKA
English
Deutsch
Français
Nederlands
Español
Italiano
Ελληνικά
Português
Dansk
Svenska
Türkçe
Русский
Norsk
Polski
Advertisement
Table of Contents

Related Manuals for Mitsubishi Electric Mr.SLIM SLZ-KF25


Summary of Contents for Mitsubishi Electric Mr.SLIM SLZ-KF25
- Page 1 Air-Conditioners Indoor unit Кондиционеры ВНУТРЕННИЙ БЛОК SLZ-KF25, KF35, KF50, KF60VA2 OPERATION MANUAL FOR USER English For safe and correct use, please read this operation manual thoroughly before operating the air-conditioner unit. BEDIENUNGSHANDBUCH FÜR BENUTZER Deutsch Zum sicheren und einwandfreien Gebrauch der Klimaanlage dieses Bedienungshandbuch vor Inbetriebnahme gründlich durchlesen.
-
Page 2: Table Of Contents
This symbol mark is according to the directive 2012/19/EU Article 14 Information for users and Annex IX, and/or to the direc- tive 2006/66/EC Article 20 Information for end-users and Annex II. Your MITSUBISHI ELECTRIC product is designed and manufactured with high quality materials and components which can be recycled and/or reused. This symbol means that electrical and electronic equipment, batteries and accumulators, at their end-of-life, should be disposed of separately from your household waste. If a chemical symbol is printed beneath the symbol (Fig. 1), this chemi- cal symbol means that the battery or accumulator contains a heavy metal at a certain concentration. -
Page 3: Parts Names
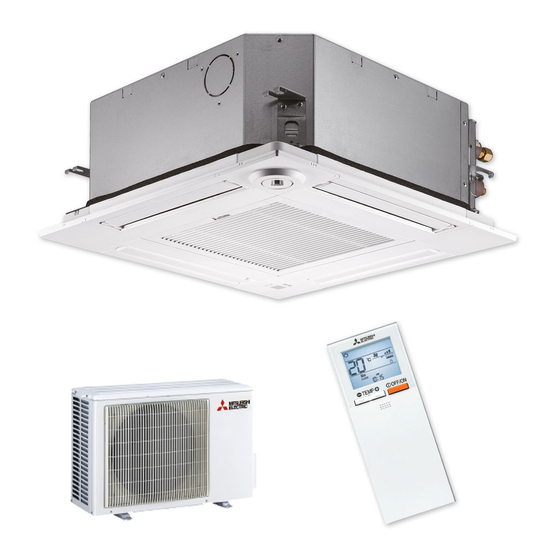
2. Parts Names ■ Indoor Unit ■ SLZ-KF·VA2 4-way Ceiling Cassette SLZ-KF·VA2 Fan steps 3 steps Filter Vane Auto with swing Vane Louver – Filter Long-life Air outlet Filter cleaning indication 2,500 hr Enter the model setting number for the indoor unit you want to operate. Air intake ■ Wired Remote Controller Controller interface... - Page 4 2. Parts Names Display The main display can be displayed in two different modes: “Full” and “Basic”. The factory setting is “Full”. To switch to the “Basic” mode, change the setting on the Main display setting. (Refer to operation manual included with remote controller.) <Full mode>...
- Page 5 2. Parts Names ■ Wireless Remote-Controller Transmission area Not available Remote controller display Battery replacement indicator Set Temperature buttons OFF/ON button Mode button (Changes operation mode) Fan Speed button (Changes fan speed) Airfl ow button (Changes up/down airfl ow direction) i-see button Timer ON button Menu button Timer OFF button SET/SEND button...
-
Page 6: Operation
2. Parts Names Notes (Only for wireless remote controller): Battery installation/replacement ■ When using the wireless remote controller, point it towards the receiver on the indoor unit. ■ If the remote controller is operated within approximately 2 minutes after power is supplied to the 1. Remove the top cover, insert two LR6 AA bat- indoor unit, the indoor unit may beep twice as the unit is performing the initial automatic check. - Page 7 3. Operation ■ Operation status memory Remote controller setting Operation mode Operation mode before the power was turned off Preset temperature Preset temperature before the power was turned off Fan speed Fan speed before the power was turned off ■ Settable preset temperature range Operation mode Preset temperature range Cool/Dry 19 –...
- Page 8 3. Operation 3.4. Fan speed setting <Navigating through the pages> page Main Main menu Vane·Louver·Vent. (Lossnay) High power Room Timer Press [F3] to go to the previous page. Weekly timer Cool Set temp. Press [F4] to go to the next page. OU silent mode Main display: Cursor Page Mode Temp.
- Page 9 3. Operation 3.5.2 Vane·Vent. (Lossnay) < How to set the fixed up/down air direction > <Accessing the menu> Notes: Select "Vane·Louver·Vent. This function cannot be set depending on the outdoor unit to be Main Main menu ● Vane·Louver·Vent. (Lossnay) connected. (Lossnay)" from the Main menu High power (refer to page 8), and press the Timer • For SLZ-KF . VA series, only the particular outlet can be fixed to certain Weekly timer [SELECT] button.
- Page 10 3. Operation ■ ■ Manual vane angle (Wired remote controller) Vane setting 1 Select “Maintenance” from the Main Main menu Main menu (refer to page 8), and No setting Step 1 Step 2 Maintenance Initial setting press the [SELECT] button. Service Step 3 Step 4 Step 5 Main display: Cursor Page...
- Page 11 3. Operation ■ Confirmation procedure 3D i-See sensor 3 Select the desired menu with the 1 First, confirm by setting “Ref. Air distribution [F1] or [F2] button, and press the Manual vane angle Energy saving option address” to 0 and “Unit No.” to 1. Ref.
- Page 12 3. Operation 3 When Direct/Indirect is selected, 2 When No occupancy energy save Direct/Indirect setting Energy saving option set each air outlet. or Room occupancy energy save No occupancy energy save : Direct Select the air outlet with the [F1] or is selected : Indirect Cooling/Heating...
-
Page 13: Timer
3. Operation 3.6.4 Seasonal airfl ow function Notes: Any person at the following places cannot be detected. 1 Select the setting with the [F4] ● Along the wall on which the air conditioner is installed Seasonal airflow button. Seasonal airflow ● Directly under the air conditioner OFF → Cooling only → Heating ● Where any obstacle, such as furniture, is between the person and Cooling/Heating only → Cooling/Heating → OFF… the air conditioner A person may not be detected in the following situations. Select: After changing the setting, press ● Room temperature is high. -
Page 14: Care And Cleaning
5. Care and Cleaning ■ Filter information will appear on the Main display If two or more indoor units are connected, filter cleaning timing for each unit may be different, depending on the filter type. in the Full mode when it is time to clean the filters. -
Page 15: Emergency Operation For Wireless Remote-Controller
6. Emergency Operation for Wireless Remote-controller When the remote controller cannot be used When the batteries of the remote controller run out or the remote controller malfunctions, the emergency operation can be done using the emergency buttons on the grille. A DEFROST/STAND BY lamp B Operation lamp C Emergency operation cooling switch D Emergency operation heating switch E Receiver Starting operation... -
Page 16: Installation, Relocation And Inspection
7. Trouble Shooting Having trouble? Here is the solution. (Unit is operating normally.) Air conditioner operates without the ON/OFF button being pressed. ■ Is the on timer set? Press the ON/OFF button to stop operation. ■ Is the air conditioner connected to a central remote controller? Consult the concerned people who control the air conditioner. -
Page 17: Specifications
8. Installation, relocation and inspection Warning: If the air conditioner operates but does not cool or heat (depending on model) the room, consult your dealer since there may be a refrigerant leak. Be sure to ask the service representative whether there is refrigerant leakage or not when repairs are carried out. The refrigerant charged in the air conditioner is safe. Refrigerant normally does not leak, however, if refrigerant gas leaks indoors, and comes into contact with the fire of a fan heater, space heater, stove, etc., harmful substances will be generated. Electrical work • Provide an exclusive circuit for power supply of the air conditioner. • Be sure to observe the breaker capacity. Warning: • The customer should not install this unit. If the unit is installed incorrectly, fire, electric shock, injury due to a falling unit, water leakage, etc. may result. • Do not connect using branched outlet or an extension cord, and do not attach many loads to one electric outlet. A fire or electric shock may result from poor contact, poor insulation, exceeding the permissible current, etc. Consult your dealer. Caution: • Apply grounding Do not connect a grounding wire to a gas pipe, water pipe, lightning rod or ground wire of a telephone. If a grounding is incorrect, it may cause an electric shock. • Install an earth leakage breaker depending on the place where the air conditioner is to be installed (humid place, etc.). - Page 18 Hinweis Richtlinie 2006/66/EG Artikel 20 Informationen für Endnutzer und Anhang II. Ihr MITSUBISHI ELECTRIC-Produkt wurde unter Einsatz von qualitativ hochwertigen Materialien und Komponenten konstruiert und gefer- tigt, die für Recycling und/oder Wiederverwendung geeignet sind.Dieses Symbol bedeutet, dass elektrische und elektronische Geräte so- wie Batterien und Akkus am Ende ihrer Nutzungsdauer von Hausmüll getrennt zu entsorgen sind. Wenn ein chemisches Symbol unterhalb des Symbols (Fig.1), bedeutet dies, dass die Batterie bzw.
- Page 19 2. Bezeichnungen der Teile ■ SLZ-KF·VA2 ■ Inneneinheit 4-Wege-Deckenkassette SLZ-KF·VA2 Lüfterstufen 3 Stufen Filter Klappe Klappe Auto mit Schwingen Luftklappe – Filter Langlebig Luftauslaß Reinigungsempfehlung für Filter 2.500 Std. Geben Sie die Modellein- stellungsnummer für das Innengerät ein, das Sie ver- wenden möchten.
- Page 20 2. Bezeichnungen der Teile Anzeige Die Hauptanzeige kann auf zwei verschiedene Arten angezeigt werden „Komplett“ und „Einfach.“ Werkseinstellung ist „Komplett“ Um die Anzeige auf „Einfach“ umzustellen, muss die Einstellung im Hauptdisplay geändert werden. (Wenden Sie sich an die mit der Fernbedienung mitgelieferte Bedie- nungsanleitung.) <Komplett Modus>...
- Page 21 2. Bezeichnungen der Teile ■ Für die schnurlose Fernbedienung Übertragungsfl äche Nicht verfügbar Display der Fernbedienung Anzeigeleuchte zum Ersetzen der Batterien Tasten zum Einstellen der Temperatur Taste OFF/ON Taste Modus (Ändert Betriebsmodus) Taste Lüftergeschwindigkeit (Ändert Lüftergeschwindigkeit) Taste Luftstrom (Ändert Richtung des Luftstroms nach oben/unten) Taste i-see Taste Timer ein...
- Page 22 2. Bezeichnungen der Teile Hinweise (Nur für Drahtlosfernbedienung): Einsetzen/Austausch der Batterien ■ Zur Benutzung der schnurlosen Fernbedienung diese auf den Empfänger am Innengerät richten. ■ 1. Entfernen Sie die Abdeckung, setzen Sie Wird die Fernbedienung innerhalb von etwa zwei Minuten betätigt, nachdem das Innengerät ein- geschaltet wurde, erklingt unter Umständen zweimal ein Piepton während das Gerät die automa- zwei LR6-AA-Batterien ein und setzen Sie tische Anfangsprüfung durchführt.
- Page 23 3. Bedienung ■ Betriebsstatusspeicher Fernbedienungseinstellung Betriebsart Betriebsmodus vor der Stromabschaltung Voreingestellte Temperatur Voreingestellte Temperatur vor der Stromabgschaltung Lüftergeschwindigkeit Lüftergeschwindigkeit vor der Stromabschaltung ■ Einstellbarer Bereich der voreingestellten Temperatur Betriebsart Voreingestellter Temperaturbereich Kühlen/Trocken 19 – 30 ºC Heizen 17 – 28 ºC „Auto“...
- Page 24 3. Bedienung 3.4. Einstellung der Lüftergeschwindigkeit <Navigation durch die Seiten> Seite Main Main menu Vane·Louver·Vent. (Lossnay) High power Timer [F3] drücken, um zur vorherge- Room Weekly timer Cool Set temp. henden Seite zu wechseln. OU silent mode Main display: [F4] drücken, um zur nächsten Seite Cursor Page zu wechseln.
- Page 25 3. Bedienung < Einstellen der fixierten Auf/Ab-Luftstromrichtung > 3.5.2 Vane·Lüftung (Lossnay) <Menü aufrufen> Hinweise: Wählen Sie „Vane·Louver·Vent. Main Main menu Diese Funktion kann je nach dem anzuschließenden Außengerät ● Vane·Louver·Vent. (Lossnay) (Lossnay)“ (Vane·Louver·Lüftung High power eventuell nicht eingestellt werden. (Lossnay)) vom Hauptmenü (siehe Timer Weekly timer Seite 24) und drücken [AUSWAHL]. •...
- Page 26 3. Bedienung ■ ■ Manueller Vane ( Kabelfernbedienung) Flügeleinstellung 1 Wählen Sie „Maintenance“ (War- Main Main menu tung) im Hauptmenü (siehe Seite Maintenance No setting Step 1 Step 2 Initial setting 24) und drücken [AUSWAHL]. Service Step 3 Step 4 Step 5 Main display: Cursor Page Draft...
- Page 27 3. Bedienung ■ Überprüfungsvorgang 1 Beginnen Sie die Überprüfung mit 3 Wählen Sie das gewünschte Menü 3D i-See sensor dem Einstellen der „Ref. address“ mit der Taste [F1] oder [F2] und Air distribution Manual vane angle (Ref.-Adresse) auf 0 und der „Unit drücken Sie die [AUSWAHL]- Energy saving option Ref.
- Page 28 3. Bedienung 3 Stellen Sie bei Einstellung von 2 Bei Auswahl von Energiesparen Energy saving option Direct/Indirect setting Direkt/Indirekt jeden Luftauslass bei Abwesenheit oder Energiespa- No occupancy energy save ein. ren bei Anwesenheit : Direct Cooling/Heating Wählen Sie den Luftauslass mit : Indirect : Indirect der Taste [F1] oder [F2] und än-...
Need help?
Do you have a question about the Mr.SLIM SLZ-KF25 and is the answer not in the manual?
Questions and answers