Sony GP-VPT2BT - Shooting Grip With WirelessRemote Commander Manual
- Help manual (25 pages)
Advertisement
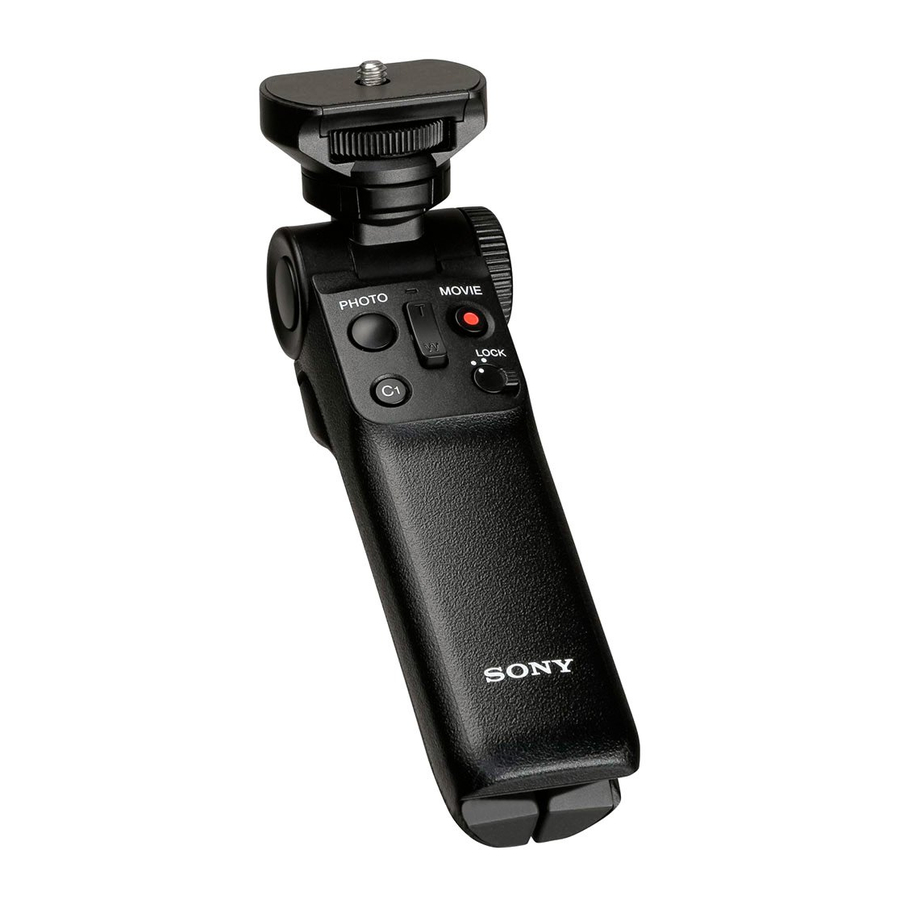
Identifying the parts

- Flip button (Flips around the mounted camera.)
- Angle adjusting button (Adjusts the angle of the grip.)
- PHOTO button
- C1 button
- Zoom button
- Camera mounting screw
- Camera mounting wheel
- Adjustment wheel (Adjusts feel for changing the angle of the grip.)
- Indicator
- MOVIE button
- LOCK switch (Disables the remote commander function to prevent unintentional camera operations.)
- Battery chamber lid
Inserting the battery

Insert the battery so that the + terminal is facing upward. (+ on the battery chamber indicates the direction of the battery.)
Pairing the unit with the mounted camera
- The following is an example of the mounting procedure for Sony Interchangeable Lens Digital Cameras and Sony digital still cameras. For details, refer to the Help Guide provided for the camera models that can be mounted on this unit.
- Before you start pairing, make sure that the LOCK switch on this unit is NOT in the "LOCK" position.
- On the camera, select MENU
![]()
![]() (network)
(network) ![]() [Bluetooth Settings] or [Bluetooth]
[Bluetooth Settings] or [Bluetooth] ![]() [Bluetooth Function]
[Bluetooth Function] ![]() [On].
[On]. - On the camera, select MENU
![]()
![]() (network)
(network) ![]() ([Transfer/Remote]
([Transfer/Remote] ![]() [Bluetooth Rmt Ctrl]
[Bluetooth Rmt Ctrl]![]() [On].
[On]. - On the camera, select MENU
![]()
![]() (network)
(network) ![]() Bluetooth Settings] or [Bluetooth]
Bluetooth Settings] or [Bluetooth] ![]() [Pairing].
[Pairing]. - On this unit, press and hold the PHOTO button and the T side of the Zoom button simultaneously for at least 7 seconds.
- When a confirmation message appears on the camera's screen, select [OK].
![]() appears and pairing begins.
appears and pairing begins.- When pairing is complete, [Paired.] appears.
 appears and pairing begins.
Note
- If pairing fails, the indicator on this unit flashes rapidly. If this happens, repeat the procedure all over again.
- In the event of the following, pair this unit with the mounted camera all over again.
- You mounted a different camera on this unit for operation. (When you replaced the camera back with the previously mounted one, you must pair the unit with the mounted camera all over again as well.)
- You reset the camera's network settings.
Confirming the setting on the camera
On the camera, select MENU 
 (network) ([Transfer/Remote] [Bluetooth Rmt Ctrl] and make sure that [On] is selected.
Mounting the camera

Adjusting the tilt angle

- Press the angle adjusting button several times to adjust the angle of the grip.
- Turn the adjustment wheel to adjust feel for changing the angle of the grip.
Camera shooting

To shoot a movie
Press the MOVIE button.
To stop shooting, press the MOVIE button once again.
To shoot a still image
Press the PHOTO button halfway down to focus, and then press it all the way down.
Specifications
| Maximum weight limit | Up to 1.5 kg (53.0 oz) (total weight of the mounted camera and accessories) |
| Dimensions (Approx.) | With the legs folded: 49.5 mm × 173.0 mm × 42.0 mm (2 in. × 6 7/8 in. × 1 11/16 in.) With the legs unfolded: 146.5 mm × 133.5 mm × 163.0 mm (5 7/8 in. × 5 3/8 in. × 6 1/2 in.) (W/H/D) |
| Mass (Approx.) | 215 g (7.6 oz) (Without the battery) |
| Included items | Shooting Grip With Wireless Remote Commander (1), Lithium coin cell battery (CR2032) (1), Pouch (1), Set of printed documentation |
The Bluetooth® word mark and logos are registered trademarks owned by the Bluetooth SIG, Inc. and any use of such marks by Sony Group Corporation is under license.

Documents / ResourcesDownload manual
Here you can download full pdf version of manual, it may contain additional safety instructions, warranty information, FCC rules, etc.
Download Sony GP-VPT2BT - Shooting Grip With WirelessRemote Commander Manual
Advertisement


Need help?
Do you have a question about the GP-VPT2BT and is the answer not in the manual?
Questions and answers