Table of Contents
Advertisement
Quick Links
Advertisement
Table of Contents

Related Manuals for Craftsman SNOWTHROWER 536.8884


Summary of Contents for Craftsman SNOWTHROWER 536.8884
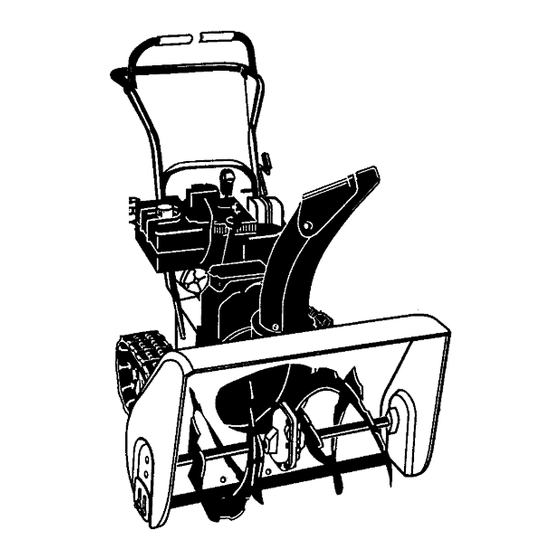
- Page 1 CRR FTSMRW 6 Horsepower 24 Inch Dual Stage Free-WheelingTrack 120V. Electric Start SNOWTHROWER MODEL NO. 536.888400 Caution: Read and follow all Safety Rules and Operating Instructions before first use of this product. SEARS, ROEBUCK AND CO., Hoffman Estates, IL 60179 U.S.A. 760817 11103/97...
- Page 2 15-17 LIMITED TWO-YEAR WARRANTY ON CRAFTSMAN SNOW THROWER For two years from the date of purchase, when this Craftsman Snow Thrower is main- tained, lubricated, and tuned up according to the operating and maintenance instructions in the owner's manual, Craftsman wilt repair, free of charge, any defect in material or work- manship.
- Page 3 PREPARATION Thoroughly inspect the area where the snow thrower is to be used and remove all doormats, sleds, boards, wires and other foreign objects. Disengage all clutches before starting the engine (motor). Do not operate the snow thrower without wearing adequate winter outer .garments.
- Page 4 17. Disengage power to the auged impeller when snow thrower is transported or not in use. 18. Use only attachments and accesso- ries approved by the manufacturer of the snow thrower (such as tire chains, electric start kits, etc). 19. Never operate the snow thrower without good visibility or light.
- Page 5 2-Screw, 5 /16-18 x 2 In'. , in carton (not shown full size) Pads 2 - Ignition Keys 1 - container 5W30 oil {Attached to engine in plastic bag) THIS SNOW THROWER HAS A TRACK FREE-WHEELING CAPABILITY If your snow thrower must be moved without the aid of the engine, it will be easier to pull the snow thrower backward by the handles rather than pushing.
- Page 6 TO REMOVE SNOW THROWER ' FROM CARTON • Locate and remove container of 5W30 oil. • Locate all parts packed separately and remove from the carton. NOTE: Place fuel stabilizer in a safe place until needed for storage. • * Remove and discard the packing matedal from around the snow thrower.
- Page 7 • Lineup openings, i nsertclevispinthrough assembly andsecurewithcotterpin. Spread endsofcotterpinto lockin place. Seefigurebelow. Universaljoint Upper Crank Rod • Tighten nut on eye bolt, keeping eye in line with the rod while tightening the in- side securely. • Tighten screw in right hand upper hole. TO INSTALL SHIFTER LEVER KNOB •...
- Page 8 'HOW TO SET UP YOUR SNOW THROWER • Your snow thrower is equipped with height adjust skids (see second figure on page 5) on the outside of the auger housing. To adjust the skid height for different conditions, (see To Adjust Skid Height paragraph on page 17).
- Page 9 KNOW YOUR SNOW THROWER READ THIS OWNER'S MANUAL AND SAFETY RULES BEFORE OPERATING SNOW THROWER. Compare the illustrations with your SNOW THROWER youmelf with the location of various controls and adjustments. reference. • I-I , Engine Engine Choke On Start Drive Clutch Auger Clutch Auger...
- Page 10 Always wear safety glasses or eye shields while operating the snow thrower. We recommend standard safety glasses or a wide vision safety mask for over your glasses, available at Craftsman Retail Stores or Service Centers. CAUTION: Read owner's manual before operating machine.
- Page 11 In lighter snow conditions or when trans- porting, you should release the weight transter system for edsier steering. • To use the weight transfer system, lift up on upper handle until bracket bolts snap into place in upper slots of weight transfer pedal.
- Page 12 moisture which loads to separation and for- mation of acids during storage. Acidic gas can damage tho fuel system of an ongine while in storage. To avoid engino probloms, the fuol system should be emptied before storage for 30 days or longer. Star the engino and let it run until the fuel lines and carburetor Use the carburetor bowl drain to empty re- sidual gasoline from the float chamber.
- Page 13 • Pushdownonthestarterbuttonuntilthe enginestarts.Donotcrank for more than 10 seconds at a time. This electric starter is thermally protected. If Overheated it will stop automatically and can be restarted only when it has cooled to a safe temperature (a wait of about 5 to 10 minutes is required).
- Page 14 CAUTION: Never run engine indoors .or'_i enclosed, poody vantilated areas. En- gine exhaust contains CARBON MONOX- IDE, AN ODORLESS AND DEADLY GAS. Keep hands, feet, hair and loose clothing away from any moving parts on engine and snow thrower. WARNING: Temperature of muffler and nearby areas may exceed 150 °...
- Page 15 CUSTOMER RESPONSIBILITIES SERVICE RECORDS Fill in dates as After first2 you complete Houra regular service Check Engine Oil Level Change EngineOil Tighten all screws and nuts Check TractionClutch Cable Adjustment(See cable Adj) Reptsca Spark P|ug Replace Drive Belts Lubricate all pivot points Drain Fuel Check Auger Clutch Cable Adjustment(See Cable AdD...
- Page 16 Check track for tension (Pull up g LUBRICATION - EVERY 25 HOURS • Lubricate Disc Drive Plate every 25 hours and at the end of the season and/or before storage. To Lubricate: • Remove bottom panel. See second figure on page 20. •...
- Page 17 ENGINE LUBRICATION Check the crankcase oil level (see figure be- low) before starting the engine and after each five (5) hours of continuous use. Add S.A.E. 5W30 motor oil as needed. "13ghten fill cap/dipstick securely each time you check the oil level. OIL RECOMMENDATION Only use high quality detergent oil rated with API service classification SG.
- Page 18 TO ADJUST SCRAPER After consiclerable use, the metal scraper bar will have a definite wear pattem. The scraper bar may have to be returned to its original lower setting to maintain the original performance level. To adjust: • Position the snow thrower on a level sur- face.
- Page 19 The drive belts on this'snow thrower are of special construction and should be replaced with original equipment belts available from your nearest Craftsman Store or Service Center. You will need the assistance of a second person while replacing the belts.
- Page 20 TO ADJUST THE BELT GUIDES After you replace the traction or auger drive belt, you need to adjust one or both of the belt guides. Proceed as follows: • Disconnect the spark plug wire. • Remove the belt cover (See last figure on page 19).
- Page 21 FdcUon Fasteners Standing on Auger Housing End Unit • Remove right side bearing plate. Leave hex shaft in original position. • Remove friction wheel from hub. Slip fric- tion wheel oft hex shaft towards right side. See figure below. • Position new friction wheel onto hub. See Figure below.
- Page 22 If you think the engine- governed high speed needs adjusting, con- tact your nearest Craftsman Service Center, which has the proper equipment and experi- ence to make any necessary adjustments.
- Page 23 NOTE: A yearly checkup or tune-up by a Craftsman Service Center is a good way to insure that your snow thrower will provide maximum performance for the next season.
- Page 24 Stop engine immediately disconnect spark plug wire. Tighten all bolts and make all necessary repairs, If vibration continues, have the unit ser- viced by a Craftsman service repairman Replace drive belt i Adjust traction drive cable i Repair frict on wheel Adjust auger drive belt;...
- Page 25 CRAFTSMAI_ 24" - 6H.P. SNOW THROWER ELECTRIC START ASSEMBLY REF. PART NO. PART NAME ENGINE Model 143.985503 (See Engine pages) 710024 1..Screw, 5/16-16 120638 Washer, Hvsptlk 3949 Guide, Rod Belt RH 120638 Washer, Hvsptlk 910828 Screw, 5/16-24x1.00 3949 Guide, Rod Belt LH 120638 Washer, Hvsptlk 910828...
- Page 26 CRAFTSMAN ® REF. NO. PART NO. ;PARTNAME 761115-833 Frame Assembly Screw, 5/16-18x.50 Tap. 780055 579760-853 Panel, Bottom 310169 Screw, 1/4-20x.63 Tap. 761195 Plate, Clutch Arm Mtg. Arm-Clutch 761198 Bolt, 3/8-16 Shoulder 710200 41529 Nut, 3/8-16 Hxctdkjam 340682 Clip, Cable Bracket,Compact...
- Page 27 CRAFTSMAN 24" -6H.P. SNOW THROWER 217 216 REF. PART NO. PART NAME 579941 Lever, Shaft Tract. Clutch 313853 Bearing, Ranged 137185 Cotter Pin .125xl .00 313919 = 193 Return Spring 579937 Lever, Spring Tmc CI." 11871 Screw, 1/4-20x.63 782585 Nut, 1/4-20 Reghexctrik 583163-853 Disc, Assy Fric.
- Page 28 CRAFTSMAN 24" - 6H.P. SNOW THROWER ® PART NO. PART NAME 10577 Gear Case, RH 10576 Gear Case, LH 710025 Screw, 1/4-20x.75 46931 Nut, 1/4-20 Mac-Lock 303008 Nut, 1/4-20 Hexkeps 9344 Screw, 3/8-16x.50 Tap. 9566 Oil Seal 50304 Beadng, Flanged 48275 Flatwasher .752x1.24x.093...
- Page 29 CRAFTSMAN 24" - 6H.P. SNOW THROWER AUGER HOUSING ASSEMBLY REF, PART NO. PART NAME 1480 583124 Pulley, V4L 577400 Screw 5/16-18x.63 71371 Square Key .18Sqx.88Lg 334514 Spacer, Slev .676xlx.53 582960 Retainer, Ball !43846 ! Beadng, Ball 180077 Screw, 5/16-18x.75 710026...
- Page 30 CRAFTSMAN REF. PART NAME PART NO. 581115 Shaft, Axle/Track 579901 Sprocket, Hub #40-21Tx.75 73839 Screw, I/4-20x2.25 782585 Nut, 1/4-20 Reghexctdk 581730 Bearing, Flanged Chain Roller#42x40P 579867 580635-853 Plate, Track Direct Dr. 313912 Spdng, Ddve Idler 316863 Baadng,Track 302628 Screw, t/4-20x 75...
- Page 31 CRAFTSMAN REF, PARTNO. PART NAME 9552-853 Upper Handle 11234 Screw, 5/16-18x2.75 120393 Flatwasher .344x.69x.065 !726 120638 Washer, HvspUk 120376 Nut, 5/16-18 Reghex 11261 !726 Stop, Red PlasUc 334195 Kit for RH Handle Assy 334195 Kit for LH Handle Assy. 4140...
- Page 32 CRAFTSMAN 24" - 6H.P. SNOW THROWER SHIFT YOKE ASSEMBLY REF. 790 581631-853 ..-._ 791 302628 ._: ,.- 792 782585 "_ 796 1304438 811 579944 "': 812 581795 813 71111 } ""-, %'.. --._.--_ DISCHARGE CHUTE ASSEMBLY IEF. 500- 500- _00- 536.888400...
- Page 33 CRAFTSMAN 24 CHUTE CONTROL ROD ASSEMBLY REF, PART NO. PART NAME 339563 Rod Assy, Upr Crank 307399 Handle, Chute Crank 309312 Washer, Rat .39x.70x.05 578159 Ring, Pet. E..375x.04 339198-853 Brkt, Chute Lower Rod Ctd 310169 Screw 1/4-20x.63 Wahhtap 339560 Rod, Assy Chute Lwr 1339534 i Grommet, .401Dx.435WD...
- Page 34 PART NAME 1760971 Decal, 9" Impeller 313892 Decal, Danger Chute 70141 Decal, Danger Auger 302922 Decal, Danger English 760972 Decal, Craftsman 761148 Decal, 6/24 ES 761079 Decal, Danger Chute 3902 Decal, Traction Dr. Engage 3903 Decal, Gear Selector 340047 Decal, Gear Selector...
- Page 35 CRAFTSMAN 4-CYCLE ENGINE MODEL NUMBER: 143.985503 3701 _...
- Page 36 CR.AFI"SMAN 4-CYCLE ENGINE MODEL NUMBER" 143.985503...
- Page 37 CRAFTSMAN 4-CYCLE ENGINE MODEL NUMBER: 143.985503 Ref.# Part No, Descdptlon 37070 Cylinder (Incl2&20) 26727 Dowel Pin 31857 Oil Drain Extension 30969 ExtensionCap Washer 28277 30589 Govemor Rod Govemor Lever 36618 36700 GovernorLever Clamp 651028 Screw8-32x3/8" TorxT-15 36170 ExtensionSpdng Oil Seal...
- Page 38 CRAFTSMAN 4-CYCLE ENGINE MODEL NUMBER; 143.985503 Starter No. 590733 REF PART 590733 !590599A 590600 590696 590601 590697 590698 590699 590709 590734 590535 590574 PART NAME Rewind Starter _vParing P in (Incl 4) sher Retainer Washer Brake Spring Starter Dog Dog Spdng Pulley &...
- Page 39 CRAFTSMAN 4-CYCLE ENGINE MODEL NUMBER: 143.985503 Starter No. 590749 (Optional) REF. PART PART NAME Rewind Starter 590749 590599A SpringPin (Incl 4) 590600 Washer Retainer 590679 590601 Washer 590698 Brake Spdng 590680 Starter Dog 590412 Dog Spring 590682 Pulley& Rewind Spdng ;590750...
- Page 40 CRAFTSMAN 4-CYCLE ENGINE MODEL NUMBER: 143.985503 Carburetor No.640058 REF. PART PART NAME 640058 Carburetor (incl 184 on engine) 631615 Throttle Shaft & Lever Ass'y, 631767 ThrotUeReturn Spring 631184 Dust Seal Washer '631183 Dust Seal (Throttle) Throtter Shutter 1631036 650506 Shutter Screw 632118 Choke Shaft &...
- Page 42 For":%erepair or replacement parts you need dehvered dnrectlyto your home' Call 7 am-7 pm, 7 days a week 1-800-366-PART (1-800-366-7278) Para ordenar piezas con entrega a domicilio -1-800-659-7084 For in-house major brand repair service Call 24 hours a day, 7 days a week 1-800-4-REPAIR (1-800-473-7247) Para pedir servicio de reparaci6n a...
Need help?
Do you have a question about the SNOWTHROWER 536.8884 and is the answer not in the manual?
Questions and answers