Epson TM-H6000IV Manual
- User manual (159 pages) ,
- Technical reference manual (138 pages) ,
- Product information manual (6 pages)
Advertisement
- 1 Key to Symbols
- 2 Usage Notes
- 3 Downloading Drivers, Utilities, and Manuals
- 4 Part Names
- 5 Power Switch and Power Switch Cover
- 6 Setting up the Printer
- 7 Unpacking
- 8 Connecting the Cables
- 9 Installing and Removing the Connector Cover
- 10 Installing and Replacing the Ribbon Cartridge
- 11 Loading Paper
- 12 Test Printing
- 13 Cleaning
- 14 Troubleshooting
- 15 Specifications
- 16 Important Safety Information
- 17 Documents / Resources
Key to Symbols
The symbols in this manual are identified by their level of importance, as defined below. Read the following carefully before handling the product.

Warnings must be followed carefully to avoid serious bodily injury.

Cautions must be observed to avoid minor injury to yourself, damage to your equipment, or loss of data.
Note:
Notes have important information and useful tips on the operation of your equipment.
Usage Notes
- Install the printer horizontally.
- Make sure cords and foreign objects are not caught in the printer.
- Do not open the covers during printing or autocutting.
- Make sure that the printer is not subjected to any impact or vibration.
- Do not put any food or drink on the printer case.
- To prevent a paper jam, do not prevent paper from being ejected from the paper exit, and do not pull the paper being ejected.
Downloading Drivers, Utilities, and Manuals
Further product information is written in the TM-H6000IV Technical Reference Guide.
Drivers, utilities, and manuals can be the following URL. http://download.epson-biz.com/?serv
Part Names

- Roll paper cover
- Receipt unit
- Front cover
- Power switch
- Manual cutter
- Connector cover
- Control panel
Control Panel
![]() (Power) LED
(Power) LED
On when the printer is on.
Error LED
On when the printer is offline after an error, such as paper out or roll paper cover open. Off when the printer operates normally. Flashes when an error occurs.
Paper LED
On when the roll paper is near its end.
Flashes when waiting for test printing on the roll paper.
Slip LED
On when the printer is in slip paper mode. Off when the printer is in roll paper mode. Flashes when the printer is waiting for slip paper to be inserted/ removed.
Feed button
This button feeds paper.
Release button
This button releases the retained paper.
Power Switch and Power Switch Cover
Use the power switch on the front of the printer to turn the printer on and off.
The enclosed power switch cover ensures that the power switch is not pressed accidentally. To install the cover, see illustration C.
You can turn on and off the power switch by inserting a sharp-pointed object in the holes in the power switch cover.
To detach the cover, use a sharp-pointed object.


If an accident occurs with the power switch cover attached, unplug the AC cable immediately. Continued use may cause fire or shock.
Setting up the Printer
To set up the printer, follow the steps below.
- Unpacking (See "Unpacking")
- Connecting the cables (See "Connecting the Cables")
- Installing the connector cover (See "Installing and Removing the Connector Cover")
- Installing the ribbon cartridge (See "Installing and Replacing the Ribbon Cartridge")
- Installing the roll paper (See "Installing and Replacing the Roll Paper")
- Operation check with test print (See "Test Printing")
Unpacking
Check whether the following items are included. If any item is damaged, contact your dealer.
- Printer
- Ribbon cartridge (ERC-32)
- Power switch cover
- AC adapter
- Thermal roll paper (for operation check)
- Connector cover
- User's manual
Connecting the Cables
For a serial interface, use a null modem cable.
For a USB interface, do not turn on the printer before installing the printer driver.
Note:
Available interfaces vary by the printer model. For the positions and shapes of the connectors, see illustration B.

- Customer display connector
- Drawer kick-out connector
- Serial Interface connector
- Power supply connector
- USB connector
The customer display is available only when using a serial interface or USB interface located at the position shown as 12 in illustration B.
- Make sure the power switch is off.
- Connect a power supply to the printer.
- Connect each interface cable to the printer. When using the USB interface, fix the USB cable with the cable hook to prevent the USB cable from coming off.

- Cable hook
- Connect the interface cable to the computer.
- Insert the AC cable plug into a power outlet.

Installing and Removing the Connector Cover
To install the included connector cover, follow the steps below.
- Align 2 projections on the top of the connector cover (indicated as a in illustration E) with holes in the back of the printer.

- Push the connector cover forward so that the projections at the bottom of the printer (indicated as b in illustration E) fit properly in the holes in both sides of the connector cover.

To remove the connector cover, push both sides of the cover inward to remove the holes in both sides of the cover from the projections at the bottom of the printer (indicated as b in illustration E).
Installing and Replacing the Ribbon Cartridge
Note:
Use the EPSON ERC-32 ribbon cartridge.
- Turn on the printer.
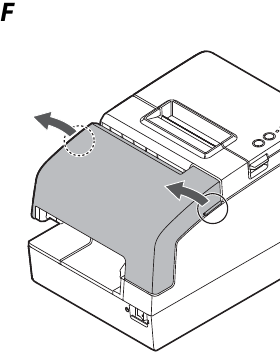
- Open the front cover using the tabs on both sides of the front cover.
![]()
- Remove the used ribbon cartridge, if there is one.
- Turn the knob on the ribbon cartridge a little in the direction of the arrow marked on the cartridge to remove any slack in the ribbon.

![]()
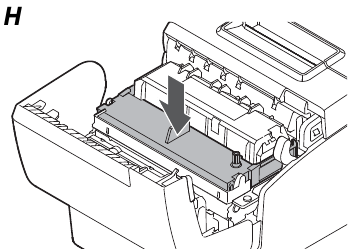
Make sure to note the direction of the arrow marked on the ribbon cartridge when turning the knob. If it is turned in the reverse direction, the cartridge may be damaged. - Insert a new ribbon cartridge until it clicks into place.
![]()
- Turn the knob on the cartridge in the marked direction again to remove any slack in the ribbon.
- Close the front cover.

Loading Paper
Be sure to use the specified roll paper.
Do not insert any paper that has clips or staples. This may cause paper jams and damage.
Make sure the slip paper is flat, without curls, folds, or wrinkles.
Note:
Use personal checks of 12 cm {4.7"} long or more.
Installing and Replacing the Roll Paper
Follow the steps below to install/replace the roll paper.

- Turn on the printer.
- Open the roll paper cover using the tabs on both sides of the roll paper cover.
- Remove the used roll paper core, if there is one, and insert the roll paper in the correct direction.
- Pull out some paper, and close the roll paper cover.
- Tear off the paper with the manual cutter.
Inserting Slip Paper
When printing on slip paper, follow the steps below to insert the paper.

- Turn on the printer.
- Insert the paper face up with the right paper edge against the right side of the paper guide, and insert it as far as it will go.
- Insert the paper straight until the top edge of the paper touches the stopper.
- When the printer starts feeding the paper, release it immediately.
- Pull the ejected paper straight up out of the printer.
Test Printing
After the printer setup or when the printer is not operating correctly, you can check the printer operation with test printing. If the printer performs pattern printing following the steps below, the printer is operating normally.
Test Printing on Roll Paper
Make sure all the covers are closed, and while pressing the Feed button, turn on the printer. After the printer prints its status and the Paper LED flashes, press the Feed button again to restart the test printing.
Test Printing on Slip Paper
Make sure all the covers are closed, and while pressing the Release button, turn on the printer. After the Slip LED flashes, insert the slip paper.
The test printing is completed when "***completed***" is printed.
Cleaning
Cleaning the Printer Case
Be sure to turn off the printer, and wipe the dirt off the printer case with a dry cloth or a damp cloth.
Never clean the product with alcohol, benzine, thinner, or other such solvents. Doing so may damage or break the parts made of plastic and rubber.
Cleaning the Thermal Head
Epson recommends cleaning the thermal head periodically (generally every 3 months) to maintain receipt print quality.
 The thermal head can be very hot after printing. Be careful not to touch it, and let it cool before you clean it.
Do not damage the thermal head by touching it with your fingers or any hard object.
Turn off the printer, open the roll paper cover, and clean the thermal elements of the thermal head with a cotton swab moistened with an alcohol solvent (ethanol or IPA).

- Thermal head
Troubleshooting
Error LED is on or flashing
- Printing stops if the head overheats and resumes automatically when it cools.
- Make sure that all the covers are properly closed.
- The autocutter blade may be locked. For a minor lock, the autocutter blade automatically returns to the correct position. Otherwise, move it to the correct position referring to "The roll paper cover will not open (the autocutter blade is locked)."
- When a paper jam occurs, remove the jammed paper referring to "Paper jam occurs."
- Turn the printer off, and after 10 seconds, turn it back on.
The roll paper cover will not open (the autocutter blade is locked)
Follow the steps below to return the autocutter blade to the correct position.
- Turn off the printer.
- Pull the lever on the left side of the receipt unit to open the receipt unit.

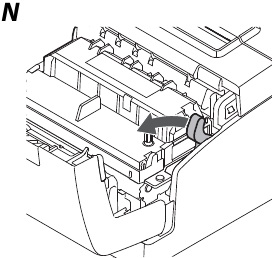
- Turn the knob of the autocutter blade in the direction of the arrow until you see a pin in the opening of the frame, as shown in illustration M.
![]()
- Knob
- Pin


Paper jam occurs
Do not touch the thermal head, because it can be very hot after printing. Let it cool before you remove the jammed paper.
When the roll paper is jammed
- Turn off the printer.
- Open the roll paper cover using the tabs on both sides of the roll paper cover.
- Remove the jammed paper.
When the slip paper is jammed
- Turn off the printer.
- Open the front cover using the tabs on both sides of the front cover. (See illustration F.)
- Open the front carriage unit using the lever at the right of the front carriage unit.
![]()
- Remove the jammed paper.
Specifications
| Printing method | Receipt: Thermal line Slip: 9-pin serial impact dot matrix | |
| Paper dimensions | Receipt | 79.5 ± 0.5 × 83 mm {3.1 ± 0.02 × 3.3"} |
| Slip | 68 ~ 230 × 68 ~ 297 mm {2.7 ~ 9.1 × 2.7 ~ 11.7"} (W × L) | |
| Paper thickness | Slip (single ply): 0.09 ~ 0.22 mm {0.0035 ~ 0.0087"} | |
| Inked ribbon | Slip: ERC-32 | |
| Interface (compatible) | Serial (RS-232)/USB [Compliance: USB 2.0, Communication speed: Full-speed (12 Mbps)] | |
| Supply voltage* | DC + 24 V ± 7% | |
| Temperature | Operating: 5 to 45°C {41 to 113°F} Storage: –10 to 50°C {14 to 122°F}, except for paper | |
| Humidity | Operating: 10 to 90% RH Storage: 10 to 90% RH, except for paper | |
| Overall dimensions | 181 × 186 × 278 mm {7.13 × 7.32 × 10.94"} (H × W × D) | |
| Weight (mass) | Approx. 4.4 kg {9.7 lb} | |
Mbps: megabits per second
* Be sure to use a safety-standards-applied power source that meets the following specifications.
Rated output: 24 V/2.0 - 10.0 A, Maximum output: 240 VA or less
Important Safety Information
This section presents important information intended to ensure safe and effective use of this product. Read this section carefully and store it in an accessible location.
Safety Precautions
Shut down your equipment immediately if it produces smoke, a strange odor, or unusual noise. Continued use may lead to fire. Immediately unplug the equipment and contact your dealer or a Seiko Epson service center for advice. Never attempt to repair this product yourself. Improper repair work can be dangerous.
Never disassemble or modify this product. Tampering with this product may result in injury or fire.
Do not use this product with any voltage other than the specified one. Doing so may lead to fire or electric shock.
Do not allow foreign matter to fall into the equipment. Penetration by foreign objects may lead to fire.
If water or other liquid spills into this equipment, unplug the AC cable immediately, and then contact your dealer or a Seiko Epson service center for advice. Continued usage may lead to fire.
Do not use aerosol sprayers containing flammable gas inside or around this product. Doing so may cause fire.
Do not connect cables in ways other than those mentioned in this manual. Different connections may cause equipment damage and burning.
Be sure to set this equipment on a firm, stable, horizontal surface. Product may break or cause injury if it falls.
Do not use in locations subject to high humidity or dust levels. Excessive humidity and dust may cause equipment damage or fire.
Do not place heavy objects on top of this product. Never stand or lean on this product. Equipment may fall or collapse, causing breakage and possible injury.
Take care not to injure your fingers on the manual cutter
- When you remove printed paper
- When you perform other operations, such as loading/replacing roll paper To ensure safety, unplug this product before leaving it unused for an extended period.
Do not connect a telephone line to the drawer kick-out connector or the display module connector; otherwise the printer and the telephone line may be damaged.
Caution Label
The caution label on the product indicates the following precaution.
Do not touch the thermal head because it can be very hot after printing.
Restriction of Use
When this product is used for applications requiring high reliability/safety, such as transportation devices related to aviation, rail, marine, automotive, etc.; disaster prevention devices; various safety devices, etc.; or functional/ precision devices, etc.; you should use this product only after giving consideration to including fail-safes and redundancies into your design to maintain safety and total system reliability. Because this product was not intended for use in applications requiring extremely high reliability/safety, such as aerospace equipment, main communication equipment, nuclear power control equipment, or medical equipment related to direct medical care, etc., please make your own judgment on this product's suitability after a full evaluation.
Documents / Resources
References
Download manual
Here you can download full pdf version of manual, it may contain additional safety instructions, warranty information, FCC rules, etc.
Advertisement


Need help?
Do you have a question about the TM-H6000IV and is the answer not in the manual?
Questions and answers