Miele KFN 9753 iD Operating And Installation Instructions
Frost free fridge-freezer with dynamic cooling
Hide thumbs
Also See for KFN 9753 iD:
- Operating and installation instructions (56 pages) ,
- Operating and installation instructions (22 pages) ,
- Operating and installation instructions (52 pages)
Table of Contents
Advertisement
Advertisement
Table of Contents

Related Manuals for Miele KFN 9753 iD


Summary of Contents for Miele KFN 9753 iD
- Page 1 Operating and installation instructions Frost free fridge-freezer with Dynamic cooling KFN 9753 iD en - GB, HK To avoid the risk of accidents or damage to the appliance, it is essential to read these instructions before it is installed and used for the first time.
-
Page 2: Table Of Contents
Contents Description of the appliance ......... 4 Caring for the environment . - Page 3 Contents Freezing and storing food ......... . 27 Maximum freezing capacity.
-
Page 4: Description Of The Appliance
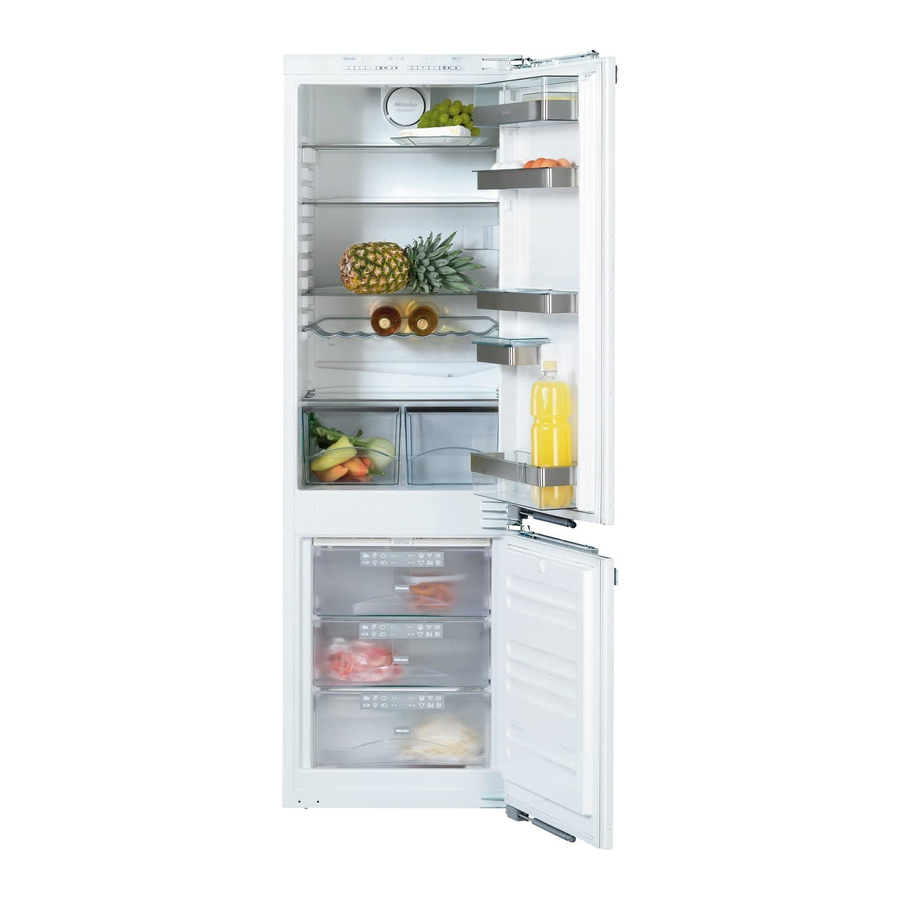
Description of the appliance a On/Off button for switching the g Master switch for switching refrigerator section on and off the whole appliance on and off separately h Freezer section temperature display b Refrigerator section temperature i Freezer section display temperature selector buttons c Refrigerator section (+ for warmer;... - Page 5 Description of the appliance a Dynamic cooling fan b Butter and cheese compartment c Bottle rack d Egg tray/Condiment tray e Interior lighting f Adjustable shelves g Condensate channel and drain hole h Universal container i Fruit and vegetable containers j Bottle divider k Bottle shelf l Freezer drawers with...
-
Page 6: Caring For The Environment
Caring for the environment Disposal of the packing Disposal of your old appliance material Electrical and electronic appliances often contain materials which, if The transport and protective packing handled or disposed of incorrectly, has been selected from materials which could be potentially hazardous to are environmentally friendly for human health and to the environment. -
Page 7: Warning And Safety Instructions
Any other usage is not supported by This appliance complies with all the manufacturer and could be relevant local and national safety dangerous. Miele cannot be held liable requirements. Improper use of the for damage resulting from incorrect or appliance can present a risk of both... -
Page 8: Technical Safety
Warning and Safety instructions Technical safety - disconnect from the mains, - air the room in which the appliance is Before setting up the appliance, located for several minutes and check it for any externally visible - contact the Service Department for damage. - Page 9 Faulty components must only be observed and tested regularly, and replaced by genuine Miele original where there is any doubt, the spare parts. The manufacturer can only household wiring system should be guarantee the safety of the appliance inspected by a qualified electrician.
- Page 10 Warning and Safety instructions Correct use Do not store cans or bottles containing carbonated drinks or liquids Never handle frozen food with wet which could freeze in the freezer hands. Your hands may freeze to the section. The cans or bottles could frozen food.
-
Page 11: Disposal Of Your Old Appliance
Warning and Safety instructions Do not use defrosting sprays or Never use a steam-cleaning de-icers, as they might contain appliance to defrost or clean this substances which could damage the appliance. Steam could reach the plastic parts or which could cause a electrical components and cause a build-up of gases and pose a danger to short circuit. -
Page 12: How To Save Energy
How to save energy Normal energy Increased energy consumption consumption Installation site In a ventilated room. In an enclosed, unventilated room. Protected from direct sunlight. In direct sunlight. Not near to a heat source (radiator, Near to a heat source (radiator, oven). -
Page 13: Switching On And Off
^ After removing the protective foil, The temperature display for the treat stainless steel surfaces with the refrigerator section lights up, and the Miele stainless steel conditioning interior lighting comes on when the door agent supplied with the appliance is opened. -
Page 14: To Switch The Refrigerator Section Off Separately
Switching on and off To switch the refrigerator section off Activating or de-activating the safety separately lock The refrigerator section can be switched off without having to switch off the freezer section. This is useful e.g. whilst on holiday. ^ Press and hold the Super freeze button for approx. -
Page 15: Switching Off For Longer Periods Of Time
Switching on and off Switching off for longer periods of time If the appliance is not going to be used for a longer period of time, e.g. whilst on holiday: ^ Switch the appliance off, ^ disconnect it from the mains. Switch off at the wall and withdraw the plug from the socket, or disconnect the mains fuse,... -
Page 16: The Correct Temperature
The correct temperature . . . in the freezer section It is very important to set the correct temperature for storing food in the To freeze fresh food and to store frozen appliance. Micro-organisms will cause food for a long time, a temperature of food which is not stored at the correct -18 °C is required. -
Page 17: Temperature Range
The correct temperature Temperature display – Each subsequent press of the button adjusts the temperature shown in During normal operation, the 1 °C steps. temperature displays on the control – Keeping the button pressed in panel show the temperature in the adjusts the temperature continually. -
Page 18: Temperature Display Brightness
The correct temperature ^ Press the Super freeze button to save Temperature display brightness the setting. The display goes out when the door is closed. The appliance is supplied with the brightness of the temperature display set as low as possible. However, if the ^ Press the master switch on the right door is opened, a setting changed or if hand side of the control panel to... -
Page 19: Alarm
Alarm Your appliance has been fitted with a Once the set temperature has been warning system which ensures that the reached in the freezer section, the temperature in the freezer section alarm switches off and the temperature cannot rise unnoticed and to avoid display stops flashing and lights up energy being wasted if a door is left constantly. -
Page 20: Using Super Cool, Super Freeze And Dynamic Cooling
Using Super cool, Super freeze and Dynamic cooling Super cool Super freeze The Super cool function can be used to Switch the Super freeze function on rapidly reduce the temperature in the before putting fresh food into the refrigerator section to its lowest setting freezer. -
Page 21: Dynamic Cooling M
Using Super cool, Super freeze and Dynamic cooling Switching off Super freeze – the ambient temperature in the room is high (above approx. 30 °C), and Depending on the amount of food placed in the freezer section, the Super – the room humidity level is high. freeze function will switch off automatically after approx. -
Page 22: Using The Refrigerator Efficiently
Using the refrigerator efficiently Different storage zones – pre-packed vegetables and other fresh food with a label stating it Due to the natural circulation of the air should be kept at a temperature of in the appliance, there are different approx. -
Page 23: Food Which Should Not Be Stored In A Refrigerator
Using the refrigerator efficiently Food which should not be Storing food correctly stored in a refrigerator Food should generally be stored covered or packaged. This will prevent Not all food is suitable for refrigeration, food smells from affecting other foods, as some food is sensitive to cold. -
Page 24: Unpacked Meat And Vegetables
Using the refrigerator efficiently – Examples of fruit and vegetables Meat which react strongly to the natural Meat should be stored unwrapped. gases given off by other types of (Undo wrappings slightly to leave meat fruit and vegetables are: loosely covered, and leave containers Kiwis, broccoli, cauliflower, brussels open). -
Page 25: Adjusting The Interior Fittings
Adjusting the interior fittings Moving the shelves To move the split shelf: ^ Take both halves of the split glass The shelves can be adjusted according to the height of the food. shelf out, ^ Raise the shelf, and pull it forwards slightly until the notch at the side is in line with the shelf support. -
Page 26: Adjusting The Condiment Tray/Bottle Shelf
Adjusting the interior fittings Adjusting the condiment Universal container tray/bottle shelf The universal container can be used ^ Lift the tray/shelf up and out of the both to store and serve food. stainless steel frame to remove. ^ Push up the stainless steel frame, and remove. -
Page 27: Freezing And Storing Food
Freezing and storing food Maximum freezing capacity Storing frozen food To ensure that fresh food placed in the When buying frozen food to store in freezer freezes through to the core as your freezer, check quickly as possible, the maximum –... -
Page 28: Home Freezing
Freezing and storing food Home freezing – Do not season fresh foods or blanched vegetables before Only freeze fresh food which is in a freezing. Only season cooked food good condition. lightly before freezing, but care should be taken as the taste of some Hints on home freezing spices alters when frozen. -
Page 29: Before Placing Food In The Freezer
Freezing and storing food ^ Make a note of the contents and the Please note that when removing the date of freezing on the packaging. drawers, the lowest freezer drawer must always remain in the freezer. Before placing food in the freezer When placing food on the glass cold ^ When freezing more than 2 kg of plate make sure it does not obstruct... -
Page 30: Freezer Calendar
Freezing and storing food Freezer calendar Poultry It is particularly important to observe food hygiene rules when The freezer calendar on the freezer defrosting poultry. Do not use the liquid drawer gives the length of time in from defrosted poultry. Pour it away months which various foods can be and wash the container it was in, the stored for effectively. -
Page 31: Ice Cubes
Freezing and storing food Ice cubes Cool pack The cool pack prevents the temperature in the freezer rising too quickly in the event of a power cut. This can help to prolong the storage time. ^ Place the cool pack in the top drawer of the freezer. -
Page 32: Automatic Defrost
Automatic defrost Refrigerator section Freezer section The refrigerator defrosts automatically. This appliance is equipped with a "Frost free" system. The freezer section Condensate and frost can build up on defrosts automatically. the back wall of the refrigerator section whilst it is in use. You do not need to The moisture generated in the remove this, as it will defrost and appliance collects on the condenser... -
Page 33: Cleaning And Care
Miele's – cleaning agents containing soda, conditioning agent for stainless steel ammonia, acids or chlorides, (available from the Miele Spare Parts Department or via the internet at – cleaning agents containing www.miele-shop.com). descaling agents, –... -
Page 34: Cleaning The Interior And Accessories
Cleaning and care ^ Detach the stainless steel trim from Before cleaning the edge of the lid (2.) at one side ^ Switch the appliance off. and remove. ^ Disconnect it from the mains. Switch ^ After cleaning, refit the stainless steel off at the wall and withdraw the plug trim onto the lid in the reverse order. -
Page 35: Ventilation Gaps
^ Any soiling on stainless steel ^ Once the freezer section has surfaces can be removed with the reached the required temperature, Miele conditioning agent for stainless steel which will also help prevent place the food back in the freezer re-soiling. -
Page 36: Problem Solving Guide
^ Check whether the ventilation gaps in tripped. If it has, contact the Miele the plinth and in the housing unit at Service Department. the top have been covered over or become too dusty. - Page 37 Problem solving guide . . . the compressor runs amounts of fresh food have been put in at once for freezing. continuously. The alarm will stop and the temperature To save energy, the compressor runs at a lower speed, but for longer, when display will light up constantly again as less cooling is required.
- Page 38 If you still cannot remedy the fault freezer section. having followed these suggestions, please contact the Miele Service At the end of a power cut, the Department. appliance will start operating again at To prevent unnecessary loss of the last temperature setting selected.
-
Page 39: Noises
Noises Normal noises What causes them Humming noise made by the motor (compressor). This noise can Brrrrr... get louder for brief periods when the motor is switching on. Blubb, blubb..A gurgling noise can be heard when coolant is circulating through the pipes. -
Page 40: After Sales / Guarantee
– your Miele Dealer – Miele (see back cover for contact details). When contacting your Dealer or Miele, please quote the model and serial number of your appliance. This information is given on the data plate inside your appliance. -
Page 41: Electrical Connection
Electrical connection Electrical connection U.K. Non-rewireable plugs (BS 1363) All electrical work should be carried out The fuse cover must be re-fitted when by a suitably qualified and competent changing the fuse, and if the fuse cover person in strict accordance with current is lost, the plug must not be used until a local and national safety regulations suitable replacement is obtained. -
Page 42: Installation
Should you least 200 cm throughout to ensure that require further assistance please warm air can be drawn through contact your Miele customer service unhindered. Otherwise the appliance centre. has to work harder, resulting in an increase in electricity consumption. -
Page 43: Before Installing The Appliance
Remove the old hinges from the housing unit. They are no longer required because the furniture door is now fitted to the appliance door. All the necessary parts are supplied or can be ordered from the Miele Spare Parts Department. -
Page 44: Building-In Dimensions
Building-in dimensions Freezer section height Niche height KFN 9753 iD 1772 - 1788... -
Page 45: Adjusting The Door Hinges
Adjusting the door hinges The door hinges are set ex-works to enable the doors to be opened wide. However, if the opening angle of the door needs to be limited for any reason, the hinges can be adjusted to accommodate this. For example, if the appliance door hits an adjacent wall when opened, the opening angle can be limited to 90°. -
Page 46: Changing The Door Hinging
Changing the door hinging ^ Unscrew fixing screws e completely, Before building the appliance in, you will need to decide on which side the and loosely screw them in at the top, door is to be hinged. If left hand door middle and bottom on the opposite hinging is required, follow the side of the appliance. - Page 47 Changing the door hinging ^ Undo ball joint d using a spanner ^ Replace caps a in the vacant holes and remove it. on the opposite side. ^ Stand the appliance doors up one by To secure the soft-close mechanism one, and slacken the hinges at the ^ Place the two doors with the outer front (the hinges remain open).
- Page 48 Changing the door hinging ^ Hang the doors onto the pre-fitted screws, and push the doors inwards. ^ Tighten the screws at the top, middle and bottom securely. ^ Replace covers a, b and c. ^ Then replace caps d in the vacant holes.
-
Page 49: Building In The Appliance
The unit corners must be at right angles, as KFN 9753 iD otherwise the furniture door will not align correctly with the 4 corners of the appliance. Fitting a door which is heavier than the maximum permitted could damage the hinges. - Page 50 Building in the appliance ^ Push the appliance two-thirds of the Preparing the appliance way into its niche. When doing this, make sure that the mains cable does not get trapped. With 16 mm thick unit walls: ^ Slide cover strip a into the holder as shown, with the bumps facing downwards.
- Page 51 Building in the appliance ^ Open both appliance doors. ^ Fit cover k onto fixing bracket l. ^ Secure fixing bracket l to the bottom of the appliance with screws m (M5 x 15). ^ Carefully remove the protective foil from sealing strip n.
- Page 52 Building in the appliance Building in the appliance On furniture with door fittings (e.g. stubs, seals etc) the dimension of these must be taken into account when making sure there is a gap all round of 42 mm. ^ Pull the appliance forwards by the dimension of the door fitting to keep the gap at 42 mm all round.
-
Page 53: Securing The Appliance In The Niche
Building in the appliance Securing the appliance in the niche ^ Press the appliance against the ^ Loosen screws b on the top and housing unit on the hinge side. bottom fixing brackets c. ^ To fix the appliance to the housing ^ Press fixing bracket c against the unit at the top and bottom, screw the side wall and tighten screws b. -
Page 54: Fitting The Furniture Doors
Building in the appliance ^ Break off the protruding end of bottom cover e. It is no longer required. ^ Fit angled cover g onto bottom fixing bracket c. ^ Close the appliance doors. Fitting the furniture doors ^ Using a pencil, lightly mark a line down the centre of the inside of the furniture door. - Page 55 Building in the appliance Securing the appliance doors to the furniture doors: ^ Hang the furniture door onto adjusting bolts h. ^ Drill fixing holes a in the furniture ^ Loosely attach nuts c on the doors and screw in the 4 x 14 mm adjusting bolts.
- Page 56 Building in the appliance ^ Replace top cover i, and snap it into place. ^ Close both of the doors, and align ^ Replace side covers j, making sure them with the neighbouring furniture they snap into place. doors. ^ Replace side covers k, making sure ^ Whilst counterholding adjusting bolts they snap into place.
- Page 60 Alteration rights reserved / 0412 M.-Nr. 09 307 880 / 00 KFN 9753 iD...
Need help?
Do you have a question about the KFN 9753 iD and is the answer not in the manual?
Questions and answers