Table of Contents
Advertisement
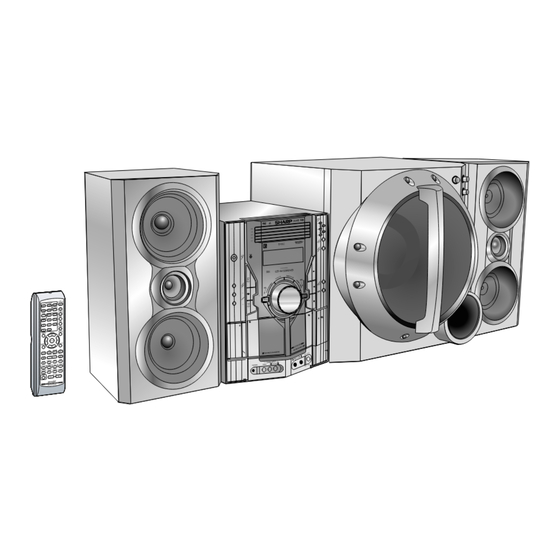
DVD MINI SYSTEM
MODEL
CD-G7500DVD
SPEAKER SYSTEM
MODEL
CP-G7500
OPERATION MANUAL
NTSC/PAL
*CD-G7500DVD(EN)Cover
1
Thank you for purchasing this SHARP product.
To obtain the best performance from this product, please read this
manual carefully. It will guide you in operating your SHARP product.
CD-G7500DVD
CD-G7500DVD DVD Mini System consisting of CD-G7500DVD (main unit).
CP-G7500
CP-G7500 Speaker System consisting of CP-G7500 (front speaker system) and CP-
SW7500 (active subwoofer).
ENGLISH
Please refer to pages E-1 to E-77.
SHARP CORPORATION
05.1.13, 14:46
CD-G7500DVD (S)
TINSZA159AWZZ
Advertisement
Table of Contents

Related Manuals for Sharp CD-G7500DVD


Summary of Contents for Sharp CD-G7500DVD
-
Page 1: Speaker System
Thank you for purchasing this SHARP product. To obtain the best performance from this product, please read this manual carefully. It will guide you in operating your SHARP product. DVD MINI SYSTEM CD-G7500DVD CD-G7500DVD DVD Mini System consisting of CD-G7500DVD (main unit). -
Page 2: Special Notes
Corporation, and is intended for home and other limited viewing uses only unless otherwise authorized by Macrovision Corporation. Reverse engi- neering or disassembly is prohibited. Video cable × 1 (Yellow) Note: Only the above accessories are included. *CD-G7500DVD(EN)01 05.1.13, 14:40 CD-G7500DVD (S) TINSZA159AWZZ... -
Page 3: Table Of Contents
Advanced DVD Features Using the function control ..........36 - 41 Repeat playback ................. 42 Programme playback ..............43 Selecting titles from the menu ..........44 Setting parameters using the disc menu ......... 44 *CD-G7500DVD(EN)02-05 05.1.13, 14:40 CD-G7500DVD (S) TINSZA159AWZZ... -
Page 4: Precautions
SHARP will not be held responsible for any damage resulting from use of this 10 cm (4") 10 cm (4") unit with a voltage other than that which is specified. -
Page 5: Controls And Indicators
26. Microphone Socket 2 ................54 27. Microphone Level Control ..............54 28. Tuner (Band) Button ................56 29. DVD/Video CD/CD/MP3/WMA Button .......... 22, 33 30. Tape (1V2) Button ................ 58, 59 31. Game/Video Button ..............54, 70 *CD-G7500DVD(EN)02-05 05.1.13, 14:40 CD-G7500DVD (S) TINSZA159AWZZ... - Page 6 21. Tape Forward Play Indicator 22. Tape 2 Reverse Mode Indicator 23. FM Stereo Mode Indicator 24. FM Stereo Receiving Indicator 25. Daily Timer Indicator 26. Tuner Receiving Frequency Indicators 27. Karaoke Mode Indicator *CD-G7500DVD(EN)02-05 05.1.13, 14:41 CD-G7500DVD (S) TINSZA159AWZZ...
-
Page 7: Rear Panel
AUDIO DIGITAL 75 OHMS power is on for better heat radiation. DVD/CD LOOP SPAN SELECTOR FM/AM(kHz) 50/9 100/10 RATED LINE VOLTAGE VIDEO FRONT SPEAKERS AC INPUT SUBWOOFER RATED SPEAKER PRE-OUT IMPEDANCE: 6 OHMS MIN. *CD-G7500DVD(EN)06-09 05.1.13, 14:41 CD-G7500DVD (S) TINSZA159AWZZ... - Page 8 5. Volume Control ................... 14 6. Crossover Frequency Control ............14 7. Cooling Fan 8. AC Power Lead ................10, 14 9. AC Voltage Selector ................14 10. Subwoofer Input Socket ............... 10, 14 *CD-G7500DVD(EN)06-09 05.1.13, 14:41 CD-G7500DVD (S) TINSZA159AWZZ...
- Page 9 36. Game/Video Button ................ 54, 70 37. Equaliser Mode Select Button ............. 18 38. Extra Bass Button ................18 39. DVD 3-D Virtual Surround Button ............39 40. DVD On Screen Button ................ 32 *CD-G7500DVD(EN)06-09 05.1.13, 14:41 CD-G7500DVD (S) TINSZA159AWZZ...
-
Page 10: Controls And Indicators
2. DVD Setup Button ................. 24, 28 3. DVD Sound Button ................39 4. DVD Super Picture Button ..............41 5. DVD/Video CD/CD A-B Repeat Button ..........42 6. DVD Digital Gamma Button ............... 40 RRMCGA015AWSA *CD-G7500DVD(EN)06-09 05.1.13, 14:41 CD-G7500DVD (S) TINSZA159AWZZ... -
Page 11: System Connections
Make sure to unplug the AC power lead before making any connections. AM Loop FM Aerial Aerial Active Subwoofer Right speaker Left speaker To a wall socket To a wall socket (See page 13) (See page 14) E-10 *CD-G7500DVD(EN)10-17 05.1.13, 14:41 CD-G7500DVD (S) TINSZA159AWZZ... -
Page 12: Speaker Connection
I Do not allow any objects to fall into or to be placed in the bass reflex ducts. Incorrect I Do not stand or sit on the speakers. You may be injured. E-11 *CD-G7500DVD(EN)10-17 05.1.13, 14:41 CD-G7500DVD (S) TINSZA159AWZZ... - Page 13 Move the speakers further away from the TV. I If any kind of magnet or an electromagnet is placed too close to the TV and the system, irregular colours may appear on the TV screen. E-12 *CD-G7500DVD(EN)10-17 05.1.13, 14:41 CD-G7500DVD (S) TINSZA159AWZZ...
- Page 14 AC plug adaptor supplied with the unit, as illustrated. The AC plug adaptor is not included in areas where the wall socket and AC power plug can be directly connected (see illustration E-13 *CD-G7500DVD(EN)10-17 05.1.13, 14:41 CD-G7500DVD (S) TINSZA159AWZZ...
-
Page 15: Active Subwoofer
(see illustration Connecting the subwoofer Use the subwoofer cable to connect the SUBWOOFER PRE-OUT socket on the main unit and the SUBWOOFER IN socket on the active subwoofer. E-14 *CD-G7500DVD(EN)10-17 05.1.13, 14:41 CD-G7500DVD (S) TINSZA159AWZZ... -
Page 16: Demonstration Mode
3. Whilst pressing down the I6 button and the X-BASS/DEMO button, press the 5 3 PRESET X button until “CLEAR AL” appears. Caution: This operation will erase all data stored in memory including clock, timer settings, tuner preset, and CD programme. E-15 *CD-G7500DVD(EN)10-17 05.1.13, 14:41 CD-G7500DVD (S) TINSZA159AWZZ... -
Page 17: Subwoofer Control
I Do not set the volume too high on the main unit. The subwoofer may be damaged. I Before you switch on/off on the main unit, minimise the volume on the main unit. Power Indicator E-16 *CD-G7500DVD(EN)10-17 05.1.17, 15:09 CD-G7500DVD (S) TINSZA159AWZZ... -
Page 18: Remote Control
This will prevent potential damage due to battery leakage. Caution: I Do not use rechargeable batteries (nickel-cadmium battery, etc.). CD-G7500DVD I Installing the batteries incorrectly may cause the unit to malfunction. 0.2 m - 6 m (8" - 20') E-17 *CD-G7500DVD(EN)10-17 05.1.13, 14:41 CD-G7500DVD (S) TINSZA159AWZZ... -
Page 19: General Control
When the VOLUME control is turned clockwise, the volume will increase. When If the EQUALIZER button is pressed in the extra bass mode, it will be cancelled it is turned anti-clockwise, the volume will decrease. automatically. E-18 *CD-G7500DVD(EN)18-19 05.1.13, 14:41 CD-G7500DVD (S) TINSZA159AWZZ... -
Page 20: Setting The Clock
(AM 12:00 - PM 11:59) Perform “Setting the clock” from step 1. → The 12-hour display will appear. “AM 0:00” Note: (AM 0:00 - PM 11:59) The clock can also be set with the remote control. E-19 *CD-G7500DVD(EN)18-19 05.1.13, 14:41 CD-G7500DVD (S) TINSZA159AWZZ... -
Page 21: Types Of Playable Discs
I DVD-RW disc that has been recorded in Video Mode. I Make sure the DVD-R/DVD-RW disc has been finalized after recording process before playback on this unit. I Further information about Video Mode, refer to DVD-R/DVD-RW recorder operation manual. E-20 *CD-G7500DVD(EN)20-22 05.1.13, 14:41 CD-G7500DVD (S) TINSZA159AWZZ... - Page 22 When this happens, check the disc type. Example: Audio CD Track 1 Track 2 Track 3 Track 4 Track 5 Note: Numbers identify each title, chapter and track on a disc. Most discs have these numbers recorded on them. E-21 *CD-G7500DVD(EN)20-22 05.1.13, 14:41 CD-G7500DVD (S) TINSZA159AWZZ...
-
Page 23: Preparing To Watch A Dvd (Dvds)
I If a disc is damaged, dirty or loaded upside down, the disc will skip. input socket and enjoy viewing high-quality images on the TV screen. Be sure to turn both the system and the TV equipment off before connecting them. E-22 *CD-G7500DVD(EN)20-22 05.1.13, 14:41 CD-G7500DVD (S) TINSZA159AWZZ... -
Page 24: Initial Setup (Osd Language Setup)
I Once you go through this procedure, the screen appears in the language selected in step 5 above from the next operation. I You cannot open the setup screen whilst a playback operation is in progress. If a disc is playing, stop playback first. RRMCGA015AWSA E-23 *CD-G7500DVD(EN)23-28 05.1.13, 14:42 CD-G7500DVD (S) TINSZA159AWZZ... -
Page 25: Setting Up For Playback Of An Ntsc Disc
I When you playback the PAL discs, either setting of “NTSC → PAL” or “NTSC” can be used on a PAL TV or a Multi-System TV. I PAL signal can not be converted to NTSC signal. I This setting disable during play operation. E-24 *CD-G7500DVD(EN)23-28 05.1.13, 14:42 CD-G7500DVD (S) TINSZA159AWZZ... -
Page 26: Tv Mode Setup
Note: 4:3 size image. If you select 16:9 whilst a 4:3 TV is connected, playing a 16:9 disc will produce A 4:3 disc is played in 4:3. a vertically stretched image. E-25 *CD-G7500DVD(EN)23-28 05.1.13, 14:42 CD-G7500DVD (S) TINSZA159AWZZ... -
Page 27: Parental Setting
I On some DVDs, the parental level setting is fixed and cannot be modified. unauthorised changes. Once you set a password, it must be input to perform the following operations. I To change the parental level. I To temporarily change the parental level during playback. E-26 *CD-G7500DVD(EN)23-28 05.1.13, 14:42 CD-G7500DVD (S) TINSZA159AWZZ... - Page 28 Press the ENTER button to confirm the setting. regardless of the parental level. To exit the setup screen and return to the startup screen, press the SET UP button whilst pressing down the SHIFT button or the RETURN button. E-27 *CD-G7500DVD(EN)23-28 05.1.13, 14:42 CD-G7500DVD (S) TINSZA159AWZZ...
-
Page 29: Audio Setting
Use this setting for a digital connection to the PCM digital input socket of a DAT or MD, or for a digital connection to a receiver (amplifier) that does not have a Dolby Digital decoder. E-28 *CD-G7500DVD(EN)23-28 05.1.13, 14:42 CD-G7500DVD (S) TINSZA159AWZZ... -
Page 30: Disc Language Setting
C O M P R E S S I O N screen. D I G I T A L BITSTREAM select. BITSTREAM M P E G E-29 C I N E M A V O I C E O F F *CD-G7500DVD(EN)29-32 05.1.13, 14:42 CD-G7500DVD (S) TINSZA159AWZZ... - Page 31 A U D I O A U D I O button, then press the ENGLISH ESPAÑOL SVENSKA ENTER button to set the “OTHER” input item (two SELECT FRANÇAIS NEDERLANDS ITALIANO DEUTSCH letters). ENTER ENTER RETURN E-30 *CD-G7500DVD(EN)29-32 05.1.13, 14:42 CD-G7500DVD (S) TINSZA159AWZZ...
- Page 32 Korean Kinyarwanda Volapük Spanish Kashmiri Sanskrit Wolof Estonian Kurdish Sindhi Xhosa Basque Kirghiz Sango Yoruba Persian Latin Serbo-Croatian Chinese Finnish Lingala Singhalese Zulu Fiji Laotian Slovak Faroese Lithuanian Slovenian French Latvian, Lettish Samoan E-31 *CD-G7500DVD(EN)29-32 05.1.13, 14:42 CD-G7500DVD (S) TINSZA159AWZZ...
-
Page 33: Changing The Display Mode
2 3 4 0 Track number/Elapsed playing time Operation indicator 1 5 / 8 3 / 2 3 4 0 2 3 4 0 R S E U E M Appears when display mode is “on”. E-32 *CD-G7500DVD(EN)29-32 05.1.13, 14:42 CD-G7500DVD (S) TINSZA159AWZZ... -
Page 34: Playing A Dvd (Dvds)
To play the desired disc: Press one of the s 1 - s 5 buttons to select the desired disc and then press the DIRECT PLAY button. To stop disc playback: Press the H button. E-33 *CD-G7500DVD(EN)33-35 05.1.13, 14:42 CD-G7500DVD (S) TINSZA159AWZZ... -
Page 35: Other Disc Play Features
1/8) 3 (about 1/16) Press the 0 button to return to the normal playback. Notes: I On some discs, the slow-motion playback functions are disabled. I Slow-motion playback is disabled on audio CDs. E-34 *CD-G7500DVD(EN)33-35 05.1.13, 14:42 CD-G7500DVD (S) TINSZA159AWZZ... - Page 36 (Only at fast forward 1 speed sound can be heard.) I With a DVD video disc, you can search within one title only. Playback starts from the beginning of the title. E-35 *CD-G7500DVD(EN)33-35 05.1.13, 14:43 CD-G7500DVD (S) TINSZA159AWZZ...
-
Page 37: Using The Function Control
I You can activate/deactivate the setting or change the level. Note: In function control mode, you can return to the previous setting screen by pressing the RETURN button or the SET UP button whilst pressing down the SHIFT button. E-36 *CD-G7500DVD(EN)36-39 05.1.13, 14:43 CD-G7500DVD (S) TINSZA159AWZZ... - Page 38 The image changes to the beginning of the specified chapter. Example: Selecting title 5 Note: The number of chapters you can enter depends on that of the chapters recorded Press the DIRECT button to – on the disc. select E-37 *CD-G7500DVD(EN)36-39 05.1.13, 14:43 CD-G7500DVD (S) TINSZA159AWZZ...
-
Page 39: Angle Setting
I This function can only be used for discs on which scenes shot from multiple You can exit the function control screen by pressing the SET UP button angles have been recorded. whilst pressing down the SHIFT button or the RETURN button. E-38 *CD-G7500DVD(EN)36-39 05.1.13, 14:43 CD-G7500DVD (S) TINSZA159AWZZ... - Page 40 I You can also press the SURROUND button on the remote control for the (You can skip steps 1 and 2). same operation in step 3. (You do not need to do the steps 1 and 2). E-39 *CD-G7500DVD(EN)36-39 05.1.13, 14:43 CD-G7500DVD (S) TINSZA159AWZZ...
- Page 41 You can also press the D.GAMMA button whilst pressing down the SHIFT button on the remote control for the same operation in step 3. (You do not need to do the steps 1 and 2.) RRMCGA015AWSA E-40 *CD-G7500DVD(EN)40-44 05.1.13, 14:43 CD-G7500DVD (S) TINSZA159AWZZ...
- Page 42 If you are already at the far left side of the image, for example, the ZOOM indicator will become red when you press the cursor button. E-41 *CD-G7500DVD(EN)40-44 05.1.13, 14:43 CD-G7500DVD (S) TINSZA159AWZZ...
-
Page 43: Repeat Playback
I A-B repeat cannot be used with the multi-angle function (see page 38). indicator from the display. I You may not be able to use this function with some discs. Note: You may not be able to use this function with some discs. E-42 *CD-G7500DVD(EN)40-44 05.1.13, 14:43 CD-G7500DVD (S) TINSZA159AWZZ... -
Page 44: Programme Playback
To clear the programme: 1. Whilst in the stop mode, press MEMORY/DIMMER button. 2. To clear all programme, press and hold down the CLEAR/DISPLAY button for more than 3 seconds whilst in the confirmation area. RRMCGA015AWSA E-43 *CD-G7500DVD(EN)40-44 05.1.13, 14:43 CD-G7500DVD (S) TINSZA159AWZZ... -
Page 45: Selecting Titles From The Menu
See the disc jacket for details. I The title menu does not appear immediately after you load a disc. It appears only if the disc has been played once, totally or partially. E-44 *CD-G7500DVD(EN)40-44 05.1.13, 14:43 CD-G7500DVD (S) TINSZA159AWZZ... -
Page 46: Video Cd
Notes: I Video CDs are recorded in PAL or NTSC format. I Analogue system CDVs (12 cm) cannot be played. I Photo CDs and CD-ROMs cannot be played. E-45 *CD-G7500DVD(EN)45-48 05.1.13, 14:43 CD-G7500DVD (S) TINSZA159AWZZ... -
Page 47: Video Cd Playback
I When there is no disc in one of the disc 1 - 5 trays, that tray will be RRMCGA015AWSA skipped and the next disc will begin to play. E-46 *CD-G7500DVD(EN)45-48 05.1.13, 14:43 CD-G7500DVD (S) TINSZA159AWZZ... -
Page 48: Video Cd Playback
I The P.B.C. function cannot be cancelled whilst in the playback mode. I Some video CDs with P.B.C. cannot be played back when the P.B.C. mode is off. I P.B.C. mode will automatically set after stop the playback. E-47 *CD-G7500DVD(EN)45-48 05.1.13, 14:43 CD-G7500DVD (S) TINSZA159AWZZ... -
Page 49: Cd Playback
CD whose number is flashing flashing “ ” will appear. You can place discs on the trays 2 - 5 by following steps 3 - 5. Press the 0 button to start playback. CD play indicator E-48 *CD-G7500DVD(EN)45-48 05.1.13, 14:43 CD-G7500DVD (S) TINSZA159AWZZ... - Page 50 I The 5/3 or 2 4 button on the remote control allows you the same When the last track of the disc with the selected track is finished, the operation. next disc will be automatically started. E-49 *CD-G7500DVD(EN)49-53 05.1.13, 14:44 CD-G7500DVD (S) TINSZA159AWZZ...
-
Page 51: Repeat Play
3. Press the RANDOM button on the remote control. display. To cancel random play: Notes: Press the 0 button again. I This function is invalid for WMA and MP3 discs. E-50 I Random play cannot function during repeat play. *CD-G7500DVD(EN)49-53 05.1.13, 14:44 CD-G7500DVD (S) TINSZA159AWZZ... -
Page 52: Cd Playback
You can also select the track number by pressing the 0 - 9 buttons. I If the CLEAR/DISPLAY button is pressed more than 2 seconds whilst in confirm condition, all programmed tracks will be cleared. I Programme mode cannot be enter whilst in repeat mode. E-51 *CD-G7500DVD(EN)49-53 05.1.13, 14:44 CD-G7500DVD (S) TINSZA159AWZZ... -
Page 53: Mp3/Wma Disc
I A track number higher than the number of tracks on the disc cannot be selected. I During random play, direct search is not possible. I If the ENTER button is not pressed after direct search buttons, the track will not be selected. E-52 *CD-G7500DVD(EN)49-53 05.1.13, 14:44 CD-G7500DVD (S) TINSZA159AWZZ... -
Page 54: Mp3/Wma Disc
I Elapsed time for WMA discs may not display correctly during the speed Repeat playback search (x8 or x32). Press R button during playback. I Press repeatedly will toggle its type of repeat as below: (Track repeat) (Folder repeat) All Repeat Cancel Repeat E-53 *CD-G7500DVD(EN)49-53 05.1.13, 14:44 CD-G7500DVD (S) TINSZA159AWZZ... -
Page 55: Playing Karaoke
I When not using the microphone, remove it from the MIC socket. RRMCGA015AWSA I When connecting or disconnecting the microphone, set the MIC LEVEL control to MIN. I When using only one microphone, unplug the other. E-54 *CD-G7500DVD(EN)54-55 05.1.13, 14:44 CD-G7500DVD (S) TINSZA159AWZZ... -
Page 56: Playing Karaoke
Press the KARAOKE button whilst pressing down the SHIFT button on the remote control until “V -CANCEL” appears in the display. “ ” will appear. E-55 *CD-G7500DVD(EN)54-55 05.1.13, 14:44 CD-G7500DVD (S) TINSZA159AWZZ... -
Page 57: Listening To The Radio
“ST” indicator. The reception changes to monaural, and the sound I 0 button on the remote control or main unit: The unit turns on and playback becomes clearer. of the last function starts (DVD/CD, TAPE, TUNER, GAME). E-56 *CD-G7500DVD(EN)56-57 05.1.13, 14:44 CD-G7500DVD (S) TINSZA159AWZZ... -
Page 58: Listening To The Radio
2. Whilst pressing down the I6 button and the X-BASS/DEMO button, press the CLOCK/TIMER button until “TUNER CL” appears. To recall a preset station 1. Press the PRESET (X or W) button for less than 0.5 seconds to select the desired station. E-57 *CD-G7500DVD(EN)56-57 05.1.13, 14:44 CD-G7500DVD (S) TINSZA159AWZZ... -
Page 59: Tape Playback
I TAPE (1 V 2 ) button (main unit and remote control): The unit turns on and the “TAPE” function is activated. I 0 button on the remote control or main unit: The unit turns on and playback of the last function starts (DVD/CD, TAPE, TUNER, GAME). E-58 *CD-G7500DVD(EN)58-59 05.1.13, 14:44 CD-G7500DVD (S) TINSZA159AWZZ... - Page 60 Press the 0 button to listen to side A, or the 1 button for side B. To play both sides ( ), start from side A. When playback starts from side B, side A will not be played. E-59 *CD-G7500DVD(EN)58-59 05.1.17, 13:37 CD-G7500DVD (S) TINSZA159AWZZ...
-
Page 61: Recording To A Cassette Tape
Operation Function Remote that the desired material is properly recorded. control I SHARP is not liable for damage or loss of your recording arising from Side A Press in the stop mode. malfunction of this unit. playback I The volume and sound controls can be adjusted with no effect on the recorded signal (Variable Sound Monitor). - Page 62 I It will stop the tape only. Another press of the I button will stop DVD playback. I Even when the DVD playback is finished, the tape will not stop. To stop the tape, press the I button. RRMCGA015AWSA E-61 *CD-G7500DVD(EN)60-65 05.1.13, 14:45 CD-G7500DVD (S) TINSZA159AWZZ...
- Page 63 Press the 0 button to start recording on side A or the 1 button for side B. To stop recording: Press the I button 2 times. The MP3/WMA and tape will stop. RRMCGA015AWSA E-62 *CD-G7500DVD(EN)60-65 05.1.13, 14:45 CD-G7500DVD (S) TINSZA159AWZZ...
- Page 64 CD and the cassette will stop automatically. I CD playback will start approximately 7 seconds after the tape starts. To stop recording: Press the I button. The CD and tape will stop. E-63 *CD-G7500DVD(EN)60-65 05.1.13, 14:45 CD-G7500DVD (S) TINSZA159AWZZ...
- Page 65 To resume recording, press the same recording button you pressed in step 5. Other buttons do not allow resuming. To stop recording: Press the H button. Note: If you hear a whistling noise whilst recording an AM station, move the AM loop aerial. E-64 *CD-G7500DVD(EN)60-65 05.1.13, 14:45 CD-G7500DVD (S) TINSZA159AWZZ...
-
Page 66: Recording To A Cassette Tape
To erase both sides, begin with side A. (If erasing is started from side B, the tape will not switch over to side A.) Note: Make sure that the TAPE 1 is not in use. E-65 *CD-G7500DVD(EN)60-65 05.1.13, 14:45 CD-G7500DVD (S) TINSZA159AWZZ... -
Page 67: Timer And Sleep Operation
When set times for the daily timer and once timer overlap, the once timer takes button. priority. Allow an interval of at least 1 minute between operations. Set the unit to the correct time if “ONCE” or “DAILY” does not appear. Continued to the next page E-66 *CD-G7500DVD(EN)66-71 05.1.13, 14:45 CD-G7500DVD (S) TINSZA159AWZZ... - Page 68 The illustrations show the timer playback setting in the daily timer mode. -DISC GHANGER Press the 5 3 or 2 4 button to adjust the minutes DV D MINI SYSTEM CD-G7500DVD and then press the MEMORY/SET button. E-67 *CD-G7500DVD(EN)66-71 05.1.13, 14:45 CD-G7500DVD (S) TINSZA159AWZZ...
- Page 69 3. Within 10 seconds, press the 5 3 or 2 4 button to select “ONCE ON” or “DAILY ON”, and press the MEMORY/SET button. 4. Press the ON/STAND-BY button to enter the power stand-by mode. Note: The timer can also be set with the remote control. E-68 *CD-G7500DVD(EN)66-71 05.1.13, 14:45 CD-G7500DVD (S) TINSZA159AWZZ...
-
Page 70: Radio
If you want to sleep and wake up listening to a tape, and the the MEMORY/SET button (steps 4 - 5). length of the tape is shorter than the sleep timer setting, timer playback will not be possible. E-69 *CD-G7500DVD(EN)66-71 05.1.13, 14:45 CD-G7500DVD (S) TINSZA159AWZZ... -
Page 71: Enhancing Your System
I Be sure your headphones have a 3.5 mm (1/8") diameter plug and are between 16 ohms and 50 ohms impedance. The recommended impedance is 32 ohms. I Plugging in the headphones disconnects the speakers automatically. Adjust the volume using the VOLUME control. E-70 *CD-G7500DVD(EN)66-71 05.1.13, 14:45 CD-G7500DVD (S) TINSZA159AWZZ... -
Page 72: Enhancing Your System
When external units are connected, you need commercially available leads. MD recorder, DTS/MPEG Optical digital lead audio processor or amplifier (not supplied) To the digital input socket To video input socket Yellow Yellow Video Cable E-71 *CD-G7500DVD(EN)66-71 05.1.13, 14:45 CD-G7500DVD (S) TINSZA159AWZZ... -
Page 73: Troubleshooting Chart
Many potential “problems” can be resolved by the owner without calling a ser- ENGLISH vice technician. If something is wrong with this product, check the following Symptom before calling your authorised SHARP dealer or service centre. Possible cause G Make sure the channel of the connected TV is set General G No image from the DVD to VIDEO or AV. - Page 74 G The picture quality is poor, or it is distorted. Karaoke Symptom Possible cause G The vocal part of a G Is the karaoke mode set to “L-CH”, “R-CH” or “V- CANCEL”? multiplexed disc is not heard. E-73 *CD-G7500DVD(EN)72-78 05.1.13, 14:45 CD-G7500DVD (S) TINSZA159AWZZ...
- Page 75 (or cassette) in the unit until normal playback is possible tion described in this operation manual. D E N (about 1 hour). Wipe off any condensation on the transmitter with a soft cloth before operating the unit. E-74 *CD-G7500DVD(EN)72-78 05.1.13, 14:45 CD-G7500DVD (S) TINSZA159AWZZ...
-
Page 76: Maintenance
ENGLISH Cleaning the tape-handling parts As part of our policy of continuous improvement, SHARP reserves the right to make design and specification changes for product improvement without prior I Dirty heads, capstans or pinch rollers can cause poor sound and tape jams. - Page 77 13 cm (5-1/8") woofer x 2 Maximum input power 400 W Rated input power 200 W Impedance 6 ohms Dimensions Width: 220 mm (8-11/16") Height: 420 mm (16-9/16") Depth: 430 mm (16-15/16") Weight 5.5 kg (12.1 lbs.)/each E-76 *CD-G7500DVD(EN)72-78 05.1.13, 14:45 CD-G7500DVD (S) TINSZA159AWZZ...
-
Page 78: Glossary
Screen size that cuts off the sides of the image to allow playing of wide (16:9) angle when playing the disc. software on a connected 4:3 TV. Zoom Allows you to zoom in and enlarge a specific part of an image. E-77 *CD-G7500DVD(EN)72-78 05.1.13, 14:45 CD-G7500DVD (S) TINSZA159AWZZ... - Page 79 CD-G7500DVD/CP-G7500 DVD MINI SYSTEM/SPEAKER SYSTEM...
Need help?
Do you have a question about the CD-G7500DVD and is the answer not in the manual?
Questions and answers