Table of Contents
Advertisement
Advertisement
Table of Contents

Related Manuals for JVC GET0172-001A


Summary of Contents for JVC GET0172-001A
- Page 1 For installation and connections, refer to the separate manual. !"#$%&'()* °√ÿ ≥ “¥Ÿ § Ÿ Ë ¡ ◊ Õ ∑’ Ë · ¬°µË “ ßÀ“° „π°“√µ‘ ¥ µ— È ß ·≈–°“√‡™◊ Ë Õ ¡µË Õ INSTRUCTIONS §”·π–π” DIRECT TRACK ACCESS LOUD !" !" KD-S5055 KD-S5055 KD-S5055 GET0172-001A...
-
Page 2: How To Reset Your Unit
IMPORTANT FOR LASER PRODUCTS 1. CLASS 1 LASER PRODUCT 2. CAUTION: Do not open the top cover. There are no user serviceable parts inside unit; leave all servicing to qualified service personnel. 3. CAUTION: Visible and invisible laser radiation when open and interlock failed or defeated. Avoid direct exposure to beam. -
Page 3: Table Of Contents
Thank you for purchasing a JVC product. Please read all instructions carefully before operation, to ensure your complete understanding and to obtain the best possible performance from the unit. CONTENTS How to reset your unit ... 2 How to use the MODE button ... 3 LOCATION OF THE BUTTONS ...4... -
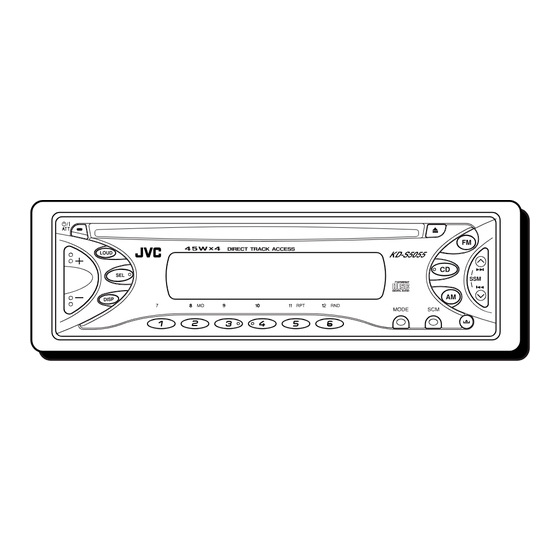
Page 4: Location Of The Buttons
LOCATION OF THE BUTTONS Control panel Display window 12 34 (Standby/On Attenuator) button 2 +/– buttons 3 LOUD (Loudness) button 4 SEL (Select) button 5 Loading slot 6 AM button 7 0 (Eject) button 8 CD button 9 FM button p DISP (Display) button q MO (Monaural) button w RPT (Repeat) button... -
Page 5: Basic Operations
Turning on the power Turn on the power. Note on One-Touch Operation: When you select a source in step 2 below, the power automatically comes on. You do not have to press this button to turn on the power. Select the source. To operate the tuner (FM or AM), see pages 6 –... -
Page 6: Radio Operations
RADIO OPERATIONS Listening to the radio You can use either automatic searching or manual searching to tune in to a particular station. Searching a station automatically: Auto search Select the band (FM 1 – 3, AM). Lights up when receiving an FM stereo broadcast with Selected sufficient signal strength. -
Page 7: Storing Stations In Memory
Tune in to a station you want while “M” (manual) is flashing. Press stations of higher frequencies. Press 4 stations of lower frequencies. • If you release your finger from the button, the manual mode will automatically turn off after 5 seconds. -
Page 8: Tuning In To A Preset Station
Manual preset You can preset up to 6 stations in each band (FM1, FM2, FM3 and AM) manually. Ex: Storing an FM station of 92.5 MHz into the preset number 1 of the FM1 band. Select the band (FM1 – 3, AM) you want to store FM stations into (in this example, FM1). -
Page 9: Cd Operations
Playing a CD Insert a disc into the loading slot. The unit turns on, draws a CD and starts playback automatically. Note on One-Touch Operation: When a CD is already in the loading slot, pressing CD turns on the unit and starts playback automatically. The CD-in indicator flashes The CD-in indicator lights up Total playing time of... -
Page 10: Locating A Track Or A Particular Portion On A Cd
Locating a track or a particular portion on a CD To fast-forward or reverse the track Press and hold while playing a CD, to fast forward the track. Press and hold 4 while playing a CD, to reverse the track. To go to the next tracks or the previous tracks Press... -
Page 11: Prohibiting Cd Ejection
Prohibiting CD ejection You can prohibit the CD ejection and can lock a CD in the loading slot. While pressing CD, press and hold 0 for more than 2 seconds. “EJECT” flashes on the display for about 5 seconds, and the CD is locked and cannot be ejected. -
Page 12: Sound Adjustments
SOUND ADJUSTMENTS Adjusting the sound You can adjust the sound characteristics to your preference. Select the item you want to adjust. Each time you press the button, the adjustable items change as follows: Indication To do: Adjust the bass. (Bass) Adjust the treble. -
Page 13: Using The Sound Control Memory (Scm)
Using the Sound Control Memory (SCM) You can select and store a preset sound adjustment suitable to each playback source. (Advanced SCM) Selecting and storing the sound modes Once you select a sound mode, it is stored in memory. It will be recalled every time you select the same source and will be shown on the display. -
Page 14: Storing Your Own Sound Adjustments
Storing your own sound adjustments You can adjust the sound modes (BEAT, SOFT, POP: see page 13) to your preference and store your own adjustments in memory. • There is a time limit in doing the following procedure. If the setting is cancelled before you finish, start from step 1 again. -
Page 15: Other Main Functions
Setting the clock Press and hold SEL (Select) for more than 2 seconds. “CLOCK H”, “CLOCK M”, “SCM LINK” or “LEVEL” appears on the display. Set the hour. 1 Select “CLOCK H” if not shown on the display. 2 Adjust the hour. Set the minute. -
Page 16: Selecting The Level Display
Selecting the level display You can select the level display according to your preference. When shipped from the factory, “VOL 2” is selected. VOL 1 : Shows the volume level indicator. VOL 2 : Alternates “VOL 1” setting and illumination display. : Erases the volume level indicator. -
Page 17: Detaching The Control Panel
Detaching the control panel You can detach the control panel when leaving the car. When detaching or attaching the control panel, be careful not to damage the connectors on the back of the control panel and on the panel holder. Detaching the control panel Before detaching the control panel, be sure to turn off the power. -
Page 18: Maintenance
MAINTENANCE Handling discs This unit has been designed to reproduce CDs and CD-Rs (Recordable). • This unit is not compatible with MP3 discs. How to handle discs When removing a disc from its case, press down the center holder of the case and lift the disc out, holding it by the edges. -
Page 19: Troubleshooting
CD-R is not finalized. • Insert a finalized CD-R. • Finalize the CD-R with the CD is locked. Unlocked the CD. (See page 11) The CD player may have While holding functioned incorrectly. (Standby/On Attenuator), press / (Eject) for more than 2 seconds. -
Page 20: Specifications
Sensitivity: 20 µV Selectivity: 35 dB Having TROUBLE with operation? Refer to page of How to reset your unit CD PLAYER SECTION Type: Compact disc player Signal Detection System: Non-contact optical pickup (semiconductor laser) Number of channels: 2 channels (stereo) - Page 21 !"#$%&'( !"#$%&' !"#$%&'()*+,-./0123456%7 012389-: !"#$%& !"#$%&#'()*+,-.%/-.01232456789:;< !" !"#$ !%&'()*+, !"#$% !"#$#%&'()* LOUD !"#$%& !'()*+"#,$-./0123 • !"#$%&' !# CD • !"#$%&' !"#...
- Page 22 !" JVC !"#$%&'()*+,-./01'(234 !"#$% ... 2 ! MODE ... 3 !" ... 4 ! ... 4 !"# ... 5 ! ... 5 !"#$ ... 6 !"# ... 6 !"#$%& ... 7 !"# ... 8 ! ... 9 ! CD ... 9 !"#$ % CD...
- Page 23 !" 12 34 2 +/– !"# 3 LOUD 4 SEL 6 AM 8 CD 9 FM p DISP !" q MO w RPT e RND t MODE !"#$% y SCM !"#$% ¢ !"#$ % &'()* SSM s df DIRECT TRACK ACCESS o SCM ;...
- Page 24 !" !"#$ !" 2 !"# $%&'( !"#$%$&'()*+ !" !" FM !" !"#$ !" 16 !"#$ !"#$%&'() ! "#$%&'()*+,- !"#$%&'()*+,-./% !"#$% 15 !"#$%& !"#$% CD !"#$%&'()*+,-./ !"#$%&'()*+,-./ !" CD !"#$%&'()*+,-. !"# MODE !"#$%&' !" 12 !"#$%&'()*+,-. !" SEE YOU !"#$ !"#$ %&'...
- Page 25 !"# !"#$%&'()$%&*+,- !"# !"#$%& !"FM1 – 3 !"#$% !"#$%&'()*+, !"#$%& !"#$%&'()*+,-./0 !"#$ !"#$%&'()*+,-./ !"#$%& FM !"#$%&'( ¢ !" !"# !" !"# MODE !" #$%& '()* !"#$%& !"FM1 – 3 !"#$%&'()*+, ¢ !"#$%&' !"#$%...
- Page 26 !"#$%&'()*+, ¢ !"# !"# !"#$%&5 • !"#$ !"!#$%&'()*+, • !"# AM-9 FM-50 !"#$%&'() !"#$%&'( !"#$% MODE !"#$ !"#$% MO ! "#$%& !" #$ MO !" MODE !" !"#$%&'()*+, !"#$%&'()*+ !"#$%& !"#$%&'()*+,-./ !" ! FM • !"#$ ! FM • !" !"#$SSM !"# FM !"#$%...
- Page 27 !"#$%&FM1, FM2, FM3 !"#$ 6 !"#$ 1 92.5MHz !"#$%&'(FM1– 3 !"# FM1 !" #$ FM • !" ! 92.5 MHz !"#$%&'( !"P1 !"#$% !"#$%&'()*+'(, !" • • !"# !"#$%&'()*+, !"#$%&'()*+,!-.' !"#$% 7 !"# !"# ¢ !" !"# !" !"# !"#$%&'()*+,-./ !"#$%&'( !"#$%""&'()*+,- !"#$%&'()#*+,-...
- Page 28 ! CD !"#$%&' !"#$% CD !"#$ !"#$ !"#$%& CD !"# $%&' !"#$%& !"# !" !" !"#$%&'()*+,-'( MODE !"#$ CD !"CD !"#$% AM • !"#$%&' CD !"#$ CD !"#$%&'()* !"#$ !"#$%& 15 • !"#$%&'()*+,-. !"#$%&'() CD !" !"#$%&'()* CD • !"#$%&'()*+,-./ !"#$%&'()*+,- CD !"#$% !"#$%&'()*+,-./0...
- Page 29 !"#$ % CD !" !"#$"% ¢ !"#$!"%& ¢ !"#$% !"#$%&"# '()*+ !"# • 6 12 !"# • 6 12 1 ! CD !"#$ ! CD !"#$ MODE ! CD !"#$ !"#$%&' !"!#$%&' !"#$%&' !" ! CD !"#$ !"#$%&' !"# !"#$%&' MODE !"...
- Page 30 !" CD !"# CD !"#$% & 0 !" !"#$%& 5 EJECT !" CD !"#$%&'= 0 2 !"#$%& CD EJECT !"# !" !"#$...
- Page 31 !"#$%&'()*+%,-./0 !"#$%&' !" #$%&'() !"#$ !" !" !"#! !"#$ !"#$ !"#$% !" !"#$%&'()*+,-./ ! 00 !"#$ ==== –06 –06 !"# !"# !"# !"# !" !"# !"# !"# !"#$%&' () !"#$ VOL !"#$%& !"#$%& !"#$%&'( )*+",- !"# !"#$%&'()*+,-.! ! "#$%&'() ! LOUD !"#$%&'() !"# LOUD...
- Page 32 !"#$%&' (SCM) !"#$%&'()*+,- ./ !"#$% !"#$% !"# $%&'()*'(+,- !"#$%&'()*+,-./0 !"#$%&'()*+$%&, !"#$%&'()'*+,-. !"#$%& – FM1 !"#$%!&'()*!&+, • !"#$%&'() !"#$ SCM – SCM LINK !"#$%& !"#"$%&'()*+#,-. • SCM LINK LINK ON • !"#$%&'()*+,-./ !"#$%&'#()*+ !"LINK OFF SCM LINK • !"#$%!&'()*+ BAS TRE SCM OFF !"...
- Page 33 !"#$%&' !"#$%&'BEAT, SOFT, POP ! 13 !"#$%&'!"( !"#$%&' !"#$%&'()*+,-./ • !"#$%&'()*+,-./ !" !"#$%&'() !"# 13 !"#!$%& !"#$ 12 !"TRE !"# !"#$%&'() 13 !"#$%& '( !"#$%& !"#$%&'%() !"#$ 12 !" 1 !"# !"#$%&'( !"#$%&'()*#+,- !"#$%& !"#$%&'(")*+ !"...
- Page 34 CLOCK H CLOCK M LINK LEVEL !" CLOCK H !" !" CLOCK M !" !"#$% !"#$%&'()*+ !"#"$%&'() DISP !"#$%& !"# !" !"#$%&'() DISP • !"# $%& 5 !"#$ SCM !"#$%&'()*+ !"#$%&'()*+,-./0 !"#$ !"#$%&'()*+,-./0 !"#$% LINK ON LINK OFF !"#$% CLOCK H LINK SCM LINK !"#$ LINK ON...
- Page 35 !"#$ ! "#$%&'(")*+,-. !"#$%&'()*+ !" # VOL 1 VOL 2 VOL 1 !" !"#$ CLOCK H CLOCK M LINK LEVEL !"#$ ! LEVEL !"#$ — VOL 1 VOL 2 VOL 2 !" !"#$ !"#$%...
- Page 36 !"# !"#$% &'()*+,-. !"#$%&'()*+,-./$ !"#$%&'( !"# !"#$%&'()*+,-./0 !"#$% !"#$%&' !"#$%&'()*+", !"# !"#$%&'()#*+,- !"#$%&'()*+,-. !"#$%& !"#$%&'()*+,-* !"#$%&'()*+,-. !"#$%&'()*+,-. !"#...
- Page 37 !"#$% CD !"=jmP= • !"# !"#$%&' !"# !"#$%&' • !"#$%&'( !"#$%&'() !"#$%&'()#*+ !"#$% • !"#$% !"#$%&'&() !"#$%&'()* !"#$%&'()* !"#$ !"#$%&'%( !"#$ !"#$%&'() !"#$ !"#$%&'()*+,-.+/ !"#$% !"#$%&'()*+ ,-./ !"#$%& !"#$%& • !"#$%&'( • !"#$%&'()*+,-./% !"#$%&'($)*+,-./ !"#$%& !"# CD-R • • ! " –...
- Page 38 !"#$%&'()*+,-./0123456789:;<=>?@ ! " • !"#$% • !"#$% • SSM !"#$%&'( !"# !"#$%&'( • !" • !" • CD-R !"#$ • CD-R !"#$%& • !"#$%& • CD !" • “NO DISC” !"#$%&'( !"# !"#$%&'( !"#$% !"# !"#$% !"# !"# CD-R • •...
- Page 39 !"#$%& !"#$ !"# 45 !"# 45 !"#$RMS 17 W 40 Hz !"#$%& 0.8% 17 W 40 Hz !"#$%& 0.8% !"4 !" 4 !"#$ 100 Hz ±10 dB 10 kHz ±10 dB !"40 Hz 20 000 Hz !70 dB !"#$%&'2.0 V/20 k !"1 k FM : 87.5 MHz 108.0 MHz...
- Page 40 LOUD • §Ë “ ∑’ Ë ∑ Ë “ πµ— È ß ‰«È ≈ Ë « ßÀπÈ “ ‡™Ë π °“√µ— È ß ∂“π’ À √◊ Õ °“√ª√— ∫ ·µË ß ‡ ’ ¬ ß°Á ® –∂Ÿ ° ≈∫ÕÕ°‰ª¥È « ¬ •...
- Page 41 MODE ... 3 CD ... 9 CD ... 9 CD ... 10 MODE MODE MODE MODE • ‰¡Ë § «√‡æ‘ Ë ¡ √–¥— ∫ ‡ ’ ¬ ß®π¥— ß ¡“°‡°‘ 𠉪 ‡æ√“–®–∑”„ÀÈ ‰ ¡Ë ‰ ¥È ¬ ‘ π ‡ ’ ¬ ß®“°¿“¬πÕ° ´÷...
- Page 42 µ”·ÀπË ß ¢Õߪÿ Ë ¡ µË “ ßÊ ·ºß§«∫§ÿ ¡ Àπ È “ ®Õ 12 34 +/– LOUD DISP MODE ¢ • ∑”ÀπÈ “ ∑’ Ë ‡ ªÁ π ªÿ Ë ¡ ¥ È « ¬ ‡¡ ◊ Ë Õ °¥æ√ È Õ ¡° — π s df DIRECT TRACK ACCESS Àπ...
- Page 43 ‡ª‘ ¥ ‡§√◊ Ë Õ ß 1 ‡ª ‘ ¥ ‡§√◊ Ë Õ ß À¡“¬‡Àµÿ ° “√„™È ß “π‚¥¬°¥ªÿ Ë ¡ §√— È ß ‡¥’ ¬ «: 2 ‡≈◊ Õ °„™È ß “π °“√ª√ — ∫ À“§≈ ◊ Ë π « ‘ ∑ ¬ ÿ À√...
-
Page 44: Auto Search
Auto Search FM1 – 3 ‡§√◊ Ë Õ ß√— ∫ §≈◊ Ë π «‘ ∑ ¬ÿ π ’ È ¡ ’ · ∫π¥Ï (FM1, FM2 FM3) ·≈– ∑’ Ë “¡“√∂„™È ‡ ≈◊ Õ °ø— ß °“√ °√–®“¬‡ ’ ¬ ߢÕß√–∫∫ ™Ë... - Page 45 3 ¢≥–∑’ Ë “M” (§È ˝ « ¬¡’ Õ ) °√–æ√‘ ∫ Õ¬Ÿ Ë „ÀÈ ª √— ∫ §≈◊ Ë π «‘ ∑ ¬ÿ „ ÀÈ µ √ß°— ∫™Ë Õ ß ∂“π’ ∑ ’ Ë µ È Õ ß°“√ ¢ • •...
- Page 46 FM1, FM2, FM3 92.5 MHz FM1 – 3 • 92.5 MHz “P1” • §≈◊ Ë π «‘ ∑ ¬ÿ ∑ ’ Ë ∫ — π ∑÷ ° ‡Õ“‰«È ® –∂Ÿ ° ≈∫ÕÕ° À“°§≈◊ Ë π «‘ ∑ ¬ÿ § «“¡∂’ Ë „ À¡Ë ∂...
- Page 47 °“√‡≈Ë π „ Ë · ºË π ´’ ¥ ’ ‡ ¢È “ ‰ª „π™Ë Õ ß„ Ë À¡“¬‡Àµ ÿ ° “√„™ È ß “π‚¥¬°¥ª ÿ Ë ¡ ‡¥ ’ ¬ «: °“√„™È ß “π·ºË π À¡“¬‡Àµÿ : °“√À¬ÿ ¥ ‡≈Ë π ·≈–π”·ºË π •...
-
Page 48: Repeat Play
°“√‰ª∑’ Ë ‡ æ≈ßÀ√◊ Õ µÕπ„¥µÕπÀπ÷ Ë ß ¢Õß·ºË π °“√°√Õ‡æ≈߉ª¢ È “ ßÀπ È “ À√ ◊ Õ °“√°√Õ‡æ≈߬ È Õ πÀ≈ — ß °“√‰ª¬— ß ‡æ≈ß∂— ¥ ‰ªÀ√◊ Õ ‡æ≈ß∑’ Ë º Ë “ π¡“ °“√‰ª¬— ß ‡æ≈ß„¥‡æ≈ßÀπ÷ Ë ß ∑— π ∑’ •... - Page 49 °“√∑”„ÀÈ ‰¡Ë ∂ Ÿ ° ¥’ ¥ ÕÕ°¡“ ¢≥–∑’ Ë ° ”≈— ß °¥ „À È ° ¥ §È “ ߉«È ‡ °‘ π °«Ë “ «‘ π “∑’ “EJECT” À“°∑Ë “ πµÈ Õ ß°“√¬°‡≈‘ ° ‰¡Ë „ÀÈ ∂ Ÿ ° ¥ ’ ¥ ÕÕ°¡“·≈– ª≈¥≈...
- Page 50 1 ‡≈◊ Õ °√“¬°“√∑’ Ë ∑ Ë “ πµÈ Õ ß°“√ª√— ∫ ·µË ß 2 ª√— ∫ √–¥— ∫ –06 –06 “ ” “TRE” – “VOL” LOUD LOUD...
- Page 51 °“√„™È À πË « ¬§«“¡®”°“√§«∫§ÿ ¡ ‡ ’ ¬ ß Advanced SCM °“√‡≈◊ Õ °·≈–∫— π ∑÷ ° ‚À¡¥‡ ’ ¬ ß FM1 FM2 FM3 AM • – SCM LINK ‡≈◊ Õ °‚À¡¥‡ ’ ¬ ß∑’ Ë ∑ Ë “ πµÈ Õ ß°“√ •...
- Page 52 BEAT, SOFT, POP • 1 ‡√’ ¬ °‚À¡¥‡ ’ ¬ ß∑’ Ë ∑ Ë “ πµÈ Õ ß°“√ª√— ∫ ·µË ß 2 „ÀÈ ‡ ≈◊ Õ ° “BAS” (‡ ’ ¬ ß∑ÿ È ¡ ) À√◊ Õ (‡ ’ ¬ ß·À≈¡) 3 ª√— ∫ √–¥— ∫ ‡ ’ ¬ ß∑ÿ È ¡ À√◊ Õ ‡ ’ ¬ ß·À≈¡ “TRE”...
- Page 53 “CLOCK H,” “CLOCK M,” “SCM LINK,” “LEVEL” “CLOCK H” “CLOCK M” DISP DISP SCM – SCM LINK Advanced SCM LINK ON: Advanced SCM LINK OFF: Conventional SCM “CLOCK H,” “CLOCK M,” “SCM LINK,” “LEVEL” “SCM LINK” “LINK ON” “LINK OFF”...
- Page 54 °“√‡≈◊ Õ °√–¥— ∫ °“√· ¥ßº≈ ∑ Ë “ π “¡“√∂‡≈ ◊ Õ °√–¥ — ∫ °“√· ¥ßº≈‰¥ È µ “¡∑ ’ Ë ∑ Ë “ πµ È Õ ß°“√ º≈‘ µ ¿— ≥ ±Ï ∑ ’ Ë Õ Õ°¡“®“°‚√ßß“π √–¥— ∫ °“√· ¥ßº≈®–∂Ÿ ° µ— È ß ‰«È ‡ ªÁ π “VOL 2”...
- Page 55 ∂ È “ ∑ Ë “ π∂Õ¥·ºß§«∫§ ÿ ¡ ÕÕ°¡“∫ Ë Õ ¬Ê µ — « ‡™ ◊ Ë Õ ¡Õ“®‡ ◊ Ë Õ ¡ ¿“扥 È ¥ — ß π — È π ‡æ ◊ Ë Õ ª È Õ ß° — π ‡Àµ ÿ ° “√≥ Ï ¥ — ß °≈ Ë “ « ∑Ë...
- Page 56 °“√¥ Ÿ · ≈√ — ° …“ °“√®— ∫ ∂◊ Õ ·ºË 𠥑 °Ï • ™ÿ ¥ π’ È „™È ‰¡Ë ‰¥È ° — ∫ «‘ ∏ ’ „™È · ºË π ´’ ¥ ’ „π°“√π”·ºË π ´’ ¥ ’ Õ Õ°®“°µ≈— ∫ •...
- Page 57 • • • • • CD • CD-R CD-R • CD-R • • • “NO DISC” • • CD-R CD-R CD. (...
- Page 58 (RMS) 20 000 Hz ±10 dB 100 Hz ±10 dB 10 kHz 40 Hz FM 87.5 MHz 108.0 MHz AM 531 kHz 1 602 kHz 11.3 dBf 50 dB 16.3 dBf 40 Hz 0.8% 40 Hz 20 000 Hz 0.8% 20 000 Hz 70 dB 20 k...
- Page 59 ± ±...
- Page 60 CD-R • CD-R • CD-R • • • • • • CD-R • CD-R • • • “ ” NO DISC...
- Page 61 CD-R CD-Rs CD-Rs CD-Rs CD-Rs CD-Rs CD-RWs ﻟﻴﺒﻞ اﻧﺔ اﺳﻄﻮ اﻟﺼﺎق ، • • • • • • • • • ﻣﻠﺼﻖ ﺑﻘﺎﻳﺎ ﺟﺔ ﻟﺰ CD-Rs • • • • • اﻧﺔ اﺳﻄﻮ ﻣﺤﻨﻴﺔ...
- Page 63 “VOL 1” “OFF” “VOL 2” “VOL 2” VOL 1 “VOL 1” VOL 2 “CLOCK H” “CLOCK M” “LEVEL” “SCM LINK” “LEVEL”...
- Page 64 “CLOCK H” “SCM “LEVEL” “SCM LINK” LINK” “LINK ON” “SCM :LINK ON :LINK OFF “CLOCK M” LINK” “OFF DISP “CLOCK H” “CLOCK M” “LEVEL” LINK” “CLOCK H” “CLOCK M” DISP •...
- Page 65 BEAT, SOFT, POP • “BAS” “TRE”...
- Page 66 “SCM LINK” “LINK ON” • • “SCM LINK” “SCM LINK” LOUD –03 • • • “LINK ON” • “LINK OFF” SCM OFF BEAT SOFT...
- Page 67 “VOL” LOUD LOUD “00”...
- Page 68 “ ” “EJECT” 0 0 0 0 0 CD-in “EJECT”...
- Page 69 MODE MODE MODE MODE ¢ ¢ • •...
- Page 70 MODE • CD-in • •...
- Page 71 FM1 – 3 • • .FM1 FM1 – 3 • ¢...
- Page 72 SSM :FM FM1 – 3 “SSM” • • “M” ¢ MODE MODE • •...
- Page 73 FM1 – 3 ¢ ¢ ¢ ¢ ¢ “M” MODE FM1 – 3 ¢...
- Page 74 MODE ”ATT“ “SEE YOU” CD’s...
- Page 75 ÷dFë …c U½ ÷dFë …c U½ ÷dFë …c U½ ÷dFë …c U½ ÷dFë …c U½ ¢ / 4 SCM ( LOUD —«—“ô« sÂUÄ« —«—“ô« sÂUÄ« —«—“ô« sÂUÄ« —«—“ô« sÂUÄ« —«—“ô« sÂUÄ« DIRECT TRACK ACCESS MODE • LOUD rJײë WŠuà rJײë WŠuà rJײë...
- Page 76 MODE MODE MODE MODE MODE MODE • • •...
- Page 77 CLASS 1 LASER PRODUCT LOUD • •...
- Page 78 KD-S5055 DIRECT TRACK ACCESS LOUD ÆqBHM*« ULOKF²Ã« VO²Â WFł« dÄ vł d¹ ¨ öO u²Ã« Ë VO d²Ã« UOKLFà ULOKF²Ã« qOÃœ EN, CT, TH, AR 0903KKSFLEJEIN © 2003 VICTOR COMPANY OF JAPAN, LIMITED...
Need help?
Do you have a question about the GET0172-001A and is the answer not in the manual?
Questions and answers