
Related Manuals for Honeywell HRGX45


Summary of Contents for Honeywell HRGX45
-
Page 1: Contents
HRGX Performance Series 4/8/16-Channel Embedded DVR HRGX45 HRGX85 HRGX161 HRGX45X HRGX85X HRGX161X HRGX41 HRGX81 HRGX162 HRGX41X HRGX81X HRGX162X HRGX82 HRGX164 HRGX82X HRGX164X User Manual Document 800-16694 – Rev A – 04/2014... - Page 2 Revisions Issue Date Revisions 04/2014 New document.
-
Page 3: Table Of Contents
Contents | 3 Contents Cautions and Warnings ......... . . Regulatory Statements . - Page 4 Exporting Network Packet ........112 www.honeywell.com/security...
- Page 5 Contents | 5 Configuring HDD Settings ........113 Viewing HDD Status .
- Page 6 6 | HRGX DVR User Manual www.honeywell.com/security...
-
Page 7: Cautions And Warnings
Cautions and Warnings WARNING Risk of explosion if battery is replaced by an incorrect type. Dispose of used batteries in accordance with local laws. CAUTION Use only with supplied power adapter. THIS SYMBOL INDICATES THAT DANGEROUS VOLTAGE CONSTITUTING A RISK OF RISK OF ELECTRIC SHOCK ELECTRIC SHOCK IS PRESENT DO NOT OPEN... -
Page 8: Safety Instructions
10. REPLACEMENT PARTS - When replacement parts are required, be sure the service technician has used replacement parts specified by the manufacturer or have the same characteristics as the original part. Unauthorized substitutions may result in fire, electric shock or other hazards. www.honeywell.com/security... -
Page 9: Overview Of Contents
About This Manual This manual introduces the Honeywell HRGX Performance Series embedded digital video recorder (DVR) and describes how to install, set up, and operate the DVR. It is intended for system integrators, installers, and end-user operators. Overview of Contents This manual contains the following chapters: •... -
Page 10: Related Documents
HRGX DVR Remote Web Access User Guide 800-18321 HRGX DVR Apple Device Mobile App User Guide 800-18322 HRGX DVR Android Device Mobile App User Guide 800-18323 Multi-Site 4200 User Guide for Windows 800-12064V2 Multi-Site 4200 User Guide for Mac 800-13101 www.honeywell.com/security... -
Page 11: Introduction
Introduction This chapter contains the following sections: • Key Features, page 11 • Front Panel Layout, page 14 • Rear Panel Layout, page 16 • Mouse Operation, page 19 • Remote Control Operation, page 20 Key Features This section provides an overview of the key features of the HRGX DVR. General •... -
Page 12: Recording And Playback
Alarm and Exception • Alarm for sensor, motion detection, video tampering, video loss events, and device exceptions. • Alarm event triggers full screen monitoring, audio alarm, notifying surveillance center and sending email. • Automatic restore when system is abnormal. www.honeywell.com/security... -
Page 13: Network Functions
Introduction | 13 Network Functions • 1 self-adaptive 10/100M network interface. • IPv6 support. • TCP/IP, PPPoE, DHCP, DNS, DDNS, RTSP, NTP, SADP, SMTP, SNMP, UPnP, NFS, and iSCSI support. • TCP, UDP, and RTP for unicast. • Remote search, playback, download, locking and unlocking of record files. •... -
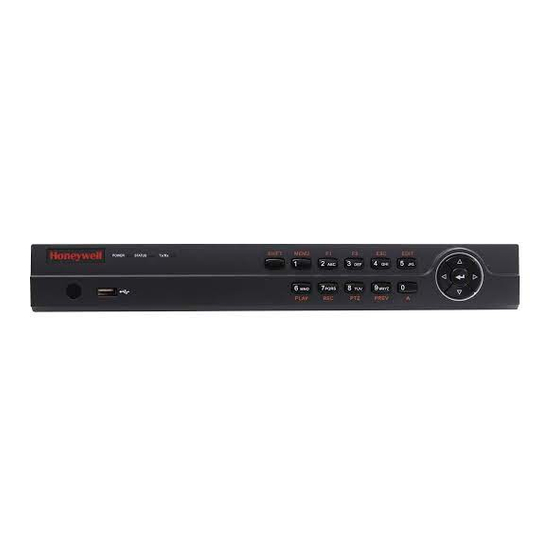
Page 14: Front Panel Layout
POWER: Lights green when DVR is receiving power. STATUS: Lights red when DVR hard drive is reading/writing. Tx/Rx: Flashes green when network connection is active. USB Port Connects USB device (such as a flash drive for saving video clips). www.honeywell.com/security... - Page 15 Introduction | 15 The following illustration shows the front panel of the 8/16-channel HRGX DVR. Figure 1-2 HRGX8/HRGX16 Front Panel No. Name Function Alphanumeric Buttons SHIFT: Switches between number/letter input and function input. MENU/1: Enters 1; MENU accesses the main menu interface. 2ABC/F1: Enters 2/A/B/C;...
-
Page 16: Rear Panel Layout
Connects RS-485 devices. Connect D+ and D– terminals to R+ and R– terminals of PTZ receiver. 12 V DC power input Power Switch Switch for turning DVR on/off Ground terminal (needs to be connected before DVR is turned on) www.honeywell.com/security... - Page 17 Introduction | 17 The following illustration shows the rear panel of the 8-channel HRGX DVR. Figure 1-4 HRGX8 Rear Panel 10 11 No. Name Description Video In BNC connectors for analog video input Video Out BNC connector for analog video output USB Port Connects USB device (such as a USB mouse) HDMI...
- Page 18 Connects RS-485 devices. Connect D+ and D– terminals to R+ and R– terminals of PTZ receiver. 12 V DC power input Power Switch Switch for turning DVR on/off Ground terminal (needs to be connected before DVR is turned on) www.honeywell.com/security...
-
Page 19: Mouse Operation
To use the mouse, connect the mouse cable to the USB port at the rear of the DVR. The mouse should be detected automatically. Note If you prefer, you can use your own mouse instead of the supplied mouse. Ask your Honeywell dealer for a list of compatible mice. The following table describes basic mouse operations: Name Action Description Live view: Select channel and display quick set menu. -
Page 20: Remote Control Operation
30 s. Enters PTZ control mode. Returns to previous menu. RESERVED Reserved PTZ Controls Control iris, focus, and zoom of PTZ camera. Selects all items in a list. Cycles through tabbed pages. www.honeywell.com/security... -
Page 21: Pairing The Remote Control With The Dvr
Check that the batteries are properly installed. Ensure that the polarities are not reversed. Check that the IR receiver on the DVR front panel is not obstructed. Aim the remote control at the IR receiver. If the problem persists, contact your Honeywell dealer for a replacement. 800-16694 - A - 04/2014... -
Page 22: Menu Structure
Maintenance Normal Record General Schedule General System Info Lock Event Alarm Advanced Encoding Image Network Log Search Shutdown Advanced Alarm Configuration Reboot HDD Detect Holiday Motion Display Upgrade Default Privacy Mask Exceptions Video User Net Detect Tampering Video Loss www.honeywell.com/security... -
Page 23: Getting Started
Getting Started This chapter contains the following sections: • Installation Precautions, page 23 • Connecting External Devices, page 24 • Starting Up and Shutting Down the DVR, page 27 • Using the Setup Wizard, page 28 • Accessing the Main Menu, page 31 •... -
Page 24: Connecting External Devices
Connecting Alarm Devices Connect alarm devices to the Alarm In/Out interface. Press and hold the orange part of the terminal block, insert the wire, then release the orange part to lock the wire in place. www.honeywell.com/security... -
Page 25: Connecting Power
Getting Started | 25 Alarm Input The alarm input should be an open/closed dry contact relay. If an open/closed relay is not used, connect the alarm input as follows: Alarm Output The alarm output relay supports connections to AC/DC loads. DC loads must be within the limit of 12 V DC / 1 A. -
Page 26: Typical Installation
The following diagram shows a typical HRGX DVR installation: Alarm Sensor Alarm Out IR Remote Control Web Browser Multi-Site Software Alarm Input/Output Internet Cameras Mobile Device Video In USB Mouse Microphone Support For backing up video clips Video Out Main Monitor Spot Monitor (BNC) www.honeywell.com/security... -
Page 27: Starting Up And Shutting Down The Dvr
Getting Started | 27 Starting Up and Shutting Down the DVR Following correct startup and shutdown procedures will help to prolong the life of your DVR. Before you begin, ensure that all extension cords, surge protectors, and uninterruptible power supplies used with the DVR are rated to handle the DVR’s electrical requirements, and ensure that the DVR is properly grounded. -
Page 28: Using The Setup Wizard
The Start wizard when device starts? check box is enabled by default. If you want to stop the setup wizard from starting each time you turn on the DVR, clear the check box. Click Next to continue to the next screen. www.honeywell.com/security... - Page 29 Getting Started | 29 Click the Admin Password field to display the on-screen numerical keypad, enter your DVR’s admin password (the default admin password is 12345), and then click Enter. If you want to create a new password, select the New Admin Password check box, enter a new password in the New Password field, and then re-enter the new password in the Confirm field.
- Page 30 Copy, select the check boxes of the channel(s) that you want to copy the settings to (or select the Analog check box to select all the channels), and then click OK. 10. Click Next to continue to the next screen. www.honeywell.com/security...
-
Page 31: Accessing The Main Menu
Getting Started | 31 11. Motion detection is disabled for all channels by default. Click the channel(s) that you want to enable motion detection for, or click Analog to select all channels, and then click OK. Accessing the Main Menu Use the following procedure to access the main menu. -
Page 32: Setting The System Date And Time
Select MM-DD-YYYY, YYYY-MM-DD, or DD-MM-YYYY. • System Date Click the calendar icon to display the on-screen calendar, and then select the current date. • System Time Click the clock icon, and then enter the current time (hh:mm:ss). Click Apply to save your settings. www.honeywell.com/security... -
Page 33: Upgrading The Firmware
Getting Started | 33 Upgrading the Firmware To obtain the latest firmware for your HRGX DVR, contact your Honeywell dealer. The firmware can be upgraded locally (by connecting a USB flash drive or other device containing the firmware file to the DVR) or remotely (via an FTP server). -
Page 34: Hdd Storage Calculation
HDD Storage Calculation The following table estimates storage space usage based on recording one channel for hour at a fixed bit rate. Actual usage will vary. Bit Rate (Kbps) Storage Used (MB) 1024 1280 1536 1792 2048 3072 1350 www.honeywell.com/security... -
Page 35: Viewing Live Video
Viewing Live Video This chapters contains the following sections: • About Live View, page 35 • Configuring Live View Settings, page 37 • Operations in Live View, page 43 About Live View Live view mode is the DVR’s default mode. When you start the DVR, live video from the connected cameras displays automatically on the monitor. -
Page 36: Shortcut Menu
Start all-day normal recording or motion detection recording for all channels. Quick Set Set video output mode to Standard, Bright, Gentle, or Vivid. Today’s Video Play back day’s video of current channel. Aux Monitor Disable main output and switch to auxiliary output. Aux monitor must be connected. www.honeywell.com/security... -
Page 37: Configuring Live View Settings
Viewing Live Video | 37 Configuring Live View Settings Setting the Screen Layout The live view interface is configurable as a single channel for multiple camera display (4, 8, or 16 channels depending on your DVR model). To display video from a single channel full screen: •... -
Page 38: Configuring Camera Image Settings
Copy to open the Copy to window, select the camera(s) you want to copy the settings to, or click Analog to copy the settings to all cameras, and then click OK. Click OK to save your settings. www.honeywell.com/security... -
Page 39: Configuring System Display Settings
Viewing Live Video | 39 Configuring System Display Settings This section describes how to configure general display settings, set the camera order, enable/disable live view for one or more cameras, and set up channel-zero encoding. Configuring General Display Settings You can configure general display settings in the System Settings menu. Follow the instructions below to set up video and audio outputs, the live view screen layout, and the auto-switching dwell time. -
Page 40: Setting The Camera Order
Select a screen on the right and then, from the list of cameras on the left, double-click the camera you want to assign to that screen. The camera number (for example, "A1") appears in the selected screen. You can assign the cameras to up to 32 screens in any order. Click Apply to save your settings. www.honeywell.com/security... - Page 41 Viewing Live Video | 41 Enabling or Disabling Live View You can enable or disable the live video feed (live view) for one or more cameras in the System Settings menu. To enable/disable live view: Go to Menu > Settings > Display > View. Do one of the following: •...
- Page 42 Select a value between 32 and 2048. The default is 1024. Click Apply to save your settings. To disable channel-zero encoding: In System Settings, on the Display page, click the Channel-Zero Encoding tab. Clear the Enable Channel-Zero Encoding check box, and then click Apply. www.honeywell.com/security...
-
Page 43: Operations In Live View
Viewing Live Video | 43 Operations in Live View Switching Between Channels In full screen display mode, you can switch between channels manually or you can use the auto-switch function to automatically cycle through each channel’s video feed at predetermined intervals. -
Page 44: Zooming In
The magnified area is indicated by a red frame. In the inset window, drag the red frame to the area of the screen you want to zoom in on. To exit digital zoom mode • Right-click anywhere on the screen, and then click Exit. www.honeywell.com/security... -
Page 45: Controlling A Ptz Device
Controlling a PTZ Device This chapters contains the following sections: • About PTZ Control, page 45 • Configuring PTZ Settings, page 46 • Calling Presets, Patrols, and Patterns, page 51 About PTZ Control You can control a connected PTZ camera in live view mode using the on-screen PTZ control interface. -
Page 46: Configuring Ptz Settings
To copy the same settings to one or more additional PTZ cameras, click Copy, select the channel(s) that you want to copy the settings to, or click Analog to select all channels, and then click OK Click Apply to save your settings. www.honeywell.com/security... -
Page 47: Programming Presets
Controlling a PTZ Device | 47 Programming Presets You can program up to 127 preset positions for the PTZ camera. For example, you can program the camera to point at a specific location, such as a doorway, when an alarm event takes place. To program a preset: Go to Menu >... -
Page 48: Programming Patrols
To program a patrol: Go to Menu > Camera > PTZ > More Settings. Select the patrol you want to program from the patrol list (Patrol 1, Patrol 2, or Patrol 3). Click the Add KeyPoint button . The KeyPoint window opens. www.honeywell.com/security... - Page 49 Controlling a PTZ Device | 49 In the KeyPoint window, configure the following settings: • Preset Select the preset you want to assign to this key point. • Duration Select the time, in seconds, that you want the camera to remain at this key point.
-
Page 50: Programming Patterns
Drag the mouse over the live image, or, alternatively, use the direction buttons, to define the desired path of the PTZ camera. Click the Save button to save the path as the selected pattern. Repeat steps 2 to 5 to save more patterns. www.honeywell.com/security... -
Page 51: Calling Presets, Patrols, And Patterns
Controlling a PTZ Device | 51 Calling Presets, Patrols, and Patterns This section describes how to call pre-programmed presets, patrols, and patterns in live view mode and within the PTZ configuration interface. Calling Presets To call a preset in live view mode: Click on a channel to display the quick setting toolbar (see Quick Setting Toolbar, page... -
Page 52: Calling Patrols
Go to Menu > Camera > PTZ > More Settings (or click Configuration in the PTZ control interface). Select the patrol you want to call from the drop-down list, and then click the Run button to call the patrol. To stop the patrol, click the Stop button. www.honeywell.com/security... -
Page 53: Calling Patterns
Controlling a PTZ Device | 53 Calling Patterns To call a pattern in live view mode: Click on a channel to display the quick setting toolbar (see Quick Setting Toolbar, page 35). On the toolbar, click the PTZ Control button In the on-screen PTZ control interface, under Camera, select your PTZ camera from the list. - Page 54 54 | HRGX DVR User Manual www.honeywell.com/security...
-
Page 55: Recording Video
Recording Video This chapter contains the following sections: • Live View Record Settings, page 55 • Configuring a Record Schedule, page 56 • Configuring Manual Record Settings, page 58 • Configuring Holiday Record Settings, page 59 • Configuring Encoding Parameters, page 60 •... -
Page 56: Configuring A Record Schedule
You can set channels to start or stop recording according to a defined schedule. To configure the schedule: Go to Menu > Record > Schedule. Select the camera you want to configure the schedule for. Select the Enable Schedule check box. www.honeywell.com/security... - Page 57 Recording Video | 57 Click Edit. The Edit window opens. In the Schedule list, select the day of the week that you want to set the schedule for. If Holiday settings have been enabled (see Configuring Holiday Record Settings, page 59), you can also select Holiday.
-
Page 58: Configuring Manual Record Settings
Click Yes. To start all-day motion detection recording of all channels: • In Menu > Record, next to Motion Detection, click . The message "Start all-day motion detection recording of all channels?" appears. Click Yes. www.honeywell.com/security... -
Page 59: Configuring Holiday Record Settings
Recording Video | 59 Configuring Holiday Record Settings You can set up special recording settings for holidays. To configure holiday recording settings: Go to Menu > Record > Holiday. Under Holiday Settings, select the holiday you want to configure from the list. Click the Edit button . -
Page 60: Configuring Encoding Parameters
Set the recording video quality. 6 levels configurable. • Frame Rate Set the recording frame rate. • Max. Bitrate Mode Set the bit rate mode to General or Customize. • Max. Bitrate(Kbps) Select or customize the maximum bit rate for recording. www.honeywell.com/security... - Page 61 Recording Video | 61 Configure the following settings: • Pre-record Sets the time to record before a scheduled recording time or event. • Post-record Sets the time to record after a scheduled recording time or event. • Expired Time (day) The expired time is the longest time a record file can be kept in the HDD.
- Page 62 Analog to copy the settings to all cameras, and then click OK. Click Apply to save your settings. To restore the current substream settings to the default parameters, click Restore. www.honeywell.com/security...
-
Page 63: Configuring Redundant Recording
Recording Video | 63 Configuring Redundant Recording If you have two or more HDDs, with the HDD storage mode set to Group (see Configuring HDD Groups, page 117), you can enable redundant recording—that is, you can set up the DVR to save recorded video not only on the R/W (read/write) HDD but also on the redundant HDD for additional security and reliability. -
Page 64: Protecting Recorded Files
Select the date and time for the start point of the search. • End Time Select the date and time for the end point of the search. Note The start and end search points must fall within the range listed next to Start/End time of record. www.honeywell.com/security... - Page 65 Recording Video | 65 Click Search. The Search result window opens, displaying a list of search results. Select the video file(s) that you want to lock, and then click the Lock button. To set the HDD property to read-only: Go to Menu > HDD > General. Under HDD Information, select the HDD you want to edit, and then click the Edit button to open the Local HDD Settings window.
- Page 66 66 | HRGX DVR User Manual www.honeywell.com/security...
-
Page 67: Playing Back Video
Playing Back Video This chapter contains the following sections: • Searching and Playing Back Video by Channel, page 68 • Searching and Playing Back Video by Time, page 70 • Searching and Playing Back Video by Event, page 72 • Searching and Playing Back Video by Tag, page 74 •... -
Page 68: Searching And Playing Back Video By Channel
To return to live view mode, click the Exit button To search and play back video from the current day or other dates: Right-click a channel in live view mode to display the shortcut menu, and then click Today’s Video. The playback interface appears. www.honeywell.com/security... - Page 69 Playing Back Video | 69 To display the channel and date selection panel, move the mouse to the right edge of the playback interface. • To switch playback to another channel or to play back video from multiple cameras simultaneously, select one or more additional cameras from the list. •...
-
Page 70: Searching And Playing Back Video By Time
Detail. Click Previous or Next to see information for the previous or following day. Click Back to close the window. • To play back video matching your search parameters from the earliest point, click Playback. The video begins playing in the playback interface. www.honeywell.com/security... - Page 71 Playing Back Video | 71 • To search for a specific video file to play back, click Search. The Search result window opens, displaying a list of search results. Select the video file that you want to view, and then click Play. The video begins playing in the playback interface.
-
Page 72: Searching And Playing Back Video By Event
Alarm Input No. to select all the alarm inputs. • If Motion was selected as the event type, select the channel(s) you want to search from the list, or click Analog to select all the channels. www.honeywell.com/security... - Page 73 Playing Back Video | 73 Click Search. A list of search results is displayed. (If no event recordings were found, the message "No event information found" appears.) Select the clips(s) you want to view, and then click the Play button If you want, you can adjust the Pre-play and Post-play settings.
-
Page 74: Searching And Playing Back Video By Tag
If Tag Keyword was selected as the tag type, enter the tag keyword you want to search for. • Start Time Select the date and time for the start point of the search. • End Time Select the date and time for the end point of the search. www.honeywell.com/security... -
Page 75: Searching And Playing Back Video By System Log
Playing Back Video | 75 Click Search. A list of search results is displayed. (If no tags were found, the message "No tag found" appears.) Select the clips(s) you want to view, and then click the Play button • If you want, you can adjust the Pre-play and Post-play settings. By default, playback starts 30 seconds before the tag and continues 30 seconds after the tag. -
Page 76: Playback Operations
On the playback control panel, click the Add custom tag button . The Add Tag window opens. In the Tag Name field, enter a unique tag name or keyword, and then click OK. www.honeywell.com/security... -
Page 77: Using Digital Zoom
Playing Back Video | 77 To manage tags: In the playback interface, on the playback control panel, click the Manage tags button The Tag Management window opens. Do one of the following: • To edit a tag name, select the tag you want to edit, and then click the Edit button In the Edit Tag window, enter a new name in the Tag Name field, and then click OK. -
Page 78: Using Smart Search
The search results are displayed over the timeline as a series of green bars. Click the Next smart search result and Previous smart search result buttons to quickly go to the video locations where motion was detected in the smart search area. www.honeywell.com/security... -
Page 79: Exporting Video
Exporting Video This chapter contains the following sections: • Exporting Recorded Video Files, page 79 • Exporting Video Clips, page 81 Exporting Recorded Video Files You can export recorded video to a USB flash drive or other external storage device. You can search for video by date and time or by event (motion detection and/or alarm). - Page 80 Click Search. The Search result window opens, displaying a list of search results. Select the file(s) that you want to export, and then click Export. The Export window opens. Click Export to save the file(s) to the storage device. www.honeywell.com/security...
-
Page 81: Exporting Video Clips
Exporting Video | 81 Exporting Video Clips You can export a customized video clip created during playback. To export customized video clips: During video playback, use the clipping start/stop function on the playback control panel to create one or more video clips. See Creating Video Clips, page Close the playback interface. - Page 82 82 | HRGX DVR User Manual www.honeywell.com/security...
-
Page 83: Configuring Alarm Settings
Configuring Alarm Settings This chapter contains the following sections: • Configuring Alarms Inputs, page 84 • Configuring Alarm Outputs, page 87 • Configuring Motion Detection Settings, page 89 • Configuring Video Tampering Detection Settings, page 92 • Configuring Video Loss Detection Settings, page 94 •... -
Page 84: Configuring Alarms Inputs
The alarm input is normally open. If it is closed, an alarm signal is generated. • N.C. The alarm input is normally closed. If it is opened, an alarm signal is generated. Select the Setting check box to enable the alarm input. www.honeywell.com/security... - Page 85 Configuring Alarm Settings | 85 Click the Handling button to set up the alarm response actions. The Handling window opens. Under Trigger Channel, select the channel(s) you want to begin full-screen monitoring or recording video with when the alarm input generates an alarm signal, or click Analog to select all the channels, and then click Apply to save your settings.
- Page 86 Copy Alarm Input to window, select the alarm input(s) you want to copy the settings to, or click Alarm Input No. to copy the settings to all alarm inputs, and then click OK. Click Apply to save your settings. www.honeywell.com/security...
-
Page 87: Configuring Alarm Outputs
Configuring Alarm Settings | 87 Configuring Alarm Outputs This section describes how to set the dwell time and handling properties of alarm outputs. To configure alarm output settings: Go to Menu > Settings > Alarm > Alarm Output. Select the alarm output you want to configure from the Alarm Output No. drop-down list. If you want, in the Alarm Name field, enter a descriptive name for the alarm output. - Page 88 Copy Alarm Output to window, select the alarm output(s) you want to copy the settings to, or click Alarm Output No. to copy the settings to all alarm outputs, and then click OK. Click Apply to save your settings. www.honeywell.com/security...
-
Page 89: Configuring Motion Detection Settings
Configuring Alarm Settings | 89 Configuring Motion Detection Settings You can set up the DVR to trigger one or more of the following alarm responses when motion is detected in a restricted area: Video Recording Video begins recording on the triggered channel. Full Screen Monitoring The monitor displays full screen video from the triggered channel. - Page 90 Click the Arming Schedule tab to set the arming schedule. You can set up to eight time periods per day (the time periods cannot repeat or overlap). To copy the arming schedule to other days of the week, click Copy. Click Apply to save your settings. www.honeywell.com/security...
- Page 91 Configuring Alarm Settings | 91 Click the Handling tab to set the action(s) you want to occur when motion is detected. Select the check box corresponding to the action(s) you want to enable, click Apply to save your settings, and then click OK to close the window. To copy these settings to one or more additional channels, click Copy to open the Copy to window, select the channel(s) you want to copy the settings to, or click Analog to copy the settings to all channels, and then click OK.
-
Page 92: Configuring Video Tampering Detection Settings
Select the camera you want to configure video tampering detection settings for by clicking a number in the Camera drop-down list. Select the Enable Video Tampering Detection check box. Click the Handling button to set up the alarm response actions. The Handling window opens. www.honeywell.com/security... - Page 93 Configuring Alarm Settings | 93 Under Arming Schedule, you can set up to eight time periods per day (the time periods cannot repeat or overlap). To copy the arming schedule to other days of the week, click Copy. Click Apply to save your settings. Click the Handling tab to set the action(s) you want to occur when video tampering is detected.
-
Page 94: Configuring Video Loss Detection Settings
Select the camera you want to configure video tampering detection settings for by clicking a number in the Camera drop-down list. Select the Enable Video Loss Alarm check box. Click the Handling button to set up the alarm response actions. The Handling window opens. www.honeywell.com/security... - Page 95 Configuring Alarm Settings | 95 Under Arming Schedule, you can set up to eight time periods per day (the time periods cannot repeat or overlap). To copy the arming schedule to other days of the week, click Copy. Click Apply to save your settings. Click the Handling tab to set the action(s) you want to occur when video loss is detected.
-
Page 96: Configuring Exception Settings
Select one or more of the following alarm responses for the exception(s): • Audible Warning • Notify Surveillance Center (Not available for Network Disconnected or IP Conflicted) • Send Email • Trigger Alarm Output Click Apply to save your settings. www.honeywell.com/security... -
Page 97: Configuring Email Settings
Configuring Alarm Settings | 97 Configuring Email Settings You can configure email settings for sending notification messages when an alarm event or a device exception is detected. Note It is recommended that you set up a web-based email account for use only with the DVR. - Page 98 Click Apply to save your settings. If you want, click Test to send a test email. A message will appear telling you whether the test succeeded or failed. If the test email fails, you will be prompted to recheck the email and network settings. www.honeywell.com/security...
-
Page 99: Configuring Remote Alarm Host Settings
Configuring Alarm Settings | 99 Configuring Remote Alarm Host Settings You can configure a remote alarm host to receive a notification message from the DVR when an alarm event or a device exception is detected. The remote alarm host must be a PC with Client Management System (CMS) software installed on it (such as Multi-Site 4200). - Page 100 100 | HRGX DVR User Manual www.honeywell.com/security...
-
Page 101: Configuring Network Settings
Configuring Network Settings This chapter contains the following sections: • Configuring General Network Settings, page 102 • Configuring Advanced Network Settings, page 103 • Managing Network Settings, page 109 800-16694 - A - 04/2014... -
Page 102: Configuring General Network Settings
Used for remote client software access. Default setting is 8000. • HTTP Port Used for remote browser access. Default setting is 8001. • RTSP Port Used for multimedia playback. Default setting is 554. Click Apply to save your settings. www.honeywell.com/security... -
Page 103: Configuring Advanced Network Settings
Configuring Network Settings | 103 Configuring Advanced Network Settings This section describes how to configure PPPoE, DDNS, NTP, SNMP, UPnP, Multicast, RTSP, server port, and HTTP port settings. Note Instructions for configuring email and remote alarm host settings are found in Chapter 8, Configuring Alarm Settings. -
Page 104: Configuring Ddns Settings
If you selected hrgDDNS as the DDNS type, enter the domain name you want to use for the DVR. The domain name must begin with a lowercase letter and cannot contain any special characters other than hyphens (-). Click Apply to save your settings. www.honeywell.com/security... -
Page 105: Configuring Ntp Server Settings
Configuring Network Settings | 105 Configuring NTP Server Settings You can configure a Network Time Protocol (NTP) server to ensure the accuracy of the system date and time. To configure NTP settings: Go to Menu > Settings > Network > NTP. Select the Enable NTP check box to enable time synchronization with an NTP server. -
Page 106: Configuring Snmp Settings
Configure the following settings: SNMP Version, SNMP Port, Read Community, Write Community, Trap Address, and Trap Port. Note By setting the trap address, you are allowing the device to send alarm event and device exception notification messages to the surveillance center. Click Apply to save your settings. www.honeywell.com/security... -
Page 107: Configuring Upnp Settings
Configuring Network Settings | 107 Configuring UPnP Settings Universal Plug and Play (UPnP) lets the DVR to seamlessly discover other devices on the network and establish functional network services for data sharing, and communications. For example, if you want to enable a fast WAN connection via a router, you should configure UPnP on the DVR. -
Page 108: Configuring Multicast Settings
IP address in the range of 239.252.0.0 to 239.255.255.255. Note When adding a device using Multi-Site 4200 or other CMS software, the multicast address must be the same as the multicast IP of the DVR. Click Apply to save your settings. www.honeywell.com/security... -
Page 109: Managing Network Settings
Configuring Network Settings | 109 Managing Network Settings This section describes how to monitor real-time network traffic data and network statistics, test network delay and packet loss, and export a network packet. Monitoring Network Traffic and Bandwidth You can view real-time information about the network, including linking status, MTU, sending/receiving rate, and bandwidth statistics for remote live view, remote playback, and net total idle. - Page 110 110 | HRGX DVR User Manual To view network bandwidth data: Go to Menu > Maintenance > Net Detect > Network Stat. Bandwidth information for remote live view, remote playback, and net total idle is displayed. Click Refresh to view the latest bandwidth statistics. www.honeywell.com/security...
-
Page 111: Testing Network Delay And Traffic Loss
Configuring Network Settings | 111 Testing Network Delay and Traffic Loss You can test network delay and traffic loss and check whether the network is operating normally. To test network delay and traffic loss: Go to Menu > Maintenance > Net Detect > Network Detection. Under Network Delay, Packet Loss Test, in the Destination Address field, enter the IP address of the packet destination. -
Page 112: Exporting Network Packet
Under Network Packet Export, select your external storage device from the Device Name drop-down list. If your device is not displayed, click Refresh to refresh the list. Click Export. After the export process is complete, click OK. You can export up to 1 MB of data each time. www.honeywell.com/security... -
Page 113: Configuring Hdd Settings
Configuring HDD Settings This chapter contains the following sections: • Viewing HDD Status, page 114 • Adding a Network HDD, page 115 • Configuring HDD Groups, page 117 • Configuring Recording Quotas, page 119 • Configuring S.M.A.R.T. Testing, page 120 •... -
Page 114: Viewing Hdd Status
Uninitialized or Abnormal, initialize the HDD (select the HDD and click Init. This will erase all data on the hard disk.). If the initialization fails, replace the HDD. You can also view the HDD status in the System Maintenance menu. See Viewing System Information, page 134. www.honeywell.com/security... -
Page 115: Adding A Network Hdd
Configuring HDD Settings | 115 Adding a Network HDD To increase storage capacity you can add a connected NAS (Network-Attached Storage) device or a SAN (Storage Area Network) device to the DVR as a network HDD. You can add up to 8 NAS devices or 7 NAS devices + 1 SAN device. - Page 116 Init to initialize the HDD. The HDD must be initialized before it can be used. To delete a network HDD: • In Menu > HDD > General, select the HDD you want to delete from the list of HDDs, and then click the Delete button www.honeywell.com/security...
-
Page 117: Configuring Hdd Groups
Configuring HDD Settings | 117 Configuring HDD Groups You can manage multiple HDDs in groups. After you have set up an HDD group, you can set the property of an HDD to R/W, Read-only, or Redundancy. To set up an HDD group: Go to Menu >... - Page 118 HDD and the R/W HDD simultaneously for additional security and reliability. In the Group area, select a group number for the HDD group. Click Apply to save your settings, click Yes to confirm, and then click OK to close the window. www.honeywell.com/security...
-
Page 119: Configuring Recording Quotas
Configuring HDD Settings | 119 Configuring Recording Quotas You can configure recording quotas for individual cameras. By setting a quota, you limit the amount of HDD capacity used for storing recorded video from that particular camera. Otherwise, all cameras will use the total capacity of the HDD for recording. To configure a recording quota: Go to Menu >... -
Page 120: Configuring S.m.a.r.t. Testing
In the Self-test Type list, select one of the following options: • Short Test • Expanded Test • Conveyance Test Click the S.M.A.R.T. button to start the test. The test results are displayed under S.M.A.R.T. Information. www.honeywell.com/security... -
Page 121: Detecting Bad Sectors
Configuring HDD Settings | 121 Detecting Bad Sectors Bad hard disk drive sectors can cause the system to slow down when reading or writing data. This section describes how to detect and repair bad sectors. To detect a bad sector: Go to Menu >... -
Page 122: Configuring Hdd Alarms
You can set up the DVR to generate alarm responses, such as an audible warning or notification email, when the hard disk drive is full or when an error is detected. See Configuring Exception Settings, page 96, for details. www.honeywell.com/security... -
Page 123: Configuring Camera Settings
Configuring Camera Settings This chapter contains the following sections: • Configuring OSD Settings, page 123 • Configuring Image Settings, page 125 • Configuring Privacy Masks, page 127 Configuring OSD Settings You can customize the appearance and location of on-screen display (OSD) text, such as the date, time, and camera name. - Page 124 Analog to copy the settings to all cameras, and then click OK. Click Apply to save your settings. To restore the default OSD settings: • In Menu > Camera > OSD, click Restore. www.honeywell.com/security...
-
Page 125: Configuring Image Settings
Configuring Camera Settings | 125 Configuring Image Settings You can create customized image settings for up to two time periods per camera to accommodate changing lighting conditions. To configure camera image settings: Go to Menu > Camera > Image. Select the camera you want to configure image settings for. For Period 1, specify the time range that you want to configure the image settings for (such as 07:00–19:00). -
Page 126: Configuring Ptz Connection Settings
Click Apply to save your settings. To restore the default camera image settings: • In Menu > Camera > Image, click Restore. Configuring PTZ Connection Settings Configuring PTZ Connection Settings, page Configuring Motion Detection Settings Configuring Motion Detection Settings, page www.honeywell.com/security... -
Page 127: Configuring Privacy Masks
Configuring Camera Settings | 127 Configuring Privacy Masks You can configure up to four privacy mask zones for each camera. Privacy mask zones conceal portions of the scene from the view of the operator. To add a privacy mask zone: Go to Menu >... - Page 128 To remove a privacy mask zone: In Menu > Camera > Privacy Mask, click the Clear Zone button corresponding to the zone(s) you want to remove, or click Clear All to clear all zones. Click Apply to save your settings. www.honeywell.com/security...
-
Page 129: Configuring Video Tampering Detection Settings
Configuring Camera Settings | 129 Configuring Video Tampering Detection Settings Configuring Video Tampering Detection Settings, page Configuring Video Loss Settings Configuring Video Loss Detection Settings, page 800-16694 - A - 04/2014... - Page 130 130 | HRGX DVR User Manual www.honeywell.com/security...
-
Page 131: Managing The Dvr
Managing the DVR This chapter contains the following sections: • Configuring General System Settings, page 132 • Viewing System Information, page 134 • Searching and Exporting Log Files, page 137 • Exporting and Importing Configuration Files, page 139 • Upgrading the Firmware, page 140 •... -
Page 132: Configuring General System Settings
Enables/disables setup wizard. Select the check box to enable the wizard; clear the check box to disable it. • Enable ID Authentication Enables/disables login password. Select the check box to enable the login password; clear the check box to disable it. www.honeywell.com/security... - Page 133 Managing the DVR | 133 Click the DST Settings tab. In DST Settings, do one of the following: • To adjust for daylight saving time automatically, select the Auto DST Adjustment check box. • To manually configure the settings, select the Enable DST check box, and then set the start and end dates and times for DST and the DST bias (recording overlap).
-
Page 134: Viewing System Information
MAC address are displayed. To view camera information: • Go to Menu > Maintenance > System Info > Camera. Information for each camera, including its name, activity status, motion detection status, video tampering detection status, and video loss status, is displayed. www.honeywell.com/security... - Page 135 Managing the DVR | 135 To view recording information: • Go to Menu > Maintenance > System Info > Record. Recording details for each camera, including recording status, stream type, frame rate, bit rate, resolution, record type, encoding parameters, and redundant record status, are displayed. To view alarm input information: •...
- Page 136 PPOE settings, are displayed. To view HDD information: • Go to Menu > Maintenance > System Info > HDD. The hard disk drive details, including the label name, status, capacity, free space, read/write properties, type, and group, are displayed. www.honeywell.com/security...
-
Page 137: Searching And Exporting Log Files
Managing the DVR | 137 Searching and Exporting Log Files Operation, alarm, exception, and HDD information is stored in log files. You can search and export these log files at any time. To search log files: Go to Menu > Maintenance > Log Search > Log Search. Set the log search parameters, including Start Time, End Time, Major Type and Minor Type. - Page 138 Format to format the backup device. Click Export to save all the log files on the HDD to the connected external storage device. Note Exported log files are saved in .txt format. The file name follows the format YYYYMMDDhhmmss (for example, 20140319023628logBack.txt). www.honeywell.com/security...
-
Page 139: Exporting And Importing Configuration Files
Managing the DVR | 139 Exporting and Importing Configuration Files Configuration files can be used to configure multiple HRGX DVRs with the same parameters. You can export configuration files to, or import configuration files from, an external storage device. To export a configuration file: Insert a USB flash drive or other external storage device into the USB port on the front of the DVR. -
Page 140: Upgrading The Firmware
140 | HRGX DVR User Manual Upgrading the Firmware To obtain the latest firmware for your HRGX DVR, contact your Honeywell dealer. The firmware can be upgraded locally (by connecting a USB flash drive or other device containing the firmware file to the DVR) or remotely (via an FTP server). -
Page 141: Restoring The Default Settings
Managing the DVR | 141 To confirm that the firmware upgrade was successful: Go to Menu > Maintenance > System Info > Device Info. Next to Firmware Version, confirm that the firmware version shown on the screen matches the firmware version that you installed. Restoring the Default Settings You can restore your all of your DVR’s settings, including user and network settings, to their factory defaults. - Page 142 142 | HRGX DVR User Manual www.honeywell.com/security...
-
Page 143: Managing Users
Managing Users This chapter contains the following sections: • Types of User Accounts, page 143 • Adding Users, page 144 • Editing Users, page 145 • Deleting Users, page 147 • Changing the Admin Password, page 147 Types of User Accounts The default user account of the DVR is an administrator account. -
Page 144: Adding Users
If the user is logging in to the DVR remotely, enter the MAC address of the user’s PC. The user must log in from this MAC address to access the DVR. Click OK to save your settings and close the window. The user is added to the list of users. www.honeywell.com/security... -
Page 145: Editing Users
Managing Users | 145 Editing Users You can edit permissions and account details of user accounts that you have created. To edit a user’s permissions: Go to Menu > Settings > User. Select from the list of users the user you want to edit permissions for. Click the Permission button to open the Permission window. - Page 146 Click the Edit button to open the Edit User window. Edit the one or more of the following settings: • User Name • Password • Confirm • Level • User’s MAC Address Click Apply to save your changes, and then click OK to close the window. www.honeywell.com/security...
-
Page 147: Deleting Users
Managing Users | 147 Deleting Users You can delete a user account that you have created. To delete a user: Go to Menu > Settings > User. Select from the list of users the user you want to delete. Click the Delete button to delete the user. - Page 148 12345.) Select the Change Password check box. In the Password field, enter the new admin password. In the Confirm field, re-enter the new admin password. Click Apply to save your settings, and then click OK to close the window. www.honeywell.com/security...
- Page 150 Document 800-16694 – Rev A – 04/2014 © 2014 Honeywell International Inc. All rights reserved. No part of this publication may be reproduced by any means without written permission from Honeywell. The information in this publication is believed to be accurate in all respects. However, Honeywell cannot assume responsibility for any consequences resulting from the use thereof.
Need help?
Do you have a question about the HRGX45 and is the answer not in the manual?
Questions and answers