Table of Contents
Advertisement
Quick Links
Advertisement
Table of Contents

Related Manuals for Philips PET7432/12


Summary of Contents for Philips PET7432/12
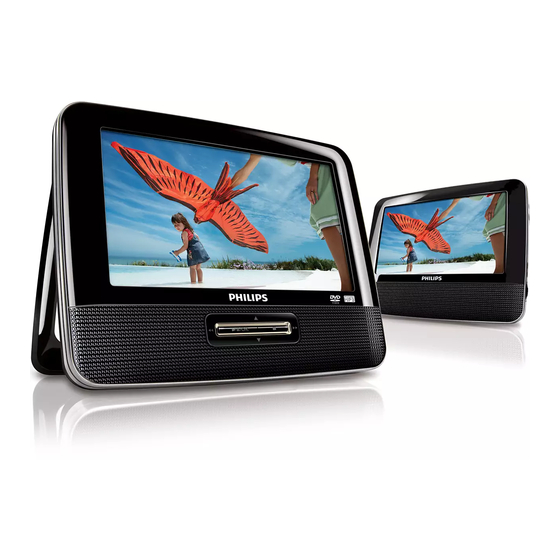
- Page 1 Register your product and get support at www.philips.com/welcome EN User manual DA Brugervejledning DE Benutzerhandbuch ES Manual del usuario FR Mode d’emploi IT Manuale utente NL Gebruiksaanwijzing SV Användarhandbok PET7432...
-
Page 2: Table Of Contents
Contents Important Important safety instructions Notice Your portable DVD player Introduction What’s in the box Overview of the main unit Overview of the remote control Overview of the second screen Get started Install remote control battery Use in a car Use at home Use your player Turn on... -
Page 3: Important
Important Important safety instructions Read these instructions. Keep these instructions. Heed all warnings. Follow all instructions. Do not use this apparatus near water. Clean only with dry cloth. Do not block any ventilation openings. Install in accordance with the manufacturer’s instructions. Do not install near any heat sources such as radiators, heat registers, stoves, or other apparatus (including amplifi... -
Page 4: Hearing Safety
Warning • Never remove the casing of this apparatus. • Never lubricate any part of this apparatus. • Never place this apparatus on other electrical equipment. • Keep this apparatus away from direct sunlight, naked fl ames or heat. • Never look into the laser beam inside this apparatus. -
Page 5: Notice
Notice Any changes or modifi cations made to this device that are not expressly approved by Philips Consumer Lifestyle may void the user’s authority to operate the equipment. This product complies with the radio interference requirements of the European Community. -
Page 6: Your Portable Dvd Player
For å redusere faren for brann eller elektrisk støt, skal apparatet ikke utsettes for regn eller fuktighet. Your portable DVD player Congratulations on your purchase, and welcome to Philips! To fully benefi t from the support that Philips offers, register your product at www.philips.com/welcome. Introduction Your portable DVD player plays digital video discs that conform to the universal DVD Video standard. -
Page 7: What's In The Box
Check and identify the contents of your package: • Main unit x 1 • Second screen x 1 • AC power adaptor x 1, DSA-9W-09 F (DVE) or AY4132 (Philips) • Remote control • Car adaptor x 1 • AV cable x 2 •... - Page 8 SETUP • Accesses or exits the setup menu. • Skips to the previous or next title, chapter, or track. OPEN • Opens the disc compartment. DISC MENU • For DVD, accesses or exits disc menu. • For VCD, turns on or off PBC (Playback Control) mode. •...
-
Page 9: Overview Of The Remote Control
Overview of the remote control SETUP • Accesses or exits the setup menu. DISPLAY • Displays play information. ZOOM • Zooms in or out of the picture. • Selects DVD subtitle language. - Page 10 A-B REPEAT • Marks the section for repeat play. REPEAT 1/ALL • Repeats a chapter/track/title. DISC MENU • For DVD, accesses or exits disc menu. • For VCD, turns on or off PBC (Playback Control) mode. • For VCD version 2.0 or SVCD with PBC turned on, returns to the menu. AUDIO •...
-
Page 11: Overview Of The Second Screen
Overview of the second screen DC IN • Power supply socket. AV IN • Audio/video input jack. • Headphone jack. VOL -/+ • Decreases or increases volume. BRIGHTNESS -/+ • Adjusts screen brightness. OFF/ON • Turns off/on the second screen. Get started Caution •... -
Page 12: Install Remote Control Battery
If you contact Philips, you will be asked for the model and serial number of your apparatus. The model number and serial number are on the back of the apparatus. Write the numbers here: Model No. __________________________ Serial No. ___________________________... - Page 13 To use the player in a car, attach the main unit and the second screen to the back of the front seat headrests. Fix the headrest mount bracket on to the front seat headrest. Position the bracket on the bars of the headrest. Fasten the screw to fi...
-
Page 14: Connect The Second Screen
Adjust the viewing angle. Release the node. Adjust the viewing angle as desired. Fasten the node. Press the release button to release the DVD player from headrest. • To attach the second screen, repeat the above steps. Connect the second screen Caution •... -
Page 15: Use At Home
Connect power Caution • Risk of product damage! Ensure that the power supply voltage corresponds to the voltage pointed on the back or the underside of the player. • Risk of electric shock! When you unplug the AC adapter, always pull the plug from the socket. -
Page 16: Use Your Player
Connect additional equipment Caution • Turn off your player before connecting to any additional equipment. You can connect the player to a TV or an amplifi er to enjoy DVDs or Karaoke. Match the color of the AV cables (the AV cable connected to TV is not supplied) with the jacks: the yellow cable is for the yellow video jack, the red/white cable is for the red/white audio jacks. -
Page 17: Play Discs
Select [-- General Setup Page --] > [OSD Language]. Press to select an option. Press /OK to confi rm. Press SETUP to exit. Play discs Slide OPEN on the main unit. Insert the disc with label side facing up. Push down to close the disc compartment. »... -
Page 18: Adjust Settings
Adjust settings Set the main unit To maximize your play experience, use SETUP to fi ne tune your settings. Press SETUP. » The setup menu is displayed. Press to select an option and press [-- General Setup Page --] [OSD Language] [Screen Saver] [Resume] [Angle Mark]... -
Page 19: Set The Second Screen
Note • *There are 3 options for • Latin: Albanian, Breton, Catalan, Danish, Dutch, English, Faroese, Finnish, French, Gaelic, German, Icelandic, Irish, Italian, Norwegian, Portuguese, Spanish and Swedish. • Central Europe: Albanian, Croat, Czech, Dutch, English, German, Hungarian, Irish, Polish, Romanian, Slovak, Slovene and Sorbian. •... -
Page 20: Troubleshooting
To keep the warranty valid, never try to repair the system yourself. If you encounter problems when using the player, check the following points before requesting service. If the problem remains unsolved, register your player and get support at www.philips.com/welcome. No power •... - Page 21 Cannot play disc • Ensure the disc label is upwards. • Clean the disc. With a clean, soft, lint-free cloth, wipe the disc outwards from the center. • Check if the disc is defective by trying another disc. No response to the remote control •...
- Page 22 © 2009 Koninklijke Philips Electronics N.V. All rights reserved.
Need help?
Do you have a question about the PET7432/12 and is the answer not in the manual?
Questions and answers