
Related Manuals for Philips Streamium WAS7500/05


Summary of Contents for Philips Streamium WAS7500/05
- Page 1 Register your product and get support at www.philips.com/welcome EN User manual Contact information WACS7500 WAS7500...
- Page 2 Philips Consumer Electronics 0738-WACS7500 (report No.) EC DECLARATION OF CONFORMITY Philips, Glaslaan 2, 5616 JB Eindhoven, The Netherlands declare under our responsibility that the electrical product: Philips (name) to which this declaration relates is in conformity with the following standards:...
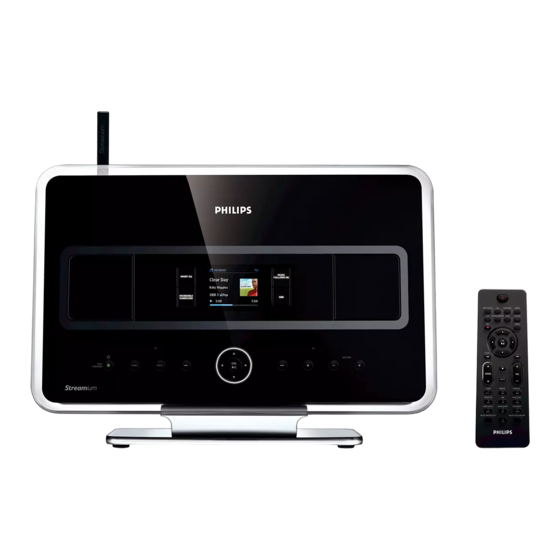
- Page 3 Wireless Music Center + Station...
- Page 4 Important notes for users in the U.K. Mains plug This apparatus is fitted with an approved 13- Amp plug.To change a fuse in this type of plug, proceed as follows: Remove fuse cover and fuse. Fix the new fuse which should be a BS1362 5- Amp, A.S.T.A.
-
Page 5: Table Of Contents
Table of contents Important Safety GPL Package written offer LGPL Library written offer Environmental information Disposal of your old product Maintenance Hearing Safety Register your product Your Wireless Music Center & Station What’s in the box Overview Wireless Music Center & Station 2.2.1 Controls on Center and Station Overview remote controls... - Page 6 CD (Center only) Supported discs Play discs 7.2.1 Search by keywords 7.2.2 Find track in current album (during playback) 7.2.3 Find passage in current track (during playback) Play modes REPEAT, SHUFFLE FM radio Tune radio stations Store preset radio stations 8.2.1 Autostore: Automatic preset program 53 8.2.2 Manual store: Manual preset program 8.2.3 Listen to preset station...
-
Page 7: Important
• Modification of the product can result in hazardous EMC radiation or other unsafe operations. This product complies with the radio interference requirements of the European Community. Philips Electronics, BG Entertainment Solutions, hereby declare that this product WACS7500 is in compliance with the essential requirements and other relevant provisions of the Directive 1999/5/EC. -
Page 8: Gpl Package Written Offer
This product contains Linux 2.4.27-vrsl that is made available under the GNU GPL license version 2 (hereafter called ‘the Program’). Philips Electronics Hong Kong Ltd. hereby offers to deliver or make available, upon request, for a charge no more than the cost of physically performing source distribution, a complete machine- readable copy of the corresponding source code of the Program on a medium customarily used for software interchange. -
Page 9: Disposal Of Your Old Product
Disposal of your old product Your product is designed and manufactured with high quality materials and components, which can be recycled and reused. In order to preserve, protect and improve the quality of the environment, protect human health, and utilize natural resources prudently and rationally, you should return the unserviceable product either to the place where you purchased it, or to a relevant facility in accordance with the local statutory regulations. -
Page 10: Hearing Safety
Important (for models supplied with headphones): Philips guarantees compliance with the maximum sound power of its audio players as determined by relevant regulatory bodies only with the original model of provided headphones. In case this one needs replacement, we recommend that you contact your retailer to order a model identical to that of the original, provided by Philips. -
Page 11: Register Your Product
• Firmware upgrade files for WACS7500 online • Interactive troubleshooting If you register your product at www.club.philips.com, we will be able to inform you as soon as new and free upgrades are available. Enjoy your Wireless Music Center & Station! -
Page 12: Your Wireless Music Center & Station
Your Wireless Music Center & Station Congratulations on your purchase and welcome to Philips! With the Wireless Music Center & Station you can: • Stream music from your PC • Dock your iPod • Plug & play from USB devices •... - Page 13 Supplied accessories Remote control, 2-way, incl. 4x AAA batteries FM wire antenna, 2x Your wireless music centre and station Remote control, 1-way, incl. 2x AAA batteries PC Suite CD, 1x Power cable, 2x Mounting kit, 1x (for Station)
-
Page 14: Overview Wireless Music Center & Station
Overview Wireless Music Center & Station 2.2.1 Controls on Center 1 Antenna USB jack 3 Disc slot (loader) (only Insert discs with graphics facing you (only Ejects a disk from the CD slot 5 LCD Display shows the status of the set MUSIC FOLLOWS ME HD: moves music playback between Center and Station... - Page 15 Navigation controls (left, right up, down) allow you to scroll through the option lists HD/CD/USB/UPnP: returns to previous option lists HD/CD/USB/UPnP: skips/searches tracks/passage back/forward (in playback screen) Fast scroll through options/alphanumeric lists Radio: tunes to stations Confirms selection Radio: enters the list of present stations Press to skip to previous track / press &...
-
Page 16: Overview Remote Controls
Overview remote controls Important! The following features require the use of the 1-way remote control: • Internet radio registration • Network configuration • Editing track information 2.3.1 2-way remote control Press briefly to switch the set to ON or Standby Press &... - Page 17 5 OK, Confirms selection starts playing Adjusts the volume level up or down MENU Enters or exits the setup menu MUTE Deactivates the sound temporarily Stops playback or recording Press to skip to previous track / press & hold to fast forward SHUFFLE (3 def) Selects random playback...
-
Page 18: 1-Way Remote Control
2.3.2 1-way remote control Press briefly to switch the set to ON or Standby Press & hold to switch the set to Eco Standby (power-saving mode) FM TUNER Selects FM radio HOME Selects HD Music Radio UPnP (Universal Plug & Play) Portable (USB Universal Serial Bus) AUX (separately connected device) In Standby mode: switches the set ON... - Page 19 MUTE Deactivates the sound temporarily SHUFFLE (3 def) Selects random playback REPEAT (2 abc) Selects continuous playback 15 INCR.SURR. (6 mno) Selects Incredible Surround sound effect (Dynamic Bass Boost) (5 jkl) Toggles the bass enhancement between on (DBB1, DBB2, DBB3) and off RDS/NEWS (9 wxyz) Radio: selects RDS information...
-
Page 20: Overview Display
Overview display Icons of the LCD: Icon Description Client connected Client not connected Music Radio UPnP Aux mode CD mode HD mode Radio mode Record (rip) mode Transfer mode USB mode Icon Description Repeat all Repeat 1 Shuffle Alarm Music broadcast Music follows me Mute Sleep... -
Page 21: Installation
Installation Install Center ( Note Before you decide where and how to install the set, test the Wi-Fi connection and rear cable connections to find a suitable location. You can install in two ways, free standing (using the supplied stands) or wall mounted (without the stands). -
Page 22: Connect Ac Power
Connect AC power Important! Always press & hold power plug. Ensure that all rear connections are established before you power up the set. Connect the AC power cord to the mains outlet.The set is now powered up (switched on). When in Standby or Eco Standby mode, To disconnect the system from the power supply completely, remove the power plug from the mains outlet. -
Page 23: Connect Antennas
3.4.1 Connect antennas 1 Extend wire antenna. 2 Connect wire antenna to FM antenna jack: 3 Optional:To improve FM reception you can install an extension line (sold separately) between the wire antenna and the antenna jack. 4 Unwind the antenna extension line completely. 5 Move it in different directions to find the optimal reception (if possible, keep it away from the TV, VCR or other radiation sources). -
Page 24: Connect Your Ipod (Optional)
You can connect your iPod (not supplied) to cable (Philips docking cradle for iPod, model DC1050 sold separately). Now you can enjoy the music library in your iPod via the sophisticated speaker system of the set.You can even charge your iPod at the same time. -
Page 25: Connect Additional Appliances
2 Use on the remote control (or use the navigation control of your iPod) to select the music in your iPod menu system. (See also 10 External sources). 3.4.4 Connect additional appliances It is possible to play audio output from an external source, e.g.TV, VCR, Laser Disc player, DVD player on .You can also record the audio output to the music library in the HD of On the additional appliance... -
Page 26: Prepare
Prepare Set the clock The time can be displayed in 24-hour or 12-hour format.You can set up your clock on There are two methods to set the clock, RDS automatic time synchronization and manual time set- RDS auto time sync: If you have preset RDS radio stations, you can synchronize the clock with one of the RDS stations. - Page 27 4 Use to select the RDS radio station you wish to synchronize the clock with. > The screen shows a confirmation screen: Manual time set: 1 Press MENU to enter the menu screen. 2 Use to select Settings followed by Time. 3 Use 3, 4, or the numeric keypad (0-9), and >...
-
Page 28: View The Clock
4 Use 3, 4, or the numeric keypad (0-9) repeatedly to set the hours followed by the minutes. 5 Confirm with OK. • Change to 12-hour or 24-hour format: 1 In the Time menu, select Time Format. 2 Use to select your option. •... -
Page 29: Remote Control
Remote control The set is supplied with a 2-way remote control and a 1-way remote control.You can use these to control functions on Note Use the 1-way remote control for Station management, Network configuration, and to Edit track information.The 2-way remote control cannot be used for these tasks. Important! •... - Page 30 Installing batteries: Open battery compartment. Install into • 2-way remote control: 4 batteries type LR03 or AAA. • 1-way remote control: 2 batteries type LR03 or AAA. Observe correct polarity (refer to ‘+’ / ‘-’ symbols inside the battery compartment). Close battery compartment.
-
Page 31: Remote Control, 2-Way
4.2.2 Remote control, 2-way You can choose to use the 2-way remote control to operate either level of interference, you can also select your preferred operational mode: Enhanced Mode or Normal Mode. Important! To save battery power, if no buttons are pressed for approx. 15 seconds, the 2-way remote control enters idle mode. -
Page 32: Navigation Controls
Navigation controls 1 Use the navigation controls 2 Highlight options with 3 Enter submenus with 2. 4 Confirm selections with Alphanumeric keys 1 Use the alphanumeric keys to enter letters or numbers. 2 When the text box appears, press the alphanumeric keys repeatedly until the desired letter/number appears. -
Page 33: Basic Functions
Basic functions Power modes and functions When you plug the product into your mains supply, it powers up and is in power mode ON.The button allows you to change the power mode. A colored light in the button indicates the current power mode: Center ( ) / Station (... - Page 34 During Standby the display shows the time (or display shows —:— if you have not set the clock). To switch the back ON again, a press y. switches ON and remembers the last source selected: The button light changes from red to green. b press one of the source buttons on the remote control, TUNER, AUX, or HOME.
-
Page 35: Eco Standby (Power-Saving Mode)
Eco Standby (power-saving mode) In the power-saving mode Eco Standby, the display and Wi-Fi connections of the product are turned off.The HD (Hard Disk) of cannot stream music between Standby the remote controls are inactive. 1 With the set switched ON, press & hold y: changes to Eco Standby. -
Page 36: Mute
MUTE During playback, you can deactivate the sound without switching off the set. 1 To deactivate the sound, press MUTE. > appears. Playback continues without sound. 2 To reactivate the sound, press > The icon disappears. Sound control 5.6.1 Smart equalizer This function enables you to play music of the current genre with the matching sound settings. -
Page 37: Dbb (Dynamic Bass Boost)
5.6.3 DBB (Dynamic Bass Boost) Press (Dynamic Bass Boost) once or more times to change the bass settings. Select your option: DBB OFF (default), DBB 1, DBB 2, or DBB 3. Some discs might be recorded in high modulation, which causes a distortion at high volume. If this occurs, switch off DBB or reduce the volume. -
Page 38: Selecting Languages
Selecting languages 1 Press MENU to enter the menu screen. 2 Use to select Settings, followed by Language. 3 Use to choose English, Français, Español, Nederlands, Italiano or Deutsch. Sleep You can preset a certain period of time after which 1 On the remote control, press minutes): >... -
Page 39: Alarm
5.10 Alarm Important! The clock must be set correctly before the alarm is set. 5.10.1 Set alarm / alarm time / repeat mode 1 Press MENU to enter the menu screen. 2 Use to select Settings. 3 Use to select Alarm, followed by Alarm On or Off. >... -
Page 40: Hd (Hard Disk)
HD (Hard Disk) Play HD Music Music is centrally stored in the 80GB HD (Hard Disk) on the streamed and played on 1 Check that is switched ON or in Standby mode (see 5 Basic functions). 2 Press HOME and select HD Music (or press >... -
Page 41: Select Track Of Same Artist
3 Use alphanumeric keys to enter keyword (maximum 8 characters) (see 4.4 Prepare: Alphanumeric keys) 4 Press to start searching > Display: Searching… Searching starts from the beginning of current option list. The matched items appear at the top of the list. The option list automatically shows the closest match in the alphabet if no match is found. -
Page 42: Find Track In Current Album (During Playback)
6.2.4 Find track in current album (during playback) In playback screen, navigate with 6.2.5 Find passage in current track (during playback) 1 In playback screen, press & hold > Track gets scanned at high speed. 2 When you found the passage you want, release >... -
Page 43: Build Music Library On Center
Build music library on Center ( Important! • Recording is permitted only if there is no infringement of copyrights or any other rights of third parties. • For CDs encoded with copyright protection technologies used by some record companies, recording will be restricted. •... - Page 44 Music recognition technology and related data are provided by Gracenote®. Gracenote is the industry standard in music recognition technology and related content delivery. For more information, please visit www.gracenote.com. CD and music-related data from Gracenote, Inc., copyright © 2000-2007 Gracenote. Gracenote Software, copyright ©...
-
Page 45: Import From Your Pc
2 In the track list screen, press > List of tracks with check boxes appears: 3 Press MARK/UNMARK all tracks). RECORD 0 4 Press (REC) to start ripping. > Display shows CD-Rip and the current track name. (A default album name, e.g. Album_001 is assigned if the CD track information cannot be found in the Gracenote®... -
Page 46: Record From Radio Or External Source
6.4.3 Record from radio or external source A maximum recording time of 3-hours can be made from the radio or an external source. a In Radio mode, tune the desired radio station (see 8.1 FM radio: Tuning radio stations). b In AUX mode, start playback from the external source. 2 Press RECORD >... -
Page 47: Delete A Playlist, Album Or Track
Delete a playlist, album or track This feature works only on 1 Navigate with 2 If necessary, press you wish to delete. 3 Press MENU to enter the menu screen. 4 Use to select Delete Playlist, Delete Album or Delete Track 5 Press to select Yes. -
Page 48: Backup To Pc
To view more track information: 1 In HD playback screen, press 2 In full view album art screen, press Backup to PC The Wireless Audio Device Manager (WADM) in the supplied PC Suite CD allows you to backup contents on the HD to your PC.The backup files on your PC can be subsequently restored if the files on the HD are lost or corrupted. -
Page 49: Music Broadcast
3 To stop MUSIC FOLLOWS ME, press • MUSIC FOLLOWS ME will be automatically deactivated if you do not activate MUSIC FOLLOWS ME on the destination unit within 5 minutes • To deactivate MUSIC FOLLOWS ME, press • After activating MUSIC FOLLOWS ME on the destination unit you can select other tracks or source for playback. -
Page 50: View System Information
6.10 View system information 1 Press MENU to enter the menu screen. 2 Use to enter Information menu. The display shows: System, Wireless and Wired. a Use to select System. > Name of display: b Use to select Wireless. > List of available information items (e.g. SSID,Wireless Mode,WEP Key, MAC Address, Subnet mask, IP Address, and IP Mode) is shown on the display: to select Wired. -
Page 51: Edit Track Information
6.11 Edit track information Note Use the 1-way remote control to Edit track information.The 2-way remote control cannot be used for this task. You can edit track title, album name, etc. on 1 Press HOME to select HD. 2 Use to select the track to be edited. -
Page 52: Cd (Center Only)
CD (Center Supported discs You can play the following discs on the system: • Pre-recorded audio CDs (CDDA) • Finalized audio CD-Rs and CD-RWs (12cm CD / 8cm CD, 185 MB / 200 MB) • MP3WMA-CDs (CD-R/CD-RWs with MP3/WMA files) •... -
Page 53: Play Discs
Play discs 1 Insert CD into CD loader slot on > Display shows: Reading CD. Audio CD: list of tracks appears (Track information may not appear, if it is not found in the HD database and if there is no Internet connection to update the missing information from the Gracenote®... -
Page 54: Search By Keywords
7.2.1 Search by keywords The keyword should be the first letter or word of the album title, artist name, track title, genre name, or playlist name you wish to search for: By entering a keyword, you can quickly find the item that most closely matches to your search criteria.The search cursor will stop at the closest alphabetical match in the list. -
Page 55: Find Track In Current Album (During Playback)
7.2.2 Find track in current album (during playback) In playback screen, press during playback. 7.2.3 Find passage in current track (during playback) 1 In playback screen, press & hold speed. 2 When you found the passage you want, release Play modes REPEAT, SHUFFLE plays the current track continuously repeats all the tracks (under current artist, genre, or album) repeats all the tracks (under current artist, genre, or album) in random order... -
Page 56: Fm Radio
FM radio Tune radio stations 1 Connect the supplied FM wire antenna to 2 Ensure that the set is switched on or in Standby mode (see 5 Basic functions). 3 Press HOME once or more times to select Radio. > Playback screen appears. Display: Radio, radio station frequency and preset number (if programmed). -
Page 57: Autostore: Automatic Preset Program
8.2.1 Autostore: Automatic preset program Autostore automatically starts programming radio stations into the preset memory, beginning with Preset 1. Available stations are programmed in the order of their radio frequency, RDS stations are followed by FM stations. A maximum of 10 RDS stations will be stored (Preset 01 to Preset 10). 1 Press MENU to enter the menu screen. -
Page 58: Rds News
RDS (Radio Data System) is a service that allows FM stations to send additional information along with the FM radio signal. Tune to RDS radio station (see 8.2.1 Autostore: Automatic preset program) Display shows (if available): • Name of radio station •... -
Page 59: Internet Radio
For first time use of the Internet radio you must register with Philips. To register you need a valid email address. Note If you enter an email address that is already registered with Philips, the display asks for your password. Enter your password and enjoy Internet radio! Internet radio registration process:... -
Page 60: Regular Use
On your PC: 1 Check the inbox of the email address you entered and look for a message from ‘ConsumerCare@Philips.com‘ with the subject: Your Streamium Registration…. 2 Read and follow the instructions given in the email to complete your registration process on the Philips website. -
Page 61: Add Internet Radio Stations And Bookmark Your Favorites
Add internet radio stations and bookmark your favorites In Internet radio mode press On your PC 1 Log in with your registered email address at www.philips.com/welcome. 2 Select Streamium Management on the left hand side of the window. 3 Choose radio stations from the list. -
Page 62: Upnp
2 To play the music library of your UPnP device on is properly installed and enabled on the device (e.g.Windows Media Player supplied PC Suite CD,Windows Media Player 11 or Philips Multimedia Manager). For more help refer to Windows Media Player. -
Page 63: Connect To The Upnp Device
For more information on the connection, see 11.2 Network settings: Connect to Wi-Fi enabled or wired home network. Connecting other UPnP clients to Philips Wireless Music Center may take longer than connecting a Philips Wireless Music Station to Center. UPnP playback Note •... -
Page 64: Play Music From Center
4 Press HOME on remote control to select UPnP mode. > The display on the set shows a list of connected UPnP devices (up to 4 UPnP devices). (Server not found appears if there is no UPnP device found in the network.) 5 Use to select your desired UPnP device. -
Page 65: External Sources
External sources 10.1 Play or record to USB mass storage device You can playback music from a USB device on to a USB mass storage device, so that you can carry your favorite music with you wherever you go. 10.1.1 About USB device Note •... -
Page 66: Play Music From Usb Device
How to organize your MP3/WMA files on a USB mass storage device browses MP3/WMA files in the same way as Organize your MP3/WMA files in different folders or sub-folders as needed. • Make sure that MP3 files end on extension .mp3 and WMA files end on extension .wma. •... -
Page 67: Transfer Music To Usb Device
10.1.3 Transfer music to USB device Important! • There is no support for transfer of music to MTP devices. • Recording is permitted only if there is no infringement of copyrights or any other rights of third parties. • For CDs encoded with copyright protection technologies used by some record companies, recording will be restricted. - Page 68 6 Press RECORD to start recording. > Display shows: Transferring... The number of tracks transferred / to be transferred appears. Selected tracks are transferred to the USB device. • Press to stop selecting tracks and return to the list of tracks.To continue, repeat steps 3 to 5. •...
-
Page 69: Play Your Ipod Music
10.2 Play your iPod music You can enjoy the music library on your iPod player through the speaker system of the WACS7500. This feature requires a Dock.The designated Philips Docking Cradle, Model DC1050 is sold separately. 1 Check that is switched on or in standby mode. -
Page 70: Network Settings
Network settings Note Use the 1-way remote control for Station management and Network configuration.The 2-way remote control cannot be used for these tasks. You can add and/or needs as follows: Type What you want Simple network settings Add another Connect to your PC for configuration management Connect to internet for Gracenote®... -
Page 71: Delete A Station
• On a Station that was already paired with another Center: a Press MENU b Select Installation mode > Station enters automatic installation mode. 2 Disconnect the power plug of > Display: Connecting to Center 3 On remote control, press >... -
Page 72: Connect To Wi-Fi (Wireless) Enabled Home Network
11.2 Connect to Wi-Fi (wireless) enabled home network The Wi-Fi enable network is a Wi-Fi infrastructure network or a Wi-Fi enable home network with a router. Important! Connections that include a Wi-Fi router require that the router is switched on at all times. -
Page 73: Set Network On Station
7 As prompted, select Yes to apply the settings. is connected to the Wi-Fi home network. might be disconnected from the Wi-Fi network of • To add to the network of Install Center and Station • If you change the WEP/WPA key after you have added the WACS7500 into your home network, the connection between the WACS7500 and your home network will be lost. -
Page 74: Connect To Wired Home Network
If you already know the WEP/WPA key for the Wi-Fi network: If there is no WEP/WPA key for the Wi-Fi network: 7 Select Automatic. 8 As prompted, select YES to apply the settings. is connected to the Wi-Fi home network. will be disconnected from the Wi-Fi network of 11.3 Connect to wired home network... -
Page 75: Set Network On Station
6 In Set IP Mode screen: If you are using a DHCP* enabled network device, select Automatic. DHCP stands for Dynamic Host Configuration Protocol. It is a protocol for assigning dynamic IP addresses to devices on a network. 11.3.2 Set network on Station ( If there is no DHCP: 1 Select Static and assign an IP address and subnet mask as prompted, using the alphanumeric keys (see 4.4 Prepare: Alphanumeric keys). -
Page 76: Connect To Two Different Home Networks
11.4 Connect to two different home networks WACS7500 can be added into two different home networks via wired and wireless network ports. Note that the IP addresses of the two different network ports cannot be in one subnet:WACS7500 has no router function and cannot determine which port to use. Note Once is added to the Wi-Fi network, all Wi-Fi ad-hoc connections with the WAC7500 will be... -
Page 77: Viewing The Connection With Home Network
11.5.2 Viewing the connection with home network 1 Check that is in HD source. 2 Press MENU to enter the menu screen. 3 Use to enter Information menu. > The display shows: System, Wireless and Wired. 4 Use to select Wireless or Wired. •... - Page 78 The following steps show how to get DNS and Gateway settings of the current network from the PC connected to the same network: 1 On your PC, click Start > Run 2 Type cmd and click OK 3 Type ipconfig/all 4 Write down the DNS and Gateway of the current connection.
-
Page 79: Connect To Your Pc
• Wireless network adapter 802.11 b/g (for wireless connection) • 500MB free hard disk space Install WADM (Philips Wireless Audio Device Manager, see 17 FAQ) 1 Insert the PC Suite CD into the PC. 2 Follow the instructions on the PC to install WADM. - Page 80 Launch WADM 1 Double click WADM. 2 If your Center appears, continue with step 6. 3 If your Center is not found, select Connection Wizard. 4 In Connection Wizard screen, select Express Mode. 5 Click Next and follow the instructions. 6 Select your Center from the list and click Connect now.
- Page 81 Launch for Windows XP or Vista: 1 Double click WADM. 2 A list of discovered Centers appears. 3 If your Center appears, continue with step 6. 4 If your Center is not found, select Connection Wizard. 5 In Connection Wizard screen, select Express Mode. 6 Click Next and follow the instructions.
-
Page 82: Gracenote® Cd Information
13.1.1 Update Gracenote® music recognition database Use your PC to register your product on www.club.philips.com and go to ‘Show Upgrades & Support’ page to download Gracenote® Music recognition database update. Note that the updates are posted quarterly and new updates are independent from old updates, i.e. a new update can be installed, even without the previous update. -
Page 83: Look Up Cd Track Information
13.2.1 Look up CD track information When an internet connection present (see 11.6 Connect to Internet), insert the CD of which you require the information (insert disc into loader slot of with graphics facing you). Searching start immediately.The system will search the local Gracenote® CD database first. If the CD track information cannot be found, the online search will start.The search results are shown on the display of If the internet query failed due to a disruption in the internet connection, the error message ‘Check... -
Page 84: Firmware Upgrade
• Never interrupt the firmware upgrading before its completion. • Never operate other functions before finishing the installation. 1 Register your Philips Wireless Music Center with www.club.philips.com. 2 Download the firmware upgrade files and store them on your PC. 3 Place side by side on a level and sturdy surface. -
Page 85: Restore Previous Firmware
14.2 Restore previous firmware After the firmware of is upgraded, you can restore it to its previous version as desired. 1 Press MENU to enter the menu screen. 2 Use to enter Settings followed by Firmware, then Restore firmware. 3 Press to select Yes. -
Page 86: Reset
Reset You can restore When to reset • Reset to reestablish Wi-Fi connection between • Reset to change the way network. 1 Check that the set is switched on (see 5 Basic functions). 2 Press MENU to enter the menu screen. 3 Use to enter Settings followed by Restore settings. -
Page 87: Technical Data
Technical data 16.1 Center General AC Power 230V ±10% Dimensions (w x h x d) 616x272x172mm Weight (Net) approx. 8.8kg Power consumption Active <45W Standby < 22W Eco Power Standby < 1W Amplifier Output power 2x20+40W(RMS) Frequency response 60-20,000Hz, - 3dB Signal-to-noise ratio 72 dBA (IEC) Speakers... -
Page 88: Station
16.2 Station General AC Power 230V ±10% Dimensions (w x h x d) 387x272x128mm Weight (Net) approx. 3.6kg Power consumption Active <25W Standby < 20W Eco Power Standby < 1W Amplifier Output power 2x7.5+15W(RMS) Frequency response 60-20,000Hz, - 3dB Signal-to-noise ratio 72 dBA (IEC) Speakers Full range... -
Page 89: Frequently Asked Questions
• If a fault occurs, first check the points listed below before taking the system for repair. If you are unable to resolve a problem by following these hints, consult your dealer or Philips for help. - Page 90 • Use the WEP/WPA key when connecting to an existing wireless PC network.To set WEP/WPA key, connect Philips Wireless Audio Device Manager (WADM) in the supplied PC Suite CD. In the WADM device configuration, enter the Wireless Network submenu, and in Device Wireless Authentication Type, select WEP or WPA.
- Page 91 Problem Nothing appears on the synchronous display of the 2-way remote control even after the set is switched The remote control does not function properly. The screen of is stuck in a menu or shows no response for a long period of time (2-5 minutes).
- Page 92 Problem Some files on the USB device are not displayed. Radio reception is poor. There is interference on the radio reception whenever the near my PC. (Such interference happens to most built-in tuner products.) How do I mount to the wall? Some WADM functions cannot be used.
- Page 93 Problem I have problems installing WADM or launching WADM after installation. Wireless upgrade of failed. Frequently asked questions Solution • Please make sure your Operating System is either Windows 2000 with Service Pack 4 and above, or Windows XP. • Please check if your PC has a virus. •...
- Page 94 Problem I have done all the steps described in Connect to PC guide to connect my WACS7500 to my home wireless network, but not connected to each other. I see the message ‘Check the internet setup for CD Database on- line’...
-
Page 95: Appendix
Appendix 18.1 How to mount Station ( Important! • The wall mounting instructions are intended for qualified installation personnel only! • Request for qualified installation personnel to carry out the wall mounting which includes drilling the holes, fixing the bracket, and mounting Mount and use free standing. -
Page 96: Preparation
18.1.3 Preparation Try the necessary rear connections and the Wi-Fi connections between find a suitable location for installation/mounting (see 3 Installation). Important! To avoid the risk of injury and damage to property as well as to the product: • Check for supply lines (gas, water, electricity, etc.) before drilling holes. •... - Page 97 End-User License Agreement USE OF THIS PRODUCT IMPLIES ACCEPTANCE OF THE TERMS BELOW Gracenote® MusicID® Terms of Use This device contains software from Gracenote, Inc. of Emeryville, California (‘Gracenote’).The software from Gracenote (the ‘Gracenote Software’) enables this application to carry out online disc identification and obtain music related information, including name, artist, track, and title information (‘Gracenote Data’) from online servers (‘Gracenote Servers’) and to perform other functions.You may use Gracenote Data only by means of the intended end user functions of this device.
- Page 98 882000110068 Brazil 0800 701 02 03 (all except Sao Paulo)(11) 2121-0203 (Sao Paulo only) Bulgaria 8001154424 Canada 1-888-744-5477 Chile 600 744 5477 (600-PHILIPS) China 4008 800 008 Colombia 01 800 700 7445 Croatia 800222778 Czech Republic 800142840 Denmark 35258759 Estonia...
- Page 99 Program and the GNU LGPL license version 2.1 (hereafter called the Library. Philips Electronics Hong Kong Ltd. Hereby offers to deliver or make available, upon request, for a charge no more than the cost of physically performing source distribution, a complete machine-readable copy of the corresponding source code of the Program or Library on a medium customary used for software interchange.
- Page 100 For example, if you distribute copies of such a program, whether gratis or for a fee, you must give the recipients all the rights that you have. You must make sure that they, too, receive or can get the source code. And you must show them these terms so they know their rights.
- Page 101 b) You must cause any work that you distribute or publish, that in whole or in part contains or is derived from the Program or any part thereof, to be licensed as a whole at no charge to all third parties under the terms of this License.
- Page 102 special exception, the source code distributed need not include anything that is normally distributed (in either source or binary form) with the major components (compiler, kernel, and so on) of the operating system on which the executable runs, unless that component itself accompanies the executable.
- Page 103 This section is intended to make thoroughly clear what is believed to be a consequence of the rest of this License. 8. If the distribution and/or use of the Program is restricted in certain countries either by patents or by copyrighted interfaces, the original copyright holder who places the Program under this License may add an explicit geographical distribution limitation excluding those countries, so that distribution is permitted only in or among...
- Page 104 OTHER PROGRAMS), EVEN IF SUCH HOLDER OR OTHER PARTY HAS BEEN ADVISED OF THE POSSIBILITY OF SUCH DAMAGES. How to Apply These Terms to Your New Programs If you develop a new program, and you want it to be of the greatest possible use to the public, the best way to achieve this is to make it free software which everyone can redistribute and change under these terms.
- Page 105 Ty Coon, President of Vice This General Public License does not permit incorporating your program into proprietary programs. consider it more useful to permit linking proprietary applications with library. If this is what you want to do, use the GNU Lesser General Public License instead of this License.
- Page 106 with the library after making changes to the library and recompiling And you must show them these terms so they know their rights. We protect your rights with a two-step method: (1) we copyright the library, and (2) we offer you this license, which gives you legal permission to copy, distribute and/or modify the library.
- Page 107 The precise terms and conditions for copying, distribution and modification follow. "work based on the library" and a "work that uses the library". former contains code derived from the library, whereas the latter must be combined with the library in order to run. GNU LESSER GENERAL PUBLIC LICENSE TERMS AND CONDITIONS FOR COPYING, DISTRIBUTION AND MODIFICATION 0.
- Page 108 c) You must cause the whole of the work to be licensed at no charge to all third parties under the terms of this License. d) If a facility in the modified Library refers to a function or a table of data to be supplied by an application program that uses the facility, other than as an argument passed when the facility is invoked, then you must make a good faith effort to ensure that, in the event an application does not supply such function or...
- Page 109 from a designated place, then offering equivalent access to copy the source code from the same place satisfies the requirement to distribute the source code, even though third parties are not compelled to copy the source along with the object code. 5.
- Page 110 Library. A suitable mechanism is one that (1) uses at run time a copy of the library already present on the user's computer system, rather than copying library functions into the executable, and (2) will operate properly with a modified version of the library, if the user installs one, as long as the modified version is interface-compatible with the version that the work was made with.
- Page 111 all its terms and conditions for copying, distributing or modifying the Library or works based on it. 10. Each time you redistribute the Library (or any work based on the Library), the recipient automatically receives a license from the original licensor to copy, distribute, link with or modify the Library subject to these terms and conditions.
- Page 112 license version number, you may choose any version ever published by the Free Software Foundation. 14. If you wish to incorporate parts of the Library into other free programs whose distribution conditions are incompatible with these, write to the author to ask for permission. copyrighted by the Free Software Foundation, write to the Free Software Foundation;...
- Page 113 but WITHOUT ANY WARRANTY; without even the implied warranty of MERCHANTABILITY or FITNESS FOR A PARTICULAR PURPOSE. Lesser General Public License for more details. You should have received a copy of the GNU Lesser General Public License along with this library; if not, write to the Free Software Foundation, Inc., 51 Franklin Street, Fifth Floor, Boston, MA 02110-1301 Also add information on how to contact you by electronic and paper mail.
- Page 114 domain by the authors. All code authors, and representatives of the companies they work for, have signed affidavits dedicating their contributions to the public domain and originals of those signed affidavits are stored in a firesafe at the main offices of Hwaci. Anyone is free to copy, modify, publish, use, compile, sell, or distribute the original SQLite code, either in source code form or as a compiled binary, for any purpose, commercial or non-commercial, and by any means.
- Page 115 The majority of code is written by Matt Johnston, under the license below. Portions of the client-mode work are (c) 2004 Mihnea Stoenescu, under same license: Copyright (c) 2002-2004 Matt Johnston Portions copyright (c) 2004 Mihnea Stoenescu All rights reserved. Permission is hereby granted, free of charge, to any person obtaining a copy of this software and associated documentation files (the "Software"), to...
- Page 116 loginrec is written primarily by Andre Lucas, atomicio.c by Theo de Raadt. strlcat() is (c) Todd C. Miller ---- Import code in keyimport.c is modified from PuTTY's import.c, licensed follows: PuTTY is copyright 1997-2003 Simon Tatham. Portions copyright Robert de Bath, Joris van Rantwijk, Delian Delchev, Andreas Schultz, Jeroen Massar, Wez Furlong, Nicolas Barry, Justin Bradford, and CORE SDI S.A.
- Page 117 furnished to do so, subject to the following conditions: The above copyright notice and this permission notice shall be included in all copies or substantial portions of the Software. THE SOFTWARE IS PROVIDED "AS IS", WITHOUT WARRANTY OF ANY KIND, EXPRESS OR IMPLIED, INCLUDING BUT NOT LIMITED TO THE WARRANTIES OF MERCHANTABILITY, FITNESS FOR A PARTICULAR PURPOSE AND NONINFRINGEMENT.
- Page 118 # along with this program; if not, write to the Free Software # Foundation, Inc., 59 Temple Place - Suite 330, Boston, MA 02111-1307, USA. # As a special exception to the GNU General Public License, if you # distribute this file as part of a program that contains a # configuration script generated by Autoconf, you may include it under # the same distribution terms that you use for the rest of that program.
- Page 119 thttpd-2.25b/cgi-src/Makefile.in:Copyright(C)1995 by Jef Poskanzer <jef@mail.acme.com>. thttpd-2.25b/cgi-src/phf.c: Copyright(C)1996 by Jef Poskanzer <jef@mail.acme.com>. thttpd-2.25b/cgi-src/redirect.8:Copyright(C)1995 by Jef Poskanzer <jef@mail.acme.com>. thttpd-2.25b/cgi-src/redirect.c: Copyright(C)1995 by Jef Poskanzer <jef@mail.acme.com>. thttpd-2.25b/cgi-src/ssi.8:Copyright(C)1995 by Jef Poskanzer <jef@mail.acme.com>. thttpd-2.25b/cgi-src/ssi.c: Copyright(C)1995 by Jef Poskanzer <jef@mail.acme.com>. thttpd-2.25b/extras/Makefile.in:Copyright(C)1995,1998 by Jef Poskanzer <jef@mail.acme.com>. thttpd-2.25b/extras/makeweb.1:Copyright(C)1995 by Jef Poskanzer <jef@mail.acme.com>.
- Page 120 # copyright notice and this permission notice appear in supporting # documentation, and that the name of M.I.T. not be used in advertising # publicity pertaining to distribution of the software without specific, # written prior permission. # suitability of this software for any purpose. # without express or implied warranty.
- Page 121 Specifications are subject to change without notice. Trademarks are the property of Koninklijke Philips Electronics N.V. or their respective owners Printed in China © 2009 Koninklijke Philips Electronics N.V. All rights reserved. WACS7500_00_UM_V2.1 www.philips.com wk9454...
Need help?
Do you have a question about the Streamium WAS7500/05 and is the answer not in the manual?
Questions and answers