Table of Contents
Advertisement
Quick Links
Advertisement
Table of Contents

Related Manuals for Philips SP9851


Summary of Contents for Philips SP9851
- Page 1 Premium Edition SP9851, SP9811 SP9851, SP9811...
- Page 3 25 26...
- Page 4 empty page before TOC...
- Page 5 English 6 简体中文...
-
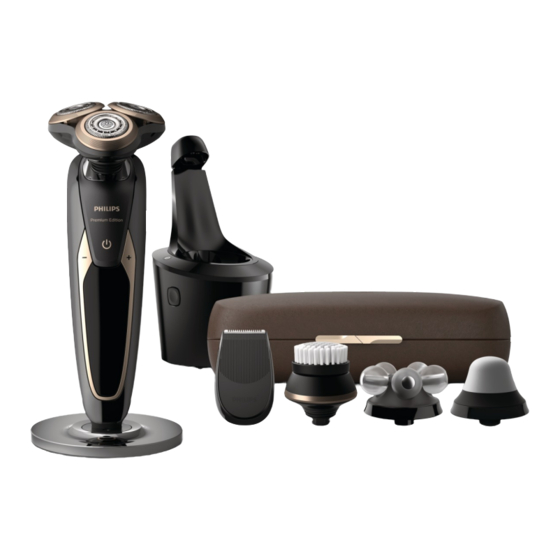
Page 6: General Description (Fig. 1)
English Introduction Congratulations on your purchase and welcome to Philips! To fully benefit from the support that Philips offers, register your product at www.philips.com/welcome. Please read this user manual, as it contains information about the features of this shaver as well as some tips to make shaving easier and more enjoyable. -
Page 7: Important Safety Information
English 27 Cleaning cartridge for SmartClean system 28 Supply unit 29 Small plug 30 Pouch The accessories supplied may vary for different products. The box shows the accessories that have been supplied with your product. Important safety information Read this important information carefully before you use the appliance and its accessories and save it for future reference. - Page 8 English - This appliance can be used by children aged from 8 years and above and persons with reduced physical, sensory or mental capabilities or lack of experience and knowledge if they have been given supervision or instruction concerning use of the appliance in a safe way and understand the hazards involved.
- Page 9 - Do not put the appliance or any part in the dishwasher. - If your shaver comes with a cleaning system, always use the original Philips cleaning fluid (cartridge or bottle, depending on the type of cleaning system). - Always place the cleaning system on a stable, level and horizontal surface to prevent leakage.
-
Page 10: Electromagnetic Fields (Emf)
- Only use the click-on massage attachment at the medium or lowest personal comfort setting. - Do not use the click-on massage attachment too close to the nostrils. Electromagnetic fields (EMF) This Philips appliance complies with all applicable standards and regulations regarding exposure to electromagnetic fields. -
Page 11: Personal Comfort Settings
English General - This shaver is waterproof. It is suitable for use in the bath or shower and for cleaning under the tap. For safety reasons, the shaver can therefore only be used without cord. - The supply unit is suitable for mains voltages ranging from 100 to 240 volts. -
Page 12: Battery Low
English Quick charge: When the battery symbol starts to flash quickly, the shaver contains enough charge for one shave. Battery fully charged When the battery is fully charged, the battery charge percentage lights up white continuously. Note: This appliance can only be used without cord. -
Page 13: Replacement Reminder
English Activating the travel lock 1 Press the on/off button for 3 seconds to enter the travel lock mode. While you activate the travel lock, the travel lock symbol lights up white continuously. When the travel lock is activated, the appliance produces a sound and the travel lock symbol flashes. -
Page 14: Charging With The Supply Unit
English Exclamation mark Overheating If the appliance overheats during charging, the exclamation mark flashes orange. When this happens, the shaver switches off automatically. Charging continues once the temperature of the appliance has decreased to the normal level. Blocked shaving heads If the shaving heads are blocked, the exclamation mark lights up orange continuously. -
Page 15: Using The Appliance
3 After charging, remove the supply unit from the wall socket and pull the small plug out of the appliance. Charging in the SmartClean system (SP9851 only) 1 Put the small plug in the back of the SmartClean system. 2 Put the supply unit in the wall socket. -
Page 16: Switching The Appliance On And Off
English Switching the appliance on and off - To switch on the appliance, press the on/off button once. The display lights up for a few seconds. - To switch off the appliance, press the on/off button once. The display lights up for a few seconds and shows the remaining battery charge. - Page 17 English Note: Do not press too hard, this can cause skin irritation. 3 Clean the appliance after use. Wet shaving For a more comfortable shave, you can also use this appliance on a wet face with shaving foam or shaving gel. To shave with shaving foam or shaving gel, follow the steps below: 1 Apply some water to your skin.
-
Page 18: Using Click-On Attachments
English 6 Dry your face. 7 Clean the appliance after use. Note: Make sure you rinse all foam or shaving gel off the appliance. Using click-on attachments Note: The accessories supplied may vary for different products. The box shows the accessories that have been supplied with your product. - Page 19 English 4 Pull the attachment straight off the appliance. Note: Do not twist the attachment while you pull it off the appliance. 5 Insert the lug of the attachment into the slot in the top of the appliance. Then press down the attachment to attach it to the appliance (‘click’).
- Page 20 English Do not use the appliance on damaged or irritated skin or on wounds. 1 Place the attachment on the attachment holder (see 'Removing or attaching the click-on attachments'). 2 Attach the attachment to the appliance (‘click’). 3 Moisten the attachment with water. Note: Do not use the appliance with a dry cleansing brush attachment, as this can irritate the skin.
- Page 21 11 Switch off the appliance and clean the attachment after use. SP9851 only: Using the fresh eyes attachment The click-on fresh eyes attachment is suitable for all skin types. We advise you to use it up to once a day in the morning for approx.
- Page 22 English 4 Place the fresh eyes attachment on the bony area below the right eye. Hold the attachment on your skin at an angle of 90°. Gently move the fresh eyes attachment from the nose towards the temple and repeat this movement. 15 sec.
-
Page 23: Cleaning And Maintenance
English 1 Place the attachment on the attachment holder (see 'Removing or attaching the click-on attachments'). 2 Attach the attachment to the appliance ('click'). 3 Switch on the appliance and set the appliance to the medium personal comfort setting (dynamic (see 'Personal comfort settings')). Only use the massage attachment at the medium or low personal comfort setting. - Page 24 English Cleaning the shaver in the SmartClean system (SP9851 only) SmartClean system Plus has two phases: the rinsing phase and the drying phase. Preparing the SmartClean system for use Caution: Do not tilt the SmartClean system to prevent leakage. Note: Hold the SmartClean system while you prepare it for use.
- Page 25 English 5 Place the cleaning cartridge in the SmartClean system. 6 While holding the SmartClean system with one hand, gently push the top part of the SmartClean system back down (‘click’). Using the SmartClean system Caution: Always shake excess water off the shaver before you place it in the SmartClean system.
- Page 26 English 3 Place the shaver in the holder (1), tilt the shaver backwards (2) and press down the top cap to connect the shaver ('click') (3). The battery symbol starts to flash, which indicates that the shaver is charging. 4 Press the on/off button on the SmartClean system to start the cleaning program.
- Page 27 English Replacing the cartridge of the SmartClean system Replace the cleaning cartridge when the replacement symbol flashes orange or when you are no longer satisfied with the cleaning result. If you clean the shaver in the SmartClean system once a week, the SmartClean cartridge lasts approximately three months.
-
Page 28: Cleaning The Shaver Under The Tap
English Cleaning the shaver under the tap Clean the shaver after every shave for optimal performance. Be careful with hot water. Always check if the water is not too hot, to prevent burning your hands. Note: Never dry the shaving unit with a towel or tissue, as this may damage the shaving heads. -
Page 29: Thorough Cleaning
English 7 Attach the shaving head holder to the bottom part of the shaving unit (‘click’). Thorough cleaning We advise you to clean the shaving heads thoroughly once a month or when the shaver does not shave as well as it used to. Note: The shaving heads are locked by a blue or an orange retaining ring. - Page 30 English 4 Turn the retaining ring anticlockwise and lift it off the shaving head. Repeat this process for the other retaining rings. Place them aside in a safe place. 5 Remove the shaving heads from the shaving head holder. Each shaving head consists of a cutter and guard.
-
Page 31: Cleaning The Click-On Attachments
English 10 Blue retaining ring: Place the retaining ring on the shaving head and turn it clockwise to reattach the retaining ring. Place the arrows on the ring in line with the projections in the shaving head holder. Turn the ring clockwise until it clicks to indicate that the ring is fixed. - Page 32 2 Detach the attachment from the attachment holder. 3 Clean the parts thoroughly with warm water and soap. 4 Dry the attachment with a towel. SP9851 only: Cleaning the fresh eyes attachment Clean the fresh eyes attachment after each use. 1 Switch off the appliance.
- Page 33 English 2 Detach the attachment from the attachment holder. 3 Clean the parts thoroughly with warm water. 4 Dry the attachment with a towel. Cleaning the massage attachment Clean the massage attachment after each use. 1 Switch off the appliance. 2 Detach the attachment from the attachment holder.
-
Page 34: Replacing The Shaving Heads
Replace damaged shaving heads immediately. Always replace the shaving heads with original Philips shaving heads ( 'Ordering accessories'). Replacement reminder The replacement reminder indicates that the shaving heads need to be replaced. The shaving... -
Page 35: Replacing The Cleansing Brush Attachment
English 1 To replace the shaving heads, remove the shaving heads from the shaving head holder one by one. See chapter Thorough Cleaning for the instructions on how to remove the retaining rings and shaving heads. Note: The shaving heads are locked by a blue or an orange retaining ring. -
Page 36: Ordering Accessories
Ordering accessories To buy accessories or spare parts, visit www.shop.philips.com/service or go to your Philips dealer. You can also contact the Philips Consumer Care Center in your country (see the international warranty leaflet for contact details). The following accessories and spare parts are... -
Page 37: Removing The Rechargeable Shaver Battery
Please take your product to an official collection point or a Philips service center to have a professional remove the rechargeable battery. - Follow your country’s rules for the separate collection of electrical and electronic products and rechargeable batteries. -
Page 38: Warranty And Support
English Warranty and support If you need information or support, please visit www.philips.com/support or read the international warranty leaflet. Warranty restrictions The shaving heads (cutters and guards) are not covered by the terms of the international warranty because they are subject to wear. - Page 39 English Problem Possible cause Solution The shaving unit is Clean the shaving heads soiled or damaged thoroughly or replace them. to such an extent that the motor cannot run. The appliance d The shaving heads Replace the shaving heads oes not shave as are damaged or (see 'Replacement').
-
Page 40: Smartclean System
English Problem Possible cause Solution The shaving heads Clean the shaving heads are soiled. (see 'Cleaning and maintenance'). Water is leaking During cleaning, This is normal and not from the bottom water may collect dangerous because all of the appliance. between the inner electronics are enclosed in body and the outer... - Page 41 (see 'Replacing be replaced. the cartridge of the SmartClean system'). You have used Only use the original another cleaning Philips cleaning cartridge. fluid than the original Philips cleaning cartridge. The drain of the Remove the cartridge from cleaning cartridge is the SmartClean system and blocked.
-
Page 42: Click-On Attachments
Philips appliance. If you have any difficulties obtaining information, please contact the Philips Consumer Care Center in your country. You find its contact details in the international warranty leaflet. You can also visit www.philips.com/support. - Page 43 English Problem Possible cause Solution I don’t know with We advise you to cleanse which cleansing your skin with your favorite products I can cleanser. You can use use the cleansing cleansing gel, foam, oil, brush milk or lotions. Please do attachment.
- Page 44 介绍 感谢您的惠顾,欢迎光临飞利浦! 为了让您能充分享 受飞利浦提供的支持,请在 www.philips.com/welcome 上注册您的产品。 请阅读本用户手册,手册包含有关此剃须刀各种功能的 信息以及一些使用技巧,让您的剃须体验更轻松更舒 适。 一般说明(图 1) 1 洁面刷附件保护盖 2 卡入式洁面刷附件 3 卡入式按摩附件 4 卡入式眼部赋活附件(仅限于 SP9851) 5 附件基座 6 卡入式精确修剪器附件 7 卡入式剃须刀头部件 8 开/关按钮 9 小插头插座 10 产品座 11 感叹号 12 更换提醒 13 旅行锁符号 14 清洗提示...
- Page 45 简体中文 29 小插头 30 存储袋 随附的附件可能因产品而异。 包装盒上会显示随附于 您产品的附件。 重要安全信息 使用本产品及其附件之前,请仔细阅读本重要信息,并 妥善保管以供日后参考。 随附的附件可能因产品而 异。 危险 保持电源部件干燥。 警告符号注释: 禁止在打开的水龙头下进行清洗。 警告 要给电池充电,请仅使用产品随附的可拆卸电源部 件 (HQ8505)。 电源部件中包含一个变压器。 请勿自行更换电源部 件的插头,否则将导致严重后果。 本产品也可以由 8 岁或以上年龄的儿童以及肢体不 健全、感觉或精神上有障碍或缺乏相关经验和知识 的人士使用,但前提是有人对他们使用本产品进行 监督或指导,以确保他们安全使用,并且让他们明 白相关的危害。 切勿让儿童玩弄本产品。 不要让儿 童在无人监督的情况下对本产品进行清洁和保养。 将剃须刀手持部分与电源软线分开后,才能在水龙 头下清洗手持部分。 使用前,请务必检查产品及其附件。 如果本产品或 其附件损坏,请勿再使用,否则可能对人体造成伤 害。 请务必用原装型号更换损坏的部件。 如果您有青光眼、眼部受伤,或在过去...
- Page 46 简体中文 警告 切勿将清洁系统或充电座浸入水中,也不要在水龙 头下冲洗。 警告符号注释:禁止用在打开的水龙头下进行清 洗。 切勿使用温度高于 60°C 的热水冲洗剃须刀。 只能将本产品用于用户手册中所示的原定用途。 出于卫生的目的,本产品只能供一个人使用。 切勿使用压缩气体、钢丝绒、研磨性清洁剂或腐蚀 性液体(例如汽油或丙酮)来清洁产品。 请勿将本产品或其任何部件放在洗碗机中。 如果剃须刀随附清洁系统,应始终使用原装飞利浦 清洁液(滤芯或瓶,取决于清洁系统类型)。 清洁系统必须放在稳定、平坦的水平表面上,以防 漏液。 如果清洁系统采用清洁滤芯,在使用清洁系统进行 清洁或为剃须刀充电之前,应始终确保滤芯仓已关 闭。 清洁系统准备就绪时,切勿移动,以免清洁液漏 出。 冲洗剃须刀时,水可能从产品底部的插口漏出。 这 是正常的,而且没有危险,因为所有电子元件都封 闭在剃须刀内部的密封电源部件中。 请勿在包含电动空气清新器的墙壁插座上或其周围 使用电源部件,以免电源部件受到不可修复的损 坏。 切勿拆开本产品更换充电电池。 如果皮肤出现皲裂、开放性伤口、正在愈合的伤 口、皮肤处于术后恢复期或存在严重粉刺、晒伤、 皮肤感染、皮肤癌、发炎、湿疹、牛皮癣、对尼龙 过敏等皮肤病或皮肤过敏,请勿使用本产品。 如果您正在服用类固醇类药物,请勿使用该产品。 如果您的面部带有穿环,则需卸下穿环后再使用卡 入式附件或确保不要在穿环上或附近使用产品。 请勿将卡入式按摩附件和卡入式眼部赋活附件与自 制洁面乳、乳液、精油或含有刺激性化学物质或去 死皮微粒的化妆品一起使用。...
- Page 47 仅以最低个人舒适度设置使用卡入式眼部赋活附 件。 请勿将卡入式眼部赋活附件放入冷冻室/冰箱或太阳 下,否则可能危害您的肌肤。 卡入式眼部赋活附件设计用于眼睛下方的骨部区 域。 请确保使用期间没有任何松散的头发缠入卡入式按 摩附件,对此,您可以佩戴头箍、扎住头发或用手 将头发向后挽。 卡入式按摩附件只能用于按摩两颊。 仅以中等或最低个人舒适度设置使用卡入式按摩附 件。 请勿距离鼻孔太近使用卡入式按摩附件。 电磁场 (EMF) 本 Philips 产品符合所有有关暴露于电磁场的适用标准 和法规。 概述 符号注释:适合于在洗澡或淋浴时使用。 允许在盛 水的浴缸、淋浴、洗脸盆或其他器皿附近使用本器 具。 该剃须刀具有防水性能。 适合在沐浴或淋浴时使 用,也可以放在水龙头下清洗。 出于安全原因,该 剃须刀在使用时不能连接电线。 电源部件适合在 100 - 240 伏的电源电压下工作。 该电源部件可将 100-240 伏的电压转换为 24 伏以 下的安全低电压。...
- Page 48 简体中文 显示屏 注意: 初次使用剃须刀前,请从显示屏上取下保护 膜。 个人舒适度设置 本产品具有让您可以进行个性化设置的功能。 您可以 根据个人的剃须需要从三种设置中进行选择(从低至 高): 舒适、强劲或高效。 当您按 - 或 + 按钮时,个 人舒适度设置栏上亮起的部分显示当前选择的设置。您 可以按 + 或 - 按钮选择不同的设置。 充电 剃须刀充电时,电池充电百分比和电池符号呈白色闪 烁。 显示屏上显示的电池充电百分比表示电池充电量。 快速充电: 电池符号开始快速闪烁时,剃须刀包含的 电量足以完成一次剃须。 电池已完全充满 电池充满电后,电池充电百分比指示灯将呈白色持续亮 起。 注意: 本产品只能在不接电源的情况下使用。在充电 期间或之后按下开/关按钮时,您将听到声音,表示剃 须刀仍然连接到电源插座。 注意: 电池充满电后,显示屏会在 30 分钟后自动关 闭。...
- Page 49 简体中文 电池电量不足 当电池电量即将耗尽时,电池符号将呈橙色闪烁,并且 您将听到声音。 电池剩余电量 显示屏上显示的电池充电百分比表示剩余的电池电量。 清洗提示 每次剃须后请清洁剃须刀,以获得出色性能。 关闭产 品时,清洗提示符号闪烁,提醒您需要清洁产品。 旅行锁 您可以在携带本产品旅行之前将其锁住。 旅行锁可防 止本产品被意外启动。 启用旅行锁 1 按住开/关按钮 3 秒钟以进入旅行锁模式。...
- Page 50 简体中文 激活旅行锁时,旅行锁符号将呈白色持续亮起。 激 活旅行锁时,产品将发出声音,同时旅行锁符号会 闪烁。 禁用旅行锁 1 按开/关按钮 3 秒钟。 旅行锁符号闪烁,然后持续亮起。 现在可以再次使 用本产品。 注意: 将产品连接到电源插座也可以解除旅行锁。 更换提醒 为获得更好剃须效果,建议每两年更换一次剃须刀头。 本产品配有更换提示,它会提醒您更换剃须刀头。 剃 须刀头部件符号呈白色持续亮起,箭头呈白色闪烁,产 品发出蜂鸣声,表示您必须更换剃须刀头。 注意: 更换剃须刀头后,您需要通过按开/关按钮 7 秒 来重置更换提醒。 感叹号 过热 如果产品在充电期间过热,感叹号将呈橙色闪烁。 在 这种情况下,剃须刀会自动关闭。 一旦产品温度降至 正常水平,将继续充电。...
- Page 51 剃须刀头被阻塞 如果剃须刀头被阻塞,感叹号将呈橙色持续亮起。更换 提醒和清洗提示将呈白色交替闪烁,并且您将听到声 音。 此时,由于剃须刀头被污染或损坏,马达将无法 运行。 如果剃须刀头被污染,您必须对其进行清洁。. 如果剃 须刀头已损坏,您必须对其进行更换。 充电 首次使用剃须刀之前,或当显示屏指示电池电量几乎耗 尽时,请先为剃须刀充电。显示屏上显示的电池充电百 分比表示电池充电量。 将剃须刀连接到电源插座时,您将听到声音。 充电约需 1 小时。充满电的剃须刀最长可使用 60 分 钟。 注意: 不能在充电时使用本产品。 用电源部件充电 1 确保产品电源已关闭。 2 将小插头插入本产品,然后将电源部件插入电源插 座。 3 充电之后,从电源插座上拔下电源部件,并从产品 上拔下小插头。 在高效智能清洁系统中充电(仅限于 SP9851) 1 将小插头插入高效智能清洁系统的背面。 2 将电源部件插入电源插座。 3 按顶盖可将剃须刀放入支架(可听到“咔哒”一声 )。...
- Page 52 简体中文 4 将剃须刀倒置放在支架上方。 确保剃须刀的正面朝 向高效智能清洁系统的支架。 5 将剃须刀放入支架并向后倾斜,然后按下顶盖以连 接剃须刀(可听到“咔哒”一声)。 注意: 电池符号开始闪烁表示产品正在充电。 当电池 已完全充满电时,电池符号将持续亮起。 使用本产品 注意: 本产品只能在不接电源的情况下使用。 打开或关闭产品 要打开本产品,请按一下开/关按钮。 显示屏将亮起几秒钟的时间。 要关闭产品,请按一下开/关按钮。 显示屏将亮起几秒钟时间,显示电池剩余电量。 剃须 皮肤适应期 前几次剃须可能不会带给您预期效果,并且您的皮肤可 能会受到轻度刺激。 这是正常的。 您的皮肤和胡须需 要时间适应任何新的剃须系统。 为了让您的皮肤适应 这款新产品,我们建议您在 3 周时间内定期(至少每 周 3 次)仅使用本产品剃须。 剃须提示 选择您的个人舒适度设置(请参阅“显示屏”一 章)。 为确保获得最佳效果,如果您 3 天或更长时间没有 剃须,我们建议您预先修剪胡须。...
- Page 53 简体中文 干用剃须 1 启动产品。 显示屏将亮起几秒钟的时间。 2 让剃须刀头在您的皮肤上作迂回运动,以刮剃向不 同方向生长的所有须发。 轻轻按压,以获取舒适贴 面的剃须感受。 注意: 不要用力按压剃须刀,这样做可能会导致皮 肤疼痛。 3 使用后要清洁本产品。 湿剃 要获得更舒适的剃须体验,您也可以先用剃须泡沫或剃 须啫喱将脸弄湿,然后再用本产品进行剃须。 要用剃须泡沫或剃须啫喱剃须,请按照下面的步骤执行 操作: 1 用水润湿皮肤。 2 在皮肤上涂抹剃须泡沫或剃须啫喱。 3 在水龙头下冲洗一下剃须刀头部件,确保剃须刀头 部件可以在您的皮肤上顺畅滑动。 4 启动产品。...
- Page 54 简体中文 5 让剃须刀头在您的皮肤上作迂回运动,以刮剃向不 同方向生长的所有须发。 轻轻按压,以获取舒适贴 面的剃须感受。 注意: 定期冲洗剃须刀头部件,确保其能够继续在 您的皮肤上顺畅滑动。 6 擦干面部。 7 使用后要清洁本产品。 注意: 确保冲洗干净本产品上的所有泡沫或剃须啫 喱。 使用卡入式附件 注意: 随附的附件可能因产品而异。 包装盒上会显示 随附于您产品的附件。 建议不要在剃须后直接使用卡入式洁面刷或卡入式按摩 或眼部赋活附件,以免皮肤过敏。 拆卸或安装卡入式附件 注意: 安装到产品上之前,先将卡入式按摩附件、洁 面刷附件和眼部赋活附件安装到附件基座上。 1 将卡入式附件竖直抽离附件基座。 2 将卡入式附件安装到附件基座上,直至其锁定到位 (可听到“咔哒”一声)。 3 确保产品电源已关闭。...
- Page 55 简体中文 4 将附件竖直抽离产品。 注意: 将附件从产品上抽出时,不要旋转。 5 将附件的凸缘插入本产品顶部的槽内。 然后,按下 附件将其安装到本产品上(可听到“咔哒”一声) 。 使用修剪器附件 您可使用修剪器附件修剪鬓角和须髭。 1 将附件安装到产品上(可听到“咔哒”一声)。 2 启动产品。 显示屏将亮起几秒钟的时间。 3 将修剪器附件垂直放在皮肤上,向下移动产品,同 时轻轻按压。 4 使用 (请参见 '清洁和保养')后要清洁附件。 使用洁面刷附件 注意: 为获得更佳的剃须效果,剃须之前使用卡入式 洁面刷附件进行清洁。 将旋转洁面刷与日常洁面产品一起使用。 洁面刷可去 除油脂和污垢,焕发健康无油脂的肌肤。建议每天使用 本产品不超过 2 次。 从最低个人舒适度设置开始,以 熟悉附件的使用方法。 请不要在受伤或发炎的皮肤或伤口上使用本产品。 1 将附件安装至附件支架 (请参见 '拆卸或安装卡入式 附件')上。...
- Page 56 简体中文 2 将附件安装到产品上(可听到“咔哒”一声)。 3 用水湿润附件。 注意: 切勿在洁面刷附件干燥的情况下使用产品, 否则可能会刺激皮肤。 4 用水润湿面部,并将洁面乳涂抹到脸上。 5 将附件置于面颊上。 6 启动产品。 7 在鼻子至耳朵之间的皮肤上轻轻地移动附件。请勿 过分用力地将附件压在皮肤上,以确保舒适护理。 注意: 切勿清洁眼部周围的敏感区域。 20 sec. 8 约 20 秒后,可将本产品移至另一侧面颊,开始清洁 这部分面部皮肤。 20 sec.
- Page 57 简体中文 9 约 20 秒后,可将本产品移至前额,开始清洁这部分 面部皮肤。 轻轻将刷头从左向右移动。 注意: 建议您不要过度清洁,任何部位的清洁时间 不要超过 20 秒钟。 20 sec. 10 护理后,洗脸并擦干。现在您可以进行日常面部护 肤的下一步了。 11 使用后,请关闭本产品并清洁附件。 SP9851 only: 使用眼部赋活附件(仅限于 SP9851) 本卡入式眼部赋活附件适合各种皮肤类型。 建议您每 天早晨最多使用一次,大约每个(眼睛)区域 15 秒。 您可以在干燥的皮肤上使用眼部赋活附件,或在皮肤上 涂抹乳液后使用。 请不要在受伤或发炎的皮肤或伤口上使用本产品。 1 将附件安装至附件支架 (请参见 '拆卸或安装卡入式 附件')上。 2 将附件安装到产品上(可听到“咔哒”一声)。 3 启动产品并将速度设定为最低个人舒适度设置: 舒...
- Page 58 简体中文 5 大约 15 秒后,将本产品移至左眼下方骨部区域,重 复护理。 6 使用 (请参见 '清洁和保养')后要清洁附件。 使用按摩附件 15 sec. 本按摩附件适合各种皮肤类型。 建议您以中速设置 (请 参见 '个人舒适度设置')一周最多使用 2-3 次,大约每个 区域 90 秒。 按摩附件只能用于护理左右两颊。 面颊 区域包括下巴、鼻子和上唇之间的部位以及眼睛和耳朵 之间的部位。 请不要在受伤或发炎的皮肤或伤口上使用本产品。 请勿在眼睛周围的敏感部位使用按摩附件。 您可以在干燥的皮肤上使用按摩附件,或在皮肤上涂抹 乳液或精油后使用。 在按摩肌肤之前,建议您先用洁 面刷附件清洁面部。 1 将附件安装至附件支架 (请参见 '拆卸或安装卡入式 附件')上。 2 将附件安装到产品上(可听到“咔哒”一声)。 3 启动产品并将速度设定为中等个人舒适度设置:...
- Page 59 简体中文 清洁和保养 注意: 随附的附件可能因产品而异。 包装盒上会显示 随附于您产品的附件。 在高效智能清洁系统中清洁剃须刀(仅限于 SP9851) 升级版高效智能清洁系统具有两个阶段: 冲洗阶段和 干燥阶段。 高效智能清洁系统使用准备 警告: 切勿倾斜高效智能清洁系统,以防溢漏。 注意: 在准备使用高效智能清洁系统时用手握住。 注意: 如果您每周在高效智能清洁系统中清洁一次剃 须刀,则高效智能清洁系统滤芯可持续工作约 3 个 月。 1 将小插头插入高效智能清洁系统的背面。 2 将电源部件插入电源插座。 3 按高效智能清洁系统侧面的按钮 (1),然后提起高效 智能清洁系统的顶部 (2)。 4 将密封圈从清洁滤芯上拔下。...
- Page 60 简体中文 5 将清洁滤芯放置在高效智能清洁系统中。 6 一只手抓住高效智能清洁系统,然后将高效智能清 洁系统的顶部向下轻轻推回去(可听到“咔哒”一 声)。 使用高效智能清洁系统 警告: 将剃须刀放入高效智能清洁系统之前,务必确 保甩掉剃须刀上多余的水份。 1 按顶盖可将剃须刀放入支架(可听到“咔哒”一声 )。 2 将剃须刀倒置放在支架上方。 确保剃须刀的正面朝 向高效智能清洁系统的支架。...
- Page 61 简体中文 3 将剃须刀放在支架中 (1),将剃须刀向后倾斜 (2), 然后按下顶盖以连接剃须刀(可听到“咔哒”一 声)(3)。 电池符号开始闪烁表示剃须刀正在充电。 4 按高效智能清洁系统上的开/关按钮以启动清洁程序 。 在冲洗阶段运行期间,冲洗符号闪烁。 冲洗阶段完成 后(约 10 分钟后),冲洗符号会熄灭。 冲洗阶段结束后,干燥阶段自动开始。 在此阶段,干 燥符号闪烁。 干燥阶段完成后(约 4 小时后),干燥 符号会熄灭。 清洁程序完成后,准备就绪符号会持续亮起。 在执行清洁程序和充电完成 30 分钟后,高效智能清洁 系统将自动关闭。 电池符号持续亮起表示剃须刀已充满电。 充电约需 1 小时。 注意: 如果在清洁程序运行期间按下高效智能清洁系 统的开/关按钮,则程序将停止工作。 此时,清洁或干 燥符号将熄灭。 注意: 如果断开高效智能清洁系统的电源,则清洁程 序将停止工作。 更换高效智能清洁系统的滤芯...
- Page 62 简体中文 1 一只手抓住高效智能清洁系统,同时按高效智能清 洁系统侧面的按钮,然后提起高效智能清洁系统的 顶部。 2 从高效智能清洁系统中取出清洁滤芯,然后将残余 的所有清洁剂倒出。 您可以安全地将清洁剂倒入水槽。 3 弃用空的清洁滤芯。 4 拆开新清洁滤芯的包装,然后将密封圈拔下。 5 将清洁滤芯放置在高效智能清洁系统中。 6 一只手抓住高效智能清洁系统,然后将高效智能清 洁系统的顶部向下轻轻推回去(可听到“咔哒”一 声)。 在水龙头下冲洗剃须刀 每次剃须后请清洁剃须刀,以获得出色性能。 使用热水要当心。 切记先检查水温是否太高,以防烫 手。 注意: 不要用毛巾或纸巾擦拭剃须刀头部件,因为这 样可能会损坏剃须刀头。 1 启动产品。...
- Page 63 简体中文 2 用温水冲洗剃须刀头部件。 3 关闭产品。 将剃须刀头支架从剃须刀头部件的底部 抽离。 4 在水龙头下冲洗胡茬储藏室。 5 用温水冲洗剃须刀头支架。 6 小心地甩掉多余水分并彻底晾干剃须刀头支架。 7 将剃须刀头支架安装到剃须刀头部件的底部(可听 到“咔哒”一声)。 彻底清洁 我们建议您每个月彻底清洁一次剃须刀头,或在剃须效 果没有以前好时进行清洁。...
- Page 64 简体中文 注意: 剃须刀头被蓝色或橙色固定环锁住。 按照正确的说明操作。 1 关闭剃须刀。 2 将剃须刀头支架从剃须刀头部件的底部抽离。 3 在水龙头下冲洗胡茬储藏室和剃须刀头支架。...
- Page 65 简体中文 4 逆时针转动固定环,然后将它从剃须刀头中取出。 对其他固定环重复此过程。 将其存放在安全的地 方。 5 从剃须刀头支架上卸下剃须刀头。 每个剃须刀头都 包括刀片和网罩。 注意: 不要同时清洁多组刀片和网罩,因为它们都 是相互匹配的。 如果不小心将刀片装到了错误的网 罩上,则需要数周时间才能恢复产品的出色剃须性 能。 6 在水龙头下清洁刀片和网罩。 7 甩掉多余的水份。 8 将刀片重新装回至网罩。 9 将剃须刀头装到剃须刀头支架中。 注意: 确保剃须刀头两侧的槽口正好卡入剃须刀头 支架上的凸起部位。 10 蓝色固定环: 将固定环放在剃须刀头上,顺时针旋 转以重新安装固定环。...
- Page 66 简体中文 将剃须刀头上的箭头与剃须刀头支架上的凸起部位 对齐。 顺时针旋转固定环,直至听到“咔哒”一 声,表明固定环已就位。 橙色固定环: 将固定环放在剃须刀头上,顺时针旋 转以重新安装固定环。 对其他固定环重复此过程。 每个固定环均具有两个凹槽,正好能够装入剃须刀 头支架的凸缘上。 顺时针旋转固定环,直至听 到“咔哒”一声,表明固定环已就位。 当您重新插入剃须刀头并重新安装固定环时,请将 剃须刀头支架握在手中。 当您执行此操作时,切勿 将剃须刀头支架放在平面上,否则可能会造成损 坏。 11 将剃须刀头支架安装到剃须刀头部件的底部(可听 到“咔哒”一声)。 清洁卡入式附件 切勿用毛巾或纸巾擦干修剪器或胡须造型器附件,这样 做可能会损坏修剪齿。 随附的附件可能因产品而异。 包装盒上会显示随附于 您产品的附件。 清洁修剪器附件 切勿用毛巾或纸巾擦干修剪器,否则可能会损坏修剪 齿。 每次使用后都要清洁修剪器附件。 1 打开装有精确修剪器附件的产品。...
- Page 67 2 在温水水龙头下冲洗附件。 3 清洁完成后,关闭产品。 4 小心地甩干多余的水,然后将附件晾干。 提示: 为达到最佳效果,请定期用一滴缝纫机油润滑 附件齿部。 清洗洁面刷附件 每次使用后都要清洗洁面刷附件。 1 关闭产品。 2 从附件支架上卸下附件。 3 用温水和肥皂彻底清洗部件。 4 用毛巾擦干附件。 SP9851 only: 清洁眼部赋活附件(仅限于 SP9851) 每次使用后都要清洁眼部赋活附件。 1 关闭产品。 2 从附件支架上卸下附件。 3 用温水彻底清洗部件。 4 用毛巾擦干眼部赋活附件。 清洁按摩附件 每次使用后都要清洁按摩附件。 1 关闭产品。 2 从附件支架上卸下附件。 3 用温水彻底清洗部件。...
- Page 68 简体中文 袋子不可水洗。 切勿将袋子浸入水中,也不要在水龙 头下冲洗。 存放 1 将产品存放在随附的软袋中。 注意: 将本产品存放到软袋之前,应确保其干燥。 2 或者,将产品存置于产品座中。 3 将保护盖放在洁面刷附件上,以防产品积聚灰尘。 更换 更换剃须刀头 为获得更好剃须效果,建议每两年更换一次剃须刀头。 2yrs 立即更换损坏的剃须刀头。 务必使用原装飞利浦剃须 刀头 ( '订购配件')进行更换。 更换提示...
- Page 69 简体中文 出现更换提醒表示需要更换剃须刀头。剃须刀头部件符 号持续亮起,箭头呈白色闪烁,并且在关闭剃须刀时您 将听到蜂鸣音。 1 要更换剃须刀头,请将剃须刀头从剃须刀头支架上 逐一卸下。 有关如何拆卸固定环和剃须刀头,请参 阅“彻底清洁”一章中的说明。 注意: 剃须刀头被蓝色或橙色固定环锁住。 按照正 确的说明操作。 2 要重置更换提醒,请按住开/关按钮约 7 秒钟。请等 到听见两声蜂鸣音。 更换洁面刷附件 每 3 个月应更换一次刷头,或当刷毛在更短时间内出 现弯曲或损坏 (请参见 '订购配件')时更换。 更换眼部赋活附件 眼部赋活附件应每年更换一次,如果部件损坏 (请参见 '订购配件'),则应提前更换。...
- Page 70 简体中文 更换按摩附件 按摩附件应每年更换一次,如果部件损坏 (请参见 '订 购配件'),则应提前更换。 订购配件 要购买附件或备件,请访问 www.shop.philips.com/service 或联系您的飞利浦经销 商。 您还可以联系所在国家/地区的飞利浦客户服务中 心(请参阅全球保修卡了解详细联系信息)。 可选配以下附件和备件: SH90 飞利浦剃须刀头 HQ110 飞利浦剃须刀头清洁喷雾剂 RQ111 Philips 胡须造型器附件 MS606 按摩附件 MS604 眼部赋活附件 RQ585 Philips 洁面刷附件 RQ560/RQ563 Philips 洁面刷头 JC301/JC302/JC303/JC304/JC305 清洁滤芯 HQ8505 电源部件 注意: 配件可用性可能因国家/地区而异。 回收 弃置本产品时,请不要将其与一般生活垃圾放在一 起,应将其交给政府指定的回收中心。 这样做将有 利于环保。...
- Page 71 简体中文 (Pb) (Hg) (Cd) (Cr (VI) ) (PBB) (PBDE) PCB’s Electrical contact pins Power plug Internal metal parts SJ/T 11364 GB/T 26572 GB/T 26572 该表格中所显示的“有害物质”在产品正常使用情 况下不会对人身和环境产生任何伤害。 该表格中所显示的“有害物质”及其存在的部件向 消费者和回收处理从业者提供相关物质的存在信 息,有助于产品废弃时的妥善处理。 卸下剃须刀的充电电池 必须在丢弃剃须刀前拆下充电电池。 卸下电池之 前,请确保剃须刀与电源插座断开连接并且电池 电量已耗尽。 当您使用工具打开剃须刀时以及在您弃置充电电 池时,请采取必要的安全保护措施。 注意,电池带非常锋利。 1 将螺丝刀插入产品底部的前面板与后面板之间的插 槽。 拆除后面板。 2 卸下前面板。...
- Page 72 简体中文 保修和支持 如需信息或支持,请访问 www.philips.com/support 或 阅读国际保修卡。 保修条款 由于剃须刀头(刀片和网罩)属于易磨损物品,因此不 在国际保修条款的涵盖范围之列。 故障种类和处理方法 本章归纳了使用本产品时最常见的一些问题。如果您无 法根据以下信息解决问题,请访问 www.philips.com/support 查阅常见问题列表,或联系 您所在国家/地区的客户服务中心。 剃须刀 问题 可能的原因 解决方法 按下开/关钮时, 产品仍然连接着电源 拔掉产品插头并按开/关按钮 产品不工作。 插座。 出于安全原 打开产品。 因,该产品在使用时 不能连接电线。 充电电池的电量已耗 给电池充电 (请参见 '充电')。 尽。 旅行锁已被激活。 按住开/关按钮 3 秒钟以禁用 旅行锁。...
- Page 73 简体中文 问题 可能的原因 解决方法 要彻底清洁剃须刀头,请将剃 须刀头从剃须刀头支架上逐一 (请参见 '更换')卸下。 然后, 分离刀片和网罩,并在水龙头 下冲洗每个刀片和网罩套装。 冲洗后,将刀片放回对应的网 罩中。 最后,将剃须刀头装 回到剃须刀头支架 (请参见 '更换')中。 我更换了剃须刀 产品尚未重置。 按住开/关按钮大约 7 秒钟以 头,但显示屏仍然 重置产品。 显示更换提醒。 显示屏上突然出现 此符号提醒您更换剃 更换剃须刀头 (请参见 '更换 剃须刀头部件符 须刀头。 ')。 号。 产品充电时显示屏 产品过热。 断开产品与电源插座的连接大 上突然出现感叹 约...
- Page 74 简体中文 高效智能清洁系统 可能的原因 解决方法 问题 按下开/关按钮 高效智能清洁系统未 将小插头插入高效智能清洁系 时,高效智能清洁 连接电源插座。 统,然后将电源部件插入电源 系统不工作。 插座。 清洁滤芯是空的。 更 将新的清洁滤芯放置在高效智 换符号闪烁表示您必 能清洁系统中 (请参见 '更换 须更换清洁滤芯。 高效智能清洁系统的滤芯')。 剃须刀放在高效智 您未将剃须刀正确插 按下顶盖(可听到“咔哒”一 能清洁系统中清洁 接到高效智能清洁系 声)以确保剃须刀和高效智能 之后依然没有完全 统,因此高效智能清 清洁系统之间的连接正确无 干净。 洁系统和剃须刀之间 误。 未通电。 剃须刀电池的电量不 如果剃须刀电池的电量不足, 足。 则高效智能清洁系统无法正常 工作。 剃须刀需要在冲洗阶 段短暂开启。...
- Page 75 过敏,请勿使用本产品。如 果您正在服用类固醇类药 物,请勿使用本产品。 我不知道哪款面部 本产品随附的所有附件均可 附件可与本产品配 与本产品配合使用。 要了解 合使用。 有关附件系列的更多信息, 请参阅我们的网站 www.shop.philips.com 或从 您购买 Philips 产品的商店获 得。 如果您获取信息有困 难,请联系您所在国家/地区 的 Philips 客户服务中心。 可 在全球保修卡中找到其详细 联系信息。 您还可以访问 www.philips.com/support。 感觉刷头太粗糙。 从最低个人舒适度设置开 始,以熟悉附件的使用方 法。 我不知道洁面刷附 建议您使用自己喜爱的洁面 件可与哪款清洁产 乳清洁肌肤。 您可以使用清 品配合使用。 洁凝胶、泡沫、精油、牛奶 或乳液。 请勿使用带微粒的...
- Page 76 简体中文 问题 可能的原因 解决方法 卡入式附件不适合 安装到产品 (请参见 '拆卸或 本产品。 安装卡入式附件')上之前,将 卡入式按摩附件、洁面刷附 件和眼部赋活附件安装到附 件基座上。 保留备用 发行日期: 12/4/2018...
- Page 77 简体中文...
- Page 79 Empty page before back cover...
- Page 80 © 2018 Koninklijke Philips N.V. All rights reserved 4222.002.5958.4 (12/4/2018) >75% recycled paper >75% papier recyclé...
Need help?
Do you have a question about the SP9851 and is the answer not in the manual?
Questions and answers