
Related Manuals for Philips VTR8800


Summary of Contents for Philips VTR8800
- Page 2 目录 1 欢迎 2 重要须知 3 您的数码录音笔 4 开始使用 5 录音 6 语音模式 7 音乐模式 8 系统设置 9 常见问题 10 技术参数...
- Page 3 1 欢迎 欢迎来到飞利浦世界!您能选择和购买飞利浦的产品,我们 非常高兴。您可在我们的官方网站上获得飞利浦公司的全方位技 术支持,如:使用手册、软件下载、保修信息等。 www.philips.com 产品特点 一键录音:仅仅按下录音键即可实现录音,按下停止键保存 录音。 高清扬声器:采用高品质振动喇叭,无论播放录音文件或音乐 文件,都让人身临其境的享受。 以常见的 MP3 格式及 WAV 格式录音,支持 96KHZ,24 位 PCM 录音。 支持多通道同时录音,用途广泛。 使用高速 USB 2.0 快速存取录音文件和数据。 声控录音功能。 可作为大容量的 USB 存储设备,确保最大的兼容性。 ...
- Page 4 2 重要须知 安全 为了避免短路,切勿将产品放置在触水受潮处。 不要将产品放在加热设备附近或阳光直射的地方。 请注意,切勿挤压电缆,特别是插头处。 特别声明:使用本产品前请仔细阅读本说明书,如因人为操作或 不可抗力因素而导致数据丢失,本公司一概不予负责。特别提醒 用户小心操作,注意将资料另外备份。 听力保护 使用耳机时请遵守下列原则: 调整至合适的音量,切勿长时间使用耳机。 特别需要注意,切勿将音量调至耳朵所能承受的范围之外。 切勿将音量调至盖过周边环境的声音。 在危险情况下请小心或暂停使用耳机。 在驾驶汽车、骑自行车、玩滑板时,切勿使用耳机。否则会 导致交通意外,且违反相关法律法规。...
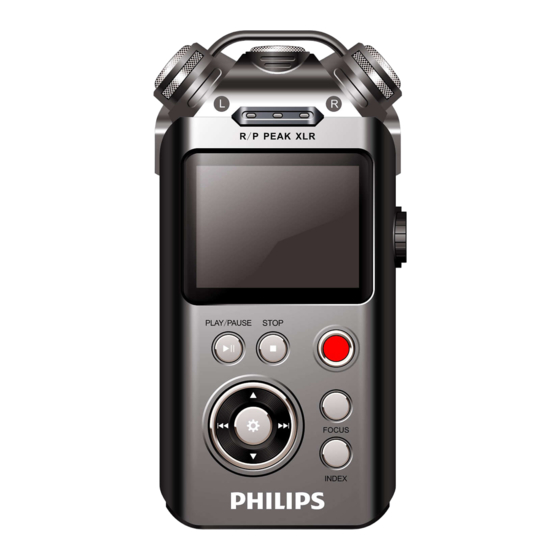
- Page 5 3 您的数码录音笔 供货范围: 概览:...
- Page 6 耳机插孔 Line in 插孔、麦克风插孔 XLR 插孔 电源开/关 卡插座 内置中间麦克风 内置两边麦克风 录音/播放指示灯 显示屏 10. 停止 11. 播放/暂停 12. 音量加、菜单项选择键 13. 上一曲、快退、菜单项选择键 14. 音量减、菜单项选择键 15. 下一曲、快进、菜单项选择键 16. USB 接口 17. 录音 18. FOCUS 19. 书签,文件夹切换 20. 录音增益调节旋钮 21. 降噪 22. 变速播放键 23. 删除键 24.
- Page 7 4 开始使用 开/关机 注意:第一次使用机器时,请对该机器充电三小时以确保机 器有电工作! 把开关键向下拨至电源处约 2 秒至 3 秒后开机, 然后显示 飞 利浦图标,如下图所示: 然后机器进入录音文件停止播放界面,如下图所示。 在此界面停止状态下短按菜单键选择菜单图标,按录音键确 认机器进入设置界面。在设置界面中包含有四个主菜单。下面四 张图片分别代表:文件菜单、录音设置、屏幕设置和设备设置。...
- Page 8 此后,本机的开机/关机由开关键控制,具体如下: 关机:在开机状态下,把开关键拨至电源处直到显示飞利浦图标 关机。 开机:在关机状态下,把开关键拨至电源处直至屏幕上显示开机 画面飞利浦图标。 提示 如果录音笔无法正常工作,请确认机器是否已没电。 当电量指示标志为“ ”时,请及时充电。 充电方法 (1) 使用 USB 数据线将本机与 PC 相连接,如下图所示。 (2) 使用专用充电器充电,如下图所示。 当采用以上方法连接后,本机进入充电状态。电量指示标志 由空到满循环变化,表示本机现正处于充电状态,充电指示灯橙 色灯常亮。一般情况下,充满电需要 3 小时左右。充满电时,电 池符号显示满格,橙色灯灭。...
- Page 9 注意: 当录音笔与电脑连接时, 对录音笔的手动操作将无效。 按键锁定(HOLD 功能) (1) 将开关键向上推至锁定位置, 锁定录音笔后, 所有按键无效。 然后屏幕上短暂显示锁图标后,随即消失,如下图所示。 (2) 要解除按键锁定,请将开关键向下拨下解锁。 连接电脑 录音笔可作为大容量的 USB 存储设备,并可方便地对文件 进行存储、备份和移动。可使用 USB 数据线将录音笔与电脑相 连,且无须安装软件,连接电脑图标如下图所示。 提示: 在文件移入或移出录音笔时,请不要断开录音笔与电脑的连 接,否则会损坏文件。...
- Page 10 当录音笔连接电脑时,手动操作无效。...
- Page 11 5 录音 当您初次使用录音笔录音时,请注意本节中的内容说明! (1) 在语音模式停止状态下,按“INDEX”键,选择所需文件夹。 (2) 按下“录音键”开始录音; “录音/ 播放”指示灯将亮红灯; 请将内置麦克风对准音源。 (3) 按“录音”键暂停录音,红灯闪烁,显示屏显示录音暂停图 标。 (4) 再次按下“录音”键,继续录音。 (5) 在录音过程中,按下“FOCUS”键,调节增益调节旋钮,可 实时调节录音增益。多通道录音,按“菜单”键,切换录音 通道,调节增益。请把录音增益调到合适的值以保证录音品 质。 (6) 按“FOCUS”键取消录音增益调节。 (7) 按“INDEX”键插入录音书签。支持 10 个书签文件。 (8) 按下“停止”键结束录音,并回到当前录音文件的停止播放 界面。 录音参考界面如下如所示: 录音界面说明:...
- Page 12 注意:电池标记符显示空格时,表明低电。低电时系统会自 动关机。如果正在录音,系统自动保存录音文件后再关机。电量 不足时,请及时充电。低电时提示的参考图标如下所示。 提示: 录音前,请先设置所需的声控录音功能和录音类型。注意: 在停止状态下,按“INDEX”键,可以在 A,B,C,D 和 MUSIC 五个文件夹之间进行转换。录音文件可以在 A,B, C, D 这四个文件夹中进行存储, 每个文件夹能存储 99 个录 音文件,当一个录音文件夹存满 99 个后,系统会把随后录...
- Page 13 入的文件自动存储在下一个文件夹中,如果,四个文件夹全 部录满,要再进行录音,请先删除一些不必要的文件再录。 请先测试录音,以确保录音笔设置正确。 每个目录最多可存储 99 个文件,总共可容纳 396 个文件 (99 文件 x 4 目录) 。 当录音时间超过录音笔可用容量或达到最大 396 个文件数 量的上限时,录音停止。请删除部分录音或将其移至电脑。 录音时请勿断电,否则这会导致录音信息丢失和文件损坏。 如果需要长时间录音,请在录音前充电。 录音笔在充满电后可以录音 56 个小时。 使用外置麦克风录音 当您使用外置麦克风录音时,请先将麦克风插入外置麦克风 插座,并按照内置麦克风的录音程序进行录音。当您连接到外置 麦克风时,内置麦克风将自动关闭,但是,选择多通道录音除外。 注意:外置麦克风的接口一定要是双声道接口;不支持接入音箱 直录。 使用 XLR 接口录音 当您使用 XLR 接口录音时, 请先将 XLR 接头插入 XLR 插座, 并按照内置麦克风的录音程序进行录音。当您连接到...
- Page 15 6 语音模式 语音停止参考界面如下如所示: 语音文件播放界面说明: 注意:在停止状态下,按“INDEX”键,可以在 A,B,C, D 和 MUSIC 五个文件夹之间进行转换。在 A,B,C 和 D 文件 夹中,长按“INDEX”键,可直接切换到 MUSIC 文件夹。 语音播放: (1) 在录音文件停止播放模式下,按“INDEX”键,选择所需文 件夹。...
- Page 16 (2) 按“ ”或“ ”键,选择要播放的文件。 (3) 按“MENU”键,选中文件列表图标,按“播放”键确认进 入文件列表浏览;按“+”键或“-”键,选择要播放的文件, 按“播放”键确认。 (4) 按“播放”键开始播放, “录音/ 播放”指示灯将亮绿灯。 (5) 使用“+”键或“-”键调节音量。 (6) 按“停止”键结束播放。在停止播放状态下,按“MENU” 键选中菜单图标,按“播放”键确认进入系统设置。 (7) 停止播放状态下,按“停止”键,显示文件名,采样率和文 件大小等文件信息。 (8) 播放过程中,按播放键暂停播放,再次按下播放键,将继续 先前位置的播放。 (9) 播放时长按“ ”或“ ”键,可快退或快进当前正在播 放的文件。 提示: 当耳机插入插孔内,录音笔扬声器将停止工作。 文件编辑 选择要播放的录音文件后, 短按播放键播放, 在播放过程中, 依次短按菜单键,在信息图标处依次显示 Append,Insert, Divide 和 Cut 等功能提示图标。 提示: 在无任何操作情况下,8 秒后此功能将会自动取消。...
- Page 17 播放点插入一段录音文件。 Divide:按“播放“键确认,在当前播放文件的当 前播放点把文件分割成两个文件。 Cut:按“FOCUS”键设置开始点,按“播放”键 确认结束点,把文件的开始点和结束点的中间段裁 剪掉;未按“FOCUS”键设置开始点,按“播放” 键,则在当前播放文件的当前播放点把文件后半部 分裁剪掉。 变速播放 此操作请参照音乐文件的变速播放部分 复读模式 在播放过程中,长按菜单键将进入复读模式。A-B 复读的具 体操作请参考“音乐播放”部分的 A-B 复读操作部份。 书签 此操作请参照音乐文件的书签部分。 文件保护 在停止播放录音文件界面下,按“FOCUS”键,将会弹出文 件保护菜单。按“播放”键,进入“锁”和“开锁”选择项。参 考图片如下图:...
- Page 18 选择“锁”确认锁定文件,选择“开锁”确认解除锁定。文 件被锁定,选择删除文件将会提示“文件被锁” ,需解除锁定才 能被删除。 删除文件 在停止播放录音文件界面下,按删除键,将会显示如下第一 张图所示界面。下面为执行删除操作的相关参考图片: 在左边界面,使用“+” 键或“-” 键选择删除单个文件或 所用文件;在右边界面,使用“+” 键或“-” 键选择“是”确 认删除, “否”保持文件;按菜单键执行命令。...
- Page 19 7 音乐模式 在语音模式下,通过文件夹切换键切换到音乐文件夹或长按 文件夹切换键切换到音乐文件夹。音乐播放参考界面如下图所 示: 注意:音乐文件只能放在“MUSIC”文件夹里面进行播放。 音乐播放界面说明: 播放模式 你可以使用“ ”和“ ”选择你想听的歌曲或者按菜单 键选中文件列表图标,按“录音”键确认进入文件列表浏览,按 “+”键和“-”键选着要播放的文件,按“播放”确认,按播放...
- Page 20 键播放。 变速播放 在播放过程中短按“SPEED”键,键入播放速度调节界面。 参考界面如下图所示: 按“+”键和“-”键,调节播放速度。 按“播放”键确认。 复读模式 在播放过程中,按菜单键将进入复读模式。 设置 AB 复读 设置复读起点: 在播放状态下,短按 “菜单” 键进入复读状态, 但此时显示屏中“A-B”的“A”在闪烁,等待确定复读起点 A,短按“ ”确定复读起点 A。 设置复读终点:设置复读起点 A 后,此时显示屏中“A-B” 的 B 在闪烁,再短按“ ”键,设置复读终点 B,此时显示 显示“A-B” 。当复读图标固定“A-B” ,开始 AB 点间的反复 播放,到达设定的次数后,闪烁图标“A-B”中的“A” ,等 待确定起点 A,这时播放返回正常播放,如不再需要设定复 读,可通过以下方式退出复读模式。...
- Page 21 取消复读:短按“播放”键,将之前设置 AB 复读取消,并 暂停播放。短按“停止”键,将之前设置 AB 复读取消,并 停止播放。短按“菜单”键,将之前设置 AB 复读取消,并 返回正常播放状态。 书签 在播放过程中,短按“INDEX”键插入书签。支持 10 个书 签文件。 在播放过程中,长按“INDEX”键,将弹出书签操作菜单, 包括转入书签播放和删除书签。 按“+” 键和 “-” 键选择“转 入书签播放”菜单,按“录音”键确认进入播放书签选择列 表。参考界面如下图: 按“+”键和“-”键,选择要播放的书签点。 按“播放”键确认进入书签点播放。 删除书签操作和播放书签类似。 提示: 在播放停止状态下,按停止键可查看文件信息,包括:文件 名,作者,采样率和文件大小等。 删除文件...
- Page 22 此操作请参照语音文件的删除文件部分。 歌词同步显示 产品支持“*.lrc”歌词文件,实现歌词与歌曲同步播放。 注意: 歌词文件的名称与歌曲文件的名称需保持一致。...
- Page 23 8 系统设置 你可根据个人喜好进行以下相应设定。 在语音或音乐模式下按菜单键选择菜单图标,按“播放”键 将会进入系统设置界面,或者长按“MENU”键进入。系统设置 界面相关参考图片如下图所示,包括:文件菜单,录音设置,屏 幕设置和设备设置。 文件菜单 文件菜单栏包括:均衡器和播放模式。可根据自己喜好做相 应设置; 均衡器 在文件菜单栏中选择“均衡器”菜单,再按“录音”键将进 入均衡器,均衡器包括以下音效: “关、摇滚、流行、柔和、爵 士、古典、重低音” ,参考界面如下图所示:...
- Page 24 在均衡器中,你可以使用“+”键和“-”键选择相应模式, 再按“播放”键确认。 播放模式 在文件菜单栏选中“播放模式”菜单,再按“播放”键,将 会进入到播放模式选择菜单,你可以选择你需要的播放模式,参 考界面如下图所示: 关:顺序播放选中目录的文件,全部播放完一遍当前目录的文件 后自动停止播放。 文件夹:循环播放选中目录的文件。 文件:一直循环播放选中的一曲文件。 随机:随机播放当前选中目录的文件。 录音设置 录音设置栏包括:性能选择,通道选择,品质设置,定时器, 声控和和自动切分。可根据相关应用做相应设置;...
- Page 25 性能选择 信能选择包括:高性能和一般性能可选。参考界面如下图所 示: 高性能:使用高性能 ADC 采集数据,最高支持 96khz,24 位 PCM 录音。运行功耗高。 一般性能:使用内置 ADC 采集数据,最高支持 48khz,16 位 PCM 录音。运行功耗低。 通道选择 使用此功能选择录音数据采集通道。 通道选择包括: 双咪头, LINE IN,XLR,单咪头,Two MIC+XLR,Two MIC+One MIC, Line in+One MIC 和 Line in+XLR。参考界面如下图所示: 双咪头:使用内置两边咪头录音。 LINE IN:使用外置麦通道录音。 XLR:使用 XLR 通道接口录音。 单咪头:使用内置中间咪头录音。...
- Page 26 Two MIC+XLR:使用内置两边咪头和 XLR 通道接口同时录 音。 Two MIC+One MIC:使用内置两边咪头和内置中间咪头同 时录音。 Line in+One MIC:使用外置麦通道和内置中间咪头同时录 音。 Line in+XLR:使用外置麦通道和 XLR 通道接口同时录音。 提示:机器能自动检测 Line in 和 XLR 接口是否插入,两通 道接口未插入,则机器默认使用内置两边咪头进行录音。 品质设置 使 用 此 功 能 设 置 需 要 录 音 的 录 音 类 型 , 包 括 : WAV 24Bit/96KHZ, WAV 16Bit/96KHZ, WAV 16Bit/48KHZ, WAV 16Bit/32KHZ,MP3 192kbps, MP3 128kbps, MP3 96kbps, MP3 64kbps 和...
- Page 27 第一个功能是定时录音时间设置功能。定时录音时间设置参 考界面如下图所示: 在此界面下,你可以选择“设置日期”和“设置时间” ,当 系统时间到达设定时间时,系统将自动开始录音。 第二个功能是设置定时录音的录音时长。你可以设置 30 分 钟, 60 分钟, 120 分钟或者没限定录音时长来设置定时录音时长。 时间长度设置参考界面如下: 注意:设定定时录音时,请先检查电池电量是否充足。 声控 声控功能一旦被启用, 录音过程中, 当机器检测到有声音时, 录音笔会自动开始录音;当未检测到声音时,录音笔在 3 秒后...
- Page 28 将自动暂停录音; 再次检测到声音时, 录音笔又会自动开始录音。 声控设置参考界面图片如下: 自动切分 在录音过程中, 自动切分可在每 30 或 60 分钟自动将录音 文件分段保存并自动进入下一个文件录音。自动切分功能参考界 面如下图所示: 屏幕设置 屏幕设置栏包括:语言和和背光。 语言 在语言选择菜单中,你可以选择一种语言作为系统语言。语 言选择参考界面如下:...
- Page 29 背光 背光时间有五种时长可供选择:20 秒、30 秒、45 秒、60 秒和恒亮。如果在设定的时间内没对机器做任何操作,背光将会 自动灭。如果选择“恒亮” ,背光将会常亮。 设备设置 设备设置栏包括:日期/时间,自动关闭,格式化设备,录音 指示灯,设备声音,内存选择,信息和恢复出厂设置。 日期/时间 系统时间设置界面,参考图片如下:...
- Page 30 在此界面下,你可以设置系统的当前时间和系统时间显示格 式。 例如:选择时间格式“设置时间格式”菜单,将会显示如下 参考界面: 此界面下有两种时间显示格式可供选择即 12 小时制和 24 小 时制。系统默认的是 12 小时制。 例如:选择 “设置日期” 菜单,将会显示如下参考界面: 在此界面下,按“+”或“-”与“ ”和“ ”可以设置 实时时间。按“ ”和“ ”选择年﹑月﹑日;按“+”或“-” 改变相应位置数值。...
- Page 31 选择”设定时间”菜单,将会显示如下参考界面 在此界面下,按“+”或“-”与“ ”和“ ”可以设置 实时时间。按“ ”和“ ”选择时、分;按“+”或“-”改 变相应位置数值。 自动关机 如果在设定的时间内没对机器做任何操作,系统将会自动关 机。自动关机设置参考界面如下: 格式化设备 使用此功能,你可以格式化本机器内存。 录音指示灯 使用此功能,录音时录音指示灯将会亮,否则灭。...
- Page 32 设备声音 使用此功能,在停止状态下,按键操作将会有声音提示。 内存选择 使用此功能,你可以使用本机内存或外置卡内存来工作。 信息 信息菜单中包括:磁盘信息,卡信息和固件版本; 磁盘信息:使用此功能,你可以查看本机内存大小和剩余空 间信息。 卡信息:使用此功能,你可以查看卡内存大小和剩余空间信 息。 固件版本:使用此功能,你可以查看固件版本信息。 恢复出厂设置 使用此功能,你可以重置机器的设置选项。...
- Page 33 9 常见问题 此处列举了常见问题的解答,可帮助解决录音笔出现的简单 问题。如果故障仍无法排除,请咨询经销商或访问我们的官方网 站:www.philips.com/support 无法启动录音笔: 电池电量已耗尽请及时充电。 录音笔无法录音: 超出录音笔允许的最大文件数量或录音笔存储空间已满。请 删除部分录音或将其移至外部存储设备。 录音笔无法播放录音: (1) 录音笔可能处于锁定模式 (HOLD)。将 “锁定” 开关拨下 解锁。 (2) 电池电量已耗尽,请充电。...
- Page 34 10 技术参数 存储器 内置存储空间 参考录音时间 (8GB) : MP3 32kbps 录音模式约 540 小时、 MP3 128kbps 录音模式约 136 小时,WAV 16bit/96khz 录音模式约 6 小时。 参考录音时间(16GB) :MP3 32kbps 录音模式约 1080 小时、 MP3 128kbps 录音模式约 272 小时,WAV 16bit/96khz 录音 模式约 12 小时。 内置存储器类型:NAND Flash 闪存 移动存储器...
- Page 35 MP3 128kbps:比特率为 128kbps,格式为 MP3 MP3 96kbps:比特率为 96kbps,格式为 MP3 MP3 64kbps:比特率为 64kbps,格式为 MP3 MP3 32kbps:比特率为 32kbps,格式为 MP3 运行条件 温度:5°–45°C 空气湿度:10% – 90%, 不凝结...
-
Page 36: Table Of Contents
Contents 1 Welcome 2 Important 3 Your voice tracer digital recorder 4 Start to use 5 Recording 6 Voice mode 7 Music mode 8 Setting mode 9 Frequently asked questions 10 Technical specifications... -
Page 37: Welcome
1 Welcome We are delighted that you have chosen a Philips device. Visit our website for comprehensive support such as user manuals, software downloads, warranty information and much more: www.philips.com Product highlights One-touch recording: just press the RECORD button to start recording, press the STOP button to save file. - Page 38 2 Important safety information Do not make any adjustments and modifications that are not described in this manual. Follow all safety instructions to ensure proper operation of the device. The manufacturer assumes no liability for damages resulting from non-compliance with the safety instructions.
- Page 39 • Be particularly careful to avoid adjusting the volume to a level that your hearing cannot deal with. • Do not turn the volume up so high that you cannot hear what is going on around you. • In potentially dangerous situations you must be very careful, or temporarily discontinue use.
- Page 40 3 Your digital recorder What’s in the box? Overview:...
- Page 41 Earphone Jack Line in Jack,Microphone Jack XLR Jack Power On/Off, HOLD Card Jack Built-in Microphone Built-in Microphone Record/Play Indicator Display 10. STOP Button 11. Play/Pause 12. Volume Up 13. Previous Track, Fast Backward, Menu Selection Buttons 14. Volume Down 15. Next Track, Fast Forward, Menu Selection Buttons 16.
- Page 42 >Then the device displays the stopped playback interface: From now on, the device’s On/Off is controlled by the POWER button as follows: Switch off: When in the power-on state, slide the POWER button until the “PHILIPS” picture is displayed, and then the device is switched off.
- Page 43 Switch on: When in the power-off state, slide the POWER button until the startup logo “PHILIPS” picture is displayed. Note: If the device cannot work normally, please make sure the device is not out of power. When the battery indicator “...
- Page 44 Note : while the device is connected to a computer, it cannot be operated manually. Enabling/disabling the keypad lock The keypad lock deactivates all keys on the device. The timer function of the device continues to function. 1 Slide the Power/Hold switch up into the x position to lock the keypad of the device.
- Page 45 Note: Do not disconnect the device from the computer while files are transferred from or to the device. This may damage or corrupt the files. While the device is connected to a computer, it cannot be operated manually.
-
Page 46: Recording
5 Recording Useless information: (1) In the stop state of voice mode, press “INDEX” button to select the folder you prefer. (2) Please place the built-in microphone towards the source of sound; press the button to start recording; the “Record/Play” indicator flickers red. (3) Press button to pause recording, then the red light flickers, and the display shows pause picture. - Page 47 Illustration of recording interface: Note: When the low battery icon occurs, it means the battery is nearly empty and the system will automatically shut down. If the device is recording, the system will automatically save the recorded file then shut down. If the device has low battery, please recharge promptly.
- Page 48 Note: Prior to recording, please preset the record type you need. When in the Stop state, press “INDEX” button to switch among folders A, B, C, D and MUSIC. The recorded file can be stored in any of the A, B, C, D folder; each folder can store up to 99 audio files.
- Page 49 Use an external microphone to record When using an external microphone to record, please first plug it into the microphone jack, and then record according to the procedures of built-in microphone. After you connect the external microphone, the built-in microphone is disabled. Please note that the plug of the external microphone must be stereo plug and do not support to access speakers record straightly.
- Page 50 6 Playback The voice stop interface below: Voice playback interface specification: Note: When in Stop state, press “INDEX” button to switch between folders A, B, C, D and MUSIC. In folders A, B, C and D, long press “INDEX”, can switch to folder MUSIC directly. Voice playback (1) In the Stop Mode of recorded file, press “INDEX”...
- Page 51 (2) Press “ ” or “ ” to select a file to play. (3) Press “MENU” button, select file list icon, press button into file list. Press “+” or “-” to select a file to play and then press to confirm. (4) Press Play button to start playing, “record / playback”...
- Page 52 after 8 seconds. Append: Press button to conform, insert a recording in the end of the current file. Insert: Press button to conform, insert a recording in the current file to the current play point. Divide: Press button to conform, split the file into the two files in the current file to the current play point.
- Page 53 playback”. Protect file On the stopped playing interface, press “FOCUS” button to enter. Protect file interface is as follows: Press “+” and “-” to choose “Lock” to protect the file, “Unlock” to don’t protect the file; press button to execute. When delete the file to locked, will display “The file is locked”.
-
Page 54: Music Mode
On the left side of the interface, press “+” or “-” button to select individual or all files; on the right side of the interface, press “+” and “-” to choose “YES” to confirm deletion, “NO” to keep file; press button to execute. - Page 55 In the voice mode, long press “INDEX” button to switch to the music folder. Music playback interface is as follows: Note: music files can only be played when they are in “MUSIC” folder. Music playback Interface illustration: Playing mode You can select the track you want by pressing “ ”...
- Page 56 the file, press button to confirm, then press to play. Play speed When plying, shortly press “SPEED” button to enter. Play speed interface is as follows: Press “+” or “-” button to adjust the play speed. Press button to confirm. Replay mode When plying, shortly press button to enter.
- Page 57 “A” in “A-B” flickers to wait for setting mark A, and the system resumes normal playing. If A-B Replay is not needed, use any of the following methods to cancel the A-B Replay mode. Cancellation:Shortly press button to cancel the AB marks and pause playing.
-
Page 58: Setting Mode
Regarding the operation approach, please refer to the Delete Files in voice playback section. The lyrics displayed This product supports "*.lrc" lyrics files, realizing the synchronous broadcasting of songs and lyrics. Note: Lyrics file's name and the name of the song files need to be consistent. - Page 59 You can change settings according to your preference. In voice mode or music mode, shortly press button to select the menu icon, press button to enter. Or long press button to enter. The Setting mode interface includes File menu, Record settings, Display settings and Device settings. The setting mode is as follows: File menu File menu includes: Equalizer and Play mode.
- Page 60 Press “+” or “-” button to select. Press button to confirm. Play mode Select the menu Play mode, press to enter. Play mode interface is as follows: File: repeat continuously the current track. Folder: Repeat tracks on a play list. Random: Play randomly tracks in selected folder.
- Page 61 change settings according to your preference. Record performance Record performance includes: High and Mid. Record performance Interface is as follows: High: Use high performance ADC to collect data. Support up to 96 KHZ, 24 bits PCM recording. Higher power consumption. Mid: Use built-in ADC to collect data.
- Page 62 Two MIC: Use the built-in microphones on both sides. LINE IN: Use the external microphones to record. XLR: Use the XLR channel to record. One MIC: Use the built-in microphones in the middle. Two MIC+XLR: Use the built-in microphones on both sides and the XLR channel to record.
- Page 63 Timer Timer: first pre-set a length of time, when system time reaches the pre-set time, the system automatically starts recording. On the functions menu, choose the “Timer”, then press the REC button to enter “Timer” setting. See the below reference picture: The interface of Set the begin is as follow: On this interface, users can select “Set date”...
- Page 64 Voice activation This is a practical function of recording, no button operation is needed. When the function is enabled, in the course of recording, if no voice is detected, the device will automatically pause recording after 3 seconds; if voice is detected again, the device resumes recording.
- Page 65 Display setting Language From the Language menu you can choose a language as system language. See the following interface picture: Backlit The backlight time function can be set at: 20, 30, 45, 60 seconds and on. If there’s no operation on the device for the set time, the backlight turns off automatically.
- Page 66 Device settings Date/time See the below picture of Date/time: On this interface, users can set the current time and the time display format. When select “Set time format” ,the device shows the picture as follow: From the list, users can choose one of two time display format: 12-hour clock or 24-hour clock.
- Page 67 For example, when select ”Set date”, the device shows the picture as follow: On this interface, press “ ” or “ ” to select year, month and day. Then press “+” or “-” to change the relevant numbers. When select “Set Time”,the device shows the picture as follow: On this interface, press “...
- Page 68 Format device You can format the device’s internal storage by using this function. Record light When recording, the REC/PLAY led will light, using the function. Device sounds In stop state, press buttons and the device will sound shortly, when enable this function. Memory select You can select built-in memory or external micro SD to play or record by using this function.
- Page 69 anytime. Micro-SD info: Use this function to check the capacity of the Micro-SD anytime. Firmware Version: You can check the device’s firmware version by using this function. Reset default setting You can restore to default settings by using this function.
-
Page 70: Frequently Asked Questions
Answers to the frequently asked questions are listed here to solve simple problems that may to the device. If the problem cannot be solved, please contact the dealer or visit our official website: www.philips.com/support Cannot switch on the device: The battery is empty, please recharge promptly. -
Page 71: Technical Specifications
10 Technical specifications Storage Internal storage Estimated recording time (8GB): approximately 540 hours with MP3 32kbps mode, 136 hours with MP3 128kbps mode, 6 hours with WAV 16bit/96khz mode. Estimated recording time (16GB): approximately 1080 hours with MP3 32kbps mode, 272 hours with MP3 128kbps mode, 12 hours with WAV 16bit/96khz mode. - Page 72 MP3 128kbps : bit rate: 128kbps,format: MP3 MP3 96kbps : bit rate: 96kbps,format: MP3 MP3 64kbps : bit rate: 64kbps,format: MP3 MP3 32kbps : bit rate: 32kbps,format: MP3 Operating conditions Temperature: 5°–45°C Humidity: 10% – 90%, no condensation...
Need help?
Do you have a question about the VTR8800 and is the answer not in the manual?
Questions and answers