Table of Contents
Advertisement
Quick Links
Advertisement
Chapters
Table of Contents

Related Manuals for Philips VTR5102Pro


Summary of Contents for Philips VTR5102Pro
- Page 1 使用手册 User manual...
-
Page 3: Table Of Contents
目录 1 欢迎 1.1 产品特点 2 重要须知 2.1 安全 3 您的智能录音笔 供货范围 概览 3.1 开 / 关机 3.2 录音... - Page 4 3.3 播放 3.4 设置模式 3.5 状态指示说明 3.6 连接电脑 3.7 安装下载 APP 3.8 连接使用 4 APP 操作指南 4.1 APP 操作录音 / 实时翻译 4.2 文件 4.3 设置 4.4 同步文件操作...
- Page 5 5 技术参数...
-
Page 6: 产品特点
1 欢迎 欢迎来到飞利浦世界!您能选择和购买飞利浦的产品,我们非常高兴。您可在 我们的官方网站上获得飞利浦公司的全方位技术支持,如:使用手册、软件下 载、保修信息等。 www.philips.com 1.1 产品特点 • 高灵敏麦克风; • 智能同步翻译; • 实时分享; • 语音转文本;... - Page 7 • 角色区分; • 边充边录功能。...
-
Page 8: 重要须知
2 重要须知 2.1 安全 • 为了避免短路,切勿将产品放置在触水受潮处。 • 不要将产品放在加热设备附近或阳光直射的地方。 • 请注意,切勿挤压电缆,特别是插头处。 小心 • 特别声明:使用本产品前请仔细阅读本说明书,如因人为操作或不可抗力因素 而导致数据丢失,本公司一概不予负责。特别提醒用户小心操作,注意将资料 另外备份。 • 文字图像仅作参考。飞利浦保留更改颜色 / 外观 / 设计 / 参数 / 产品功能的权 利,硬件、软件、APP、丝印如有更新,恕不另行通知。... -
Page 9: 您的智能录音笔
3 您的智能录音笔 供货范围:... - Page 10 概览:...
-
Page 11: 开 / 关机
3.1 开 / 关机 (1) 开机:长按“ ”键 2~3 秒开机,并显示“PHILIPS”。(开机分享功 能自动打开,分享图标闪,5 分钟后没有连接,则自动关闭。) (2) 关机:在开机状态下,长按“ ”键 2~3 秒显示“PHILIPS”后关机。... - Page 12 3.2 录音 当你第一次使用录音笔录音时,请注意本节中的录音说明:录音前,请先设置 好录音场景以及存储的文件夹,方便您查找; • 每个文件夹能存储 99 个录音文件,总共可容纳 396 个文件。当一个录音 文件夹存满 99 个后,系统会把随后录入的文件自动存储在下一个文件夹 中,如果四个文件夹全部录满,录音会提示目录满,此时,请删除部分录 音文件或将文件移至电脑后再进行录音。 ①录音:长按“ ”键 2~3 秒开机,在开机状态下,长按红色“〇”录音键 2~3 秒进入录音 , 在录音状态下,短按“〇”键录音暂停,再按一下取消暂停, 录音继续,长按“〇”键保存录音。...
- Page 13 ② APP 操作录音:连接 APP 后,在主界面,选择相应的录音场景即可以进去录 音,在录音过程中,点 APP 上的暂停图标,录音会暂停,再点一次会取消暂停, 并继续录音,点完成即可保存录音。...
- Page 14 3.3 播放 本机播放:在语音界面,按“ ”播放当前的录音文件,在播放的过程中, 按“ ”暂停播放,再按一次取消暂停并继续播放。可按上下曲键切换文件。 3.3.1 音乐播放 在主菜单界面,可按上下曲键切换至音乐菜单,按“ ”键,进去音乐播放 界面。音乐文件需要拷至音乐文件夹才能“播放”。 3.3.2 音量调整 在播放状态下,按音量键会弹出音量调整界面,再按上下曲键调整音量大小。...
- Page 15 3.3.3 播放模式 播放模式设置, 先去设置菜单找到播放模式设置, 设置好后, 回到播放界面即可。...
-
Page 16: 设置模式
3.3.4 删除文件 在播放停止界面,长按音量键弹出删除界面,按上下曲键选择删除文件或删除 全部,按“ ”确定即可删除。 删除文件:是指删除当前的单个文件。 删除全部:是指删除当前文件夹的全部文件。 注意 • 重要资料另行备份好,避免误删。 3.4 设置模式 设置模式包括:录音场景、背光时间、自动关机、设备 ID、录音灯、固件版本、... -
Page 17: 状态指示说明
播放模式、音效模式、格式化、系统时间、定时录音、语言设置、出厂设置、 磁盘信息、解除绑定、APP 二维码。 3.5 状态指示说明 ①蓝牙搜索配对状态:分享图标闪; ②蓝牙连接后待机:分享图标不闪; ③录音状态:红灯常亮;暂停,红灯闪烁; ④播放:绿灯常亮;暂停绿灯闪烁; ⑤充电状态:充电时灯亮,充满灯灭。 3.6 连接电脑 录音笔可作为存储设备,在文件移入或移出时,请不要断开与电脑的连接,避... -
Page 18: 安装下载 App
免损坏文件。 3.7 安装下载 APP 安卓 / 苹果手机均可扫描此二维码,安装下载 APP,安装过程中弹出的权限, 请都点击“允许”项,否则不能使用,请知悉。... -
Page 19: 连接使用
注意 1. 如果连接不成功,检查手机蓝牙是否打开; 2. 关闭录音笔重新打开; 3. APP 关掉重新打开连接。 3.8 连接使用 安卓手机连接: 第一步 : 长按 “ ” 键 2~3 秒开机, 机器自动进入蓝牙搜索状态, 分享图标闪烁 ; 第二步:把手机的蓝牙设置开关打开, 再把手机下载安装好的APP应用打开; 第三步:打开手机APP进入搜索状态,搜索出机器型号后,手动点连接;若 “连接或搜索”不成功时,请检查机器分享功能是否打开,或手机的蓝牙是否... - Page 20 设置正确,重新打开后,需要再点一次搜索 / 连接; 第四步:连接成功后会进去APP界面,显示连接状态,即可使用。 苹果手机连接: 第一步:手机下载安装好APP后,直接在桌面打开APP,根据提示连接; 第二步:直接打开APP,界面会提示“手机蓝牙没打开”,这个时候需要去 设置里或去快捷方式处把手机蓝牙打开;如果已打开蓝牙,再去打开APP会 直接提示“未找到设备,请点击搜索”; 第三步:点击搜索后,会弹出机器的 ID 号,如 VTR5102Pro_XX_XX 手动选择连 接即可,如搜索没有 ID 号,请选择“重新搜索设备”。连接成功后,界面会 显示“已连接”即可使用。...
- Page 21 注意 • 连接过程中,如搜索不到 ID 号,请确认机器是否打开蓝牙,以及手机蓝 牙是否打开,重新点击搜索;如搜索到 ID 号,连接不成功,请关掉APP, 重新打开搜索连接。 • 苹果手机使用 4G 网络时,请确保蜂窝数据权限是打开的,否则不能使用 翻译功能。...
-
Page 22: App 操作指南
4 APP 操作指南 4.1 APP 操作录音 / 实时翻译 录音笔与 APP 连接上后,手机 APP 界面显示“设备已连接”即可使用,可通过 APP 操作录音笔录音。在 APP 实时翻译主菜单界面,打开按钮,APP 会进去录 音并识别文字和翻译,同时录音笔也会进去录音。APP 录音界面,可操作右下 角的“翻译助手”设置识别语言和翻译语言。 温馨提示: 1 因环境因素和不同品牌手机的差异性,为了获得更好的录音效果,以及实 时翻译的流畅性,请保证设备与手机的距离在 5 米内,中间不要有阻碍物; 2 录音过程中, 请不要直接关机, 或关 APP, 要先保存文件, 避免录音文件损坏; 3 APP 操作录音,超出有效距离时,APP 断开,机器录音继续,需要手动操作 保存录音;... - Page 23 4 APP 操作录音,电话通话后断开,或直接关掉 APP 时,又或者直接关蓝牙后, 都需要手动操作保存录音;手机 APP 与设备连接超出有效距离断开后,再 回到可连接距离时需要手动去连接 APP; 5 设备与手机 APP 连接状态下,接通电话后需要手动去切换到手机听筒接电 话; 6 设备与手机 APP 连接状态下,使用微信 /QQ 语音及视频时,会提示麦克风 在使用,需要关闭手机的蓝牙,或断开连接才能正常使用。 注意 当手机没有网络或网络差时,会提示“网络不可用”此时 APP 只有录音,没 有识别语和翻译语言出来。录音保存后会自动切换到文件播放界面。...
- Page 24 注意 1. 实时翻译时,请将音源对准麦克风,不要手握住咪头处避免影响识别效果; 2. 实时翻译时,不要超出识别的有效距离; 3. 实时翻译有阻挡物时会影响识别效果。 4.2 文件 在 APP 主界面,选择“文件”会切换到文件列表界面。 手机 APP 操作录音,手机端保存的录音文件,实时翻译列表。 同步设备:选择同步设备会弹出 ABCD 文件夹,选择相应的文件夹后,下拉屏 幕可刷新同步录音笔的文件,注意,APP 操作录音的文件不会重复同步到手机, 同步只能同步录音笔单独录音的文件。...
- Page 25 文件播放界面可编缉、分享、角色区分等操作。 注意 • 角色区分目前只支持中文,不支持其它语言; • 使用角色区分时,请确保文件是清晰的,混乱吵杂的文件会影响区分效果。 4.3 设置 在 APP 录音界面,选择右上角的“设置”,可在设置中设置录音场景、指示灯、 播放模式、背光、时间校准、容量(剩余 / 总)、APP 界面介绍、当前版本、 关于、断开设备等。...
-
Page 26: 同步文件操作
提示 • 需要退出与 APP 的连接时,可以在设置里选择断开设备,即可断开连接, 不能直接关掉 APP,避免出现异常。 4.4 同步文件操作 (1)在 APP 界面,选择同步设备选项进去列表界面,点击相应的文件夹,进 去列表界面可选择需要的文件同步,同步成功后会提示下载完成。 (2)文件上传成功后,点文件进去可转写。 (3)转写后的文件可进行播放、编缉、分享、保存等。 (4)在同步设备列表界面,选择“删除”后,会弹出“删除手机文件”或“删 除录音笔文件”,当选择“删除手机文件”时,则删除手机上已转写的内容, 选择“删除录音笔文件”时,则删除录音笔上的文件,删除选项请慎重,注意... - Page 27 把重要文件备份好,不要误删。 选择“全选”删除时可选择“全选”或“全不选”。 提示 • 同步文件是指录音笔单独录音的文件,连接手机 APP 后可同步到手机转文 本和翻译。 • 录音笔里的后缀名为 opus 的文件不能删除,否则不能同步。 • 同步上传文件的时间会跟随您手机的蓝牙配置而定,不同品牌的手机,以 及不同的蓝牙版本,上传的速度也会不同。...
- Page 28 5 技术参数 录音格式:WAV 录音场景:教学模式 ; 日记模式 ; 会议模式 ; 采访模式 麦克风:双 MIC 阵列 净重:37g 尺寸:76*22*10.5mm 手机操作系统要求:Android 6.0 以上, iOS9.0 或更高版本...
- Page 30 Content 1 Welcome 1.1 Product features 2 Important Notice 2.1 Safety 3 Your Smart Voice Recorder What’s in the box Overview 3.1 Power on/off 3.2 Recording 3.3 Playback...
- Page 31 3.4 Settings mode 3.5 Status indication 3.6 Connect to the computer 3.7 Download and install APP 3.8 Connection 4 APP Operating Instruction 4.1 Recording with APP/Real-time translation 4.2 File 4.3 Settings 4.4 Sync file operation 5 Specifications...
-
Page 32: Welcome
1 Welcome Welcome to the world of Philips! We are honoured by your choice and purchase of Philips’ products. You can have Philips’ comprehensive technical supports from our website, e.g. user’s manuals, software downloading and warranty information etc. www.philips.com 1.1 Product features •... - Page 33 • Record while charging.
-
Page 34: Important Notice
2 Important Notice 2.1 Safety • To avoid short circuits, DO NOT expose the product to humidity. • DO NOT place the product near a location with heat source or direct sunlight. • Be careful not to pinch the cable, especially the plug. - Page 35 We specially recommend that users make additional copies of the files in the device. • Images are for reference only. Philips reserves the right to change the color / appearance / design / parameters/product functions. Hardware,...
-
Page 36: Your Smart Voice Recorder
3 Your Smart Voice Recorder What’s in the box:... -
Page 37: Overview
Overview: USB interface Microphone Display screen Speaker Indicator light Record button Power/Play button Previous/Volume+ Next/Volume- Return/Volume button Black clip... -
Page 38: Power On/Off
(1)Power on: Long press “ ” for 2~3 seconds to switch the device on, and “PHILIPS” will be displayed. (Share at power-on function is enabled au- tomatically, and the Share icon begins to flash, the function will be disabled automatically after no connection for 5 minutes ) -
Page 39: Recording
(2)Power off: In the state of power-on, long press “ ” for 2~3 seconds to power off after “PHILIPS” is displayed. 3.2 Recording If it is the first time you use this Recorder, please notice the recording instructions in this section: for your convenience, please set the Rec scene, and Storage folder before recording;... -
Page 40: Playback
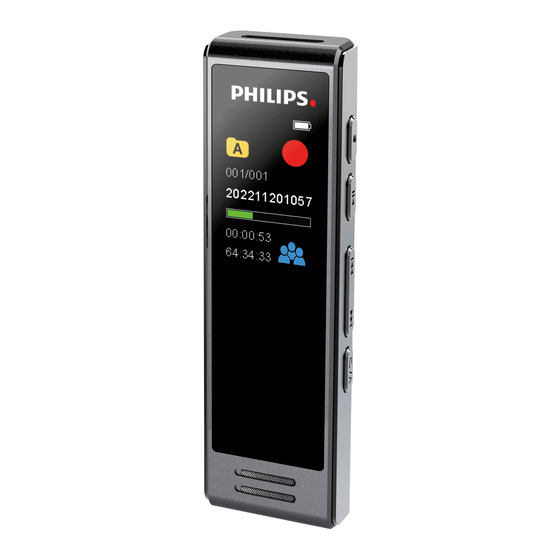
① Voice record : Long press “ ” for 2~3 seconds to power on the de- vice. In the state of power-on, long press “ ” for 2~3 seconds to record. 〇 In the state of voice record, press “ ”... - Page 41 Folder File name Current recording time Remaining time Battery Recording status Recording scene recording file, press “ ” to pause, and press again to resume playback. Press “Previous/Next” button to switch recordings. 3.3.1 Music Play In the main menu interface, Press “Previous/Next” button to switch to...
- Page 42 Music menu, and press “ ” to enter the music play interface. Music files need to be copied to the music folder to playback. 3.3.2 Volume Control In the playback state, the Volume Control interface will pop up by pressing “Volume”...
- Page 43 Playback mode Folder File name Progress bar Current play time Total play time Battery Recording status indicator Recording scene 3.3.4 Delete files In the stop interface, the delete menu interface will pop up. A single file or all files can be deleted by pressing “Previous/Next” button, and deleted by...
-
Page 44: Settings Mode
pressing “ ”. Delete file: Delete a current file. Delete all: Delete all the files in the current folder. Note Important data should be backed up to avoid deletion by mistake. 3.4 Settings mode Settings mode includes Record mode, Blacklight, Auto off, Device ID, Re- cord LED, Version, Play format, Sys time, Timer rec, Language, Factory set, Memory info, Unbind, QR code etc. -
Page 45: Status Indication
3.5 Status indication ① Bluetooth search and pairing: Share icon flashes; ② Standby after Bluetooth connected: Share icon doesn’t flash; ③ Recording: The indicator turns red and keeps on; when paused, the indicator flashes in red; ④ Playback: The indicator turns green and keeps on; when paused, the indicator flashes in green;... -
Page 46: Download And Install App
3.7 Download and install APP Scan the QR code to download and install the APP with an Android phone or iPhone. Choose “Always allow” if there is a prompt that the application requires the permission of the mobile phone, otherwise it cannot be used. -
Page 47: Connection
Note 1. If failed to connect, please check whether the Bluetooth is turned on; 2. Turn the recorder off, then turn it on again; 3. Close the APP and reopen it to connect. 3.8 Connection Connect with an Android phone: Step 1: Press “... - Page 48 device is turned on, or if Bluetooth of the phone is set up correctly, reopen the APP and tap Connect/Search again. Step 4: If connected successfully, the APP interface appears and show the connection status, and ready for use. Connect with iPhone Step 1: Download and install the APP, open it directly and connect as prompted;...
- Page 49 ready for use once “Connected” appears on the interface.; Note • During the connection, if the ID number cannot be found, please confirm whether the Bluetooth of the device and the mobile phone be turned on, then click search again; if the ID number is found but cannot make connection, please close the APP and reopen the search to connect.
-
Page 50: App Operating Instruction
4 APP Operating Instruction 4.1 Recording with APP/Real-time translation After the Recorder is connected to the APP, the APP interface displays “Device connected”, then the recording works by operating the recorder through the APP. In the APP, select the recording scene in the Real-time translation interface, and then the APP will record, recognize word and translations, so as the Recorder. - Page 51 of real-time translation, make sure the device is within 5 meters of the mobile phone, and no obstacles between them; 2 During recording, do not turn off the device or close the APP. Save the recording file first to avoid file corruption; 3 When recording with the APP, if the effective distance is exceeded, the APP will be disconnected.
- Page 52 is used, you will be prompted that the microphone is in use. You need to turn off Bluetooth of the mobile phone, or disconnect for normal use. Note • When the mobile phone has no network or has poor network, it will prompt “The network is not available, please check the network”.
-
Page 53: File
Note 1. During real-time translation, focus the sound source on the micro- phone, and do not cover the Mic head with your hand, so as to avoid to affect the recognition effect; 2. During real-time translation, do not exceed the effective recognition distance;... - Page 54 Real-time translation list: Recording files that saved on mobile phone after recording with APP. Sync device:The ABCD folder will pop up when the Sync device is selected. After selecting the folder, the files that sync with the Recorder can be re- freshed by pulling down the screen.
-
Page 55: Settings
Note • At present, voice distinguishment only supports Chinese, not other languages; • When using voice distinguishment, please make sure that the file is clear. Messy and noisy files will affect the effect. 4.3 Settings In the recording interface, tap "Settings" in the upper right, to set Record- ing scene, Indicator, Playback mode, Backlight, Time calibration, Capacity (remaining/total), APP interface introduction, Current version, About, Disconnect the device, etc. -
Page 56: Sync File Operation
Reminder • If you need to disconnect with the APP, just select “Disconnect the device” in the Settings to disconnect. To avoid exceptions, you cannot close the APP directly. 4.4 Sync file operation (1)In the APP interface, select the “Sync with device” to enter the list inter- face. - Page 57 (4)In the synced device list interface, after you select “Delete”, “Delete mobile phone file” or “Delete Voice Recorder file” will pop up. If “Delete mobile phone file” was chosen, the transcribed file on the phone will be de- leted. If “Delete Voice Recorder file” was chosen, the file on the Recorder will be deleted.
- Page 58 Reminder • The sync file refers to the file recorded by the recorder independently, which can be synchronized to the mobile phone for text transcription and translation after connecting with the APP. • The files with the “opus” suffix cannot be deleted, otherwise they cannot be synchronized.
-
Page 59: Specifications
5 Specifications Recording format: WAV Recording scenes: Teching mode; Diary mode; Meeting mode; Interview mode Microphone: Dual MIC array Net weight: 37g Dimensions: 76*22*10.5mm Operating system: Android 6.0 or above, IOS 9.0 or above... - Page 61 VTR5102Pro...
- Page 64 © 2021 Speech Processing Solutions GmbH. Register your product and get support at www.philips.com/welcome 版权所有文档版本 1.0, 2021/03/10...
Need help?
Do you have a question about the VTR5102Pro and is the answer not in the manual?
Questions and answers