
Related Manuals for JVC GET0471-001A


Summary of Contents for JVC GET0471-001A
- Page 1 VCD/CD RECEIVER For canceling the display demonstration, see page 7. For installation and connections, refer to the separate manual. INSTRUCTIONS KD-SV3305 KD-SV3305 GET0471-001A [U/UH]...
- Page 2 • Your preset adjustments will also be erased. • Be careful not to drop the disc when it ejects. • If this does not work, reset your unit.
- Page 3 CONTENTS ¢...
-
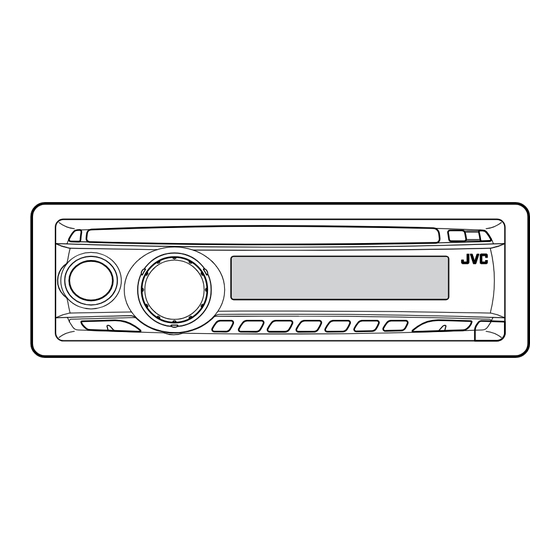
Page 4: Control Panel
Control panel ¢ DO NOT expose the remote sensor to strong light (direct sunlight or artificial lighting). -
Page 5: Remote Controller
Remote controller — Installing the lithium coin battery (CR2025) Aim the remote controller directly at the remote sensor on the unit. Make sure there is no obstacle in between. Warning: Main elements and features RM-RK120 ∞ Continued on the next page... - Page 6 ∞ ∞ ∞ 2 ∞ Returns to the previous menu. Confirms the selection.
-
Page 7: Adjust The Volume
Getting started Basic operations Turn on the power. Ÿ * You cannot select these sources if they are not ready or not connected. For FM/AM tuner ⁄ Adjust the volume. Adjust the sound as you want. (See page 14.) Caution on volume setting: To drop the volume in a moment (ATT) To turn off the power... -
Page 8: Radio Operations
Radio operations Ÿ Lights up when receiving an FM stereo broadcast with sufficient signal strength. Start searching for a station. When a station is received, searching stops. To stop searching, press the same button again. To tune in to a station manually In step ! above... -
Page 9: Disc Operations
Manual presetting Listening to a preset station Select the preset station (1 – 6) you want. To check the other information while listening to the radio Ô Clock Disc operations Playing a disc in the unit Before performing any operations, make sure the following... - Page 10 Ÿ...
- Page 11 Playback Control (PBC) operations This operation is only possible when using the remote controller. While playing a VCD... Ô PBC ON PBC OFF PBC ON : A menu appears on the monitor. PBC OFF : Cancels. • A menu may be a list of items, submenus, or some moving pictures.
-
Page 14: Sound Adjustments
Sound adjustments... -
Page 15: General Settings - Psm
General settings — PSM You can change PSM (Preferred Setting Mode) items listed in the table that follows. : Initial) • Display demonstration • Hour adjustment Minute adjustment • Dimmer • • Telephone muting • : Display demonstration will be activated automatically if no operation is done for about 20 seconds, [7]. - Page 16 Indications Item SCROLL * TAG DISP AMP GAIN VIDEO EXT IN * Some characters or symbols will not be shown correctly (or will be blanked) on the display. Displayed only when one of the following sources is selected—FM, AM, DISC, or LINE IN. Setting, [reference page] ONCE AUTO...
-
Page 17: Ipod / D. Player Operations
iPod / D. player operations Ÿ ⁄... -
Page 18: Selecting The Playback Modes
Selecting a track from the menu Enter the main menu. Now the work as the menu selecting buttons*. Select the desired menu. For iPod: Ô PLAYLIST ARTISTS Ô Ô SONGS GENRES (back to the beginning) For D. player: Ô PLAYLIST ARTIST Ô... -
Page 19: Other External Component Operations
Other external component operations Line Input Adapter AUX Input Adapter Ÿ Turn on the connected component and start playing the source. Adjust the volume. ⁄ Adjust the sound as you want. (See page 14.) To check the other information while listening to an external component Clock Ô... -
Page 20: More About This Unit
More about this unit... - Page 21 Continued on the next page...
- Page 22 Changing the source Ejecting a disc General settings—PSM iPod or D. player operations Notice: For iPod users: For D. player users:...
-
Page 23: Troubleshooting
Troubleshooting Continued on the next page... - Page 24 Symptoms Remedies/Causes...
-
Page 25: Specifications
Specifications AUDIO AMPLIFIER SECTION VIDEO SECTION TUNER SECTION FM Tuner AM Tuner VCD/CD PLAYER SECTION GENERAL Design and specifications are subject to change without notice. - Page 26 Having TROUBLE with operation? Please reset your unit Refer to page of How to reset your unit EN, TH © 2007 Victor Company of Japan, Limited 0207DTSMDTJEIN...
- Page 27 KD-SV3305 Installation/Connection Manual GET0471-004A [U/UH] ENGLISH WARNINGS Ω Ω 0207DTSMDTJEIN EN, TH © 2007 Victor Company of Japan, Limited ∑’ Ë ‰ ¡Ë „ ™È · ≈È « × ×...
- Page 28 INSTALLATION (IN-DASH MOUNTING) TROUBLESHOOTING • • • • • • • × × • • • • • • • × ×...
-
Page 29: Electrical Connections
ENGLISH ELECTRICAL CONNECTIONS Typical connections / Before connecting: Connecting the parking brake wire / When installing the monitor in a location where it can be seen by the driver Connecting the crimp connector / LINE IN VIDEO OUT When installing the monitor in a location where it cannot be seen by the driver... - Page 30 JVC Amplifier Connecting the external components / JVC CD changer, Apple iPod, or JVC D. player / JVC CD Set “CHANGER” for the external input setting (See page 16 of the INSTRUCTIONS.) / CAUTION: Other external component / Set “EXT IN”...
- Page 31 VCD/CD RECEIVER ALAT PENERIMA VCD/CD For canceling the display demonstration, see page 7. Untuk membatalkan tampilan demonstrasi, lihat halaman 7. For installation and connections, refer to the separate manual. Untuk instalasi dan penyambungan, lihat buku pedoman terpisah. INSTRUCTIONS BUKU PETUNJUK KD-SV3305 KD-SV3305 GET0471-007A...
- Page 32 • Your preset adjustments will also be erased. • Be careful not to drop the disc when it ejects. • If this does not work, reset your unit.
- Page 33 CONTENTS ¢...
- Page 34 Control panel ¢ DO NOT expose the remote sensor to strong light (direct sunlight or artificial lighting).
- Page 35 Remote controller — Installing the lithium coin battery (CR2025) Aim the remote controller directly at the remote sensor on the unit. Make sure there is no obstacle in between. Warning: Main elements and features RM-RK120 ∞ Continued on the next page...
- Page 36 ∞ ∞ ∞ 2 ∞ Returns to the previous menu. Confirms the selection.
- Page 37 Getting started Basic operations Turn on the power. Ÿ * You cannot select these sources if they are not ready or not connected. For FM/AM tuner ⁄ Adjust the volume. Adjust the sound as you want. (See page 14.) Caution on volume setting: To drop the volume in a moment (ATT) To turn off the power...
- Page 38 Radio operations Ÿ Lights up when receiving an FM stereo broadcast with sufficient signal strength. Start searching for a station. When a station is received, searching stops. To stop searching, press the same button again. To tune in to a station manually In step ! above...
- Page 39 Manual presetting Listening to a preset station Select the preset station (1 – 6) you want. To check the other information while listening to the radio Ô Clock Disc operations Playing a disc in the unit Before performing any operations, make sure the following...
- Page 40 Ÿ...
- Page 41 Playback Control (PBC) operations This operation is only possible when using the remote controller. While playing a VCD... Ô PBC ON PBC OFF PBC ON : A menu appears on the monitor. PBC OFF : Cancels. • A menu may be a list of items, submenus, or some moving pictures.
- Page 44 Sound adjustments...
-
Page 45: General Settings - Psm
General settings — PSM You can change PSM (Preferred Setting Mode) items listed in the table that follows. : Initial) • Display demonstration • Hour adjustment Minute adjustment • Dimmer • • Telephone muting • : Display demonstration will be activated automatically if no operation is done for about 20 seconds, [7]. - Page 46 Indications Item SCROLL * TAG DISP AMP GAIN VIDEO EXT IN * Some characters or symbols will not be shown correctly (or will be blanked) on the display. Displayed only when one of the following sources is selected—FM, AM, DISC, or LINE IN. Setting, [reference page] ONCE AUTO...
- Page 47 iPod / D. player operations Ÿ ⁄...
- Page 48 Selecting a track from the menu Enter the main menu. Now the work as the menu selecting buttons*. Select the desired menu. For iPod: Ô PLAYLIST ARTISTS Ô Ô SONGS GENRES (back to the beginning) For D. player: Ô PLAYLIST ARTIST Ô...
- Page 49 Other external component operations Line Input Adapter AUX Input Adapter Ÿ Turn on the connected component and start playing the source. Adjust the volume. ⁄ Adjust the sound as you want. (See page 14.) To check the other information while listening to an external component Clock Ô...
- Page 50 More about this unit...
- Page 51 Continued on the next page...
- Page 52 Changing the source Ejecting a disc General settings—PSM iPod or D. player operations Notice: For iPod users: For D. player users:...
-
Page 53: Troubleshooting
Troubleshooting Continued on the next page... - Page 54 Symptoms Remedies/Causes...
- Page 55 Specifications AUDIO AMPLIFIER SECTION VIDEO SECTION TUNER SECTION FM Tuner AM Tuner VCD/CD PLAYER SECTION GENERAL Design and specifications are subject to change without notice.
- Page 56 Having TROUBLE with operation? Please reset your unit Refer to page of How to reset your unit Ada MASALAH dengan cara pengoperasian? Setel kembali unit Anda Lihat halaman mengenai Bagaimana mereset unit anda EN, IN © 2007 Victor Company of Japan, Limited 0207DTSMDTJEIN...
- Page 57 KD-SV3305 Installation/Connection Manual Manual Pemasangan/Penyambungan GET0471-008A [UN] ENGLISH WARNINGS Ω Ω INDONESIA PERINGATAN 0207DTSMDTJEIN EN, IN © 2007 Victor Company of Japan, Limited Ω Ω × ×...
- Page 58 INSTALLATION (IN-DASH MOUNTING) TROUBLESHOOTING • • • • • • • PEMASANGAN (BINGKAI-DALAM DASH) × × PEMECAHAN MASALAH × ×...
- Page 59 ENGLISH INDONESIA LINE IN VIDEO OUT...
- Page 60 Connecting the external components / Menyambung komponen eksternal JVC CD changer, Apple iPod, or JVC D. player / JVC CD changer, Apple iPod atau JVC D. player Set “CHANGER” for the external input setting (See page 16 of the INSTRUCTIONS.) / Aturlah “CHANGER” untuk pengaturan input eksternal (Lihat halaman 16 dari BUKU PETUNJUK.)
Need help?
Do you have a question about the GET0471-001A and is the answer not in the manual?
Questions and answers